

 Video TutorialsAboutAccount
Zicalstar User Guide
Updated Sep 2026
1. Meet Zicalstar
See how Zicalstar and its companion Zical App keep your family organized.
1.1 What Is Zicalstar ?
Zicalstar is the brand behind an AI-powered family organization system for home displays, and the Zical App is its companion mobile app. Together, the software on your home display and the Zical App bring calendars, tasks, meal plans, school schedules, photos, and other household tools into one shared system. Content stays synced between your phone and home display, helping your family coordinate schedules, share responsibilities, and stay connected.
Main features
1.2 How the App and Home Display Work Together
Use the Zical App to create or join a calendar, manage members and access, add events, tasks, and other family content, and connect calendars from other services. The home display brings everyone's shared plans and information together in one place. When the App and home display are connected to the same Zical calendar, your family's shared information stays up to date on both.
2. Get Started
This setup only takes a few minutes. Follow the steps below to get started.
2.1 Complete First-Time Setup
Set up the Zical App, find your activation code, and follow the on-screen instructions to activate your home display.
① Scan the QR code to get the Zical App on your phone.
② Open the Zical App and sign up or log in.
③ Create a calendar. Get the 8-digit Activation Code.
④ On the device, enter the 8-digit activation code.
2.1.1 Download the Zical App
Download the Zical App from the App Store or Google Play, or scan the QR code.

2.1.2 Create an Account
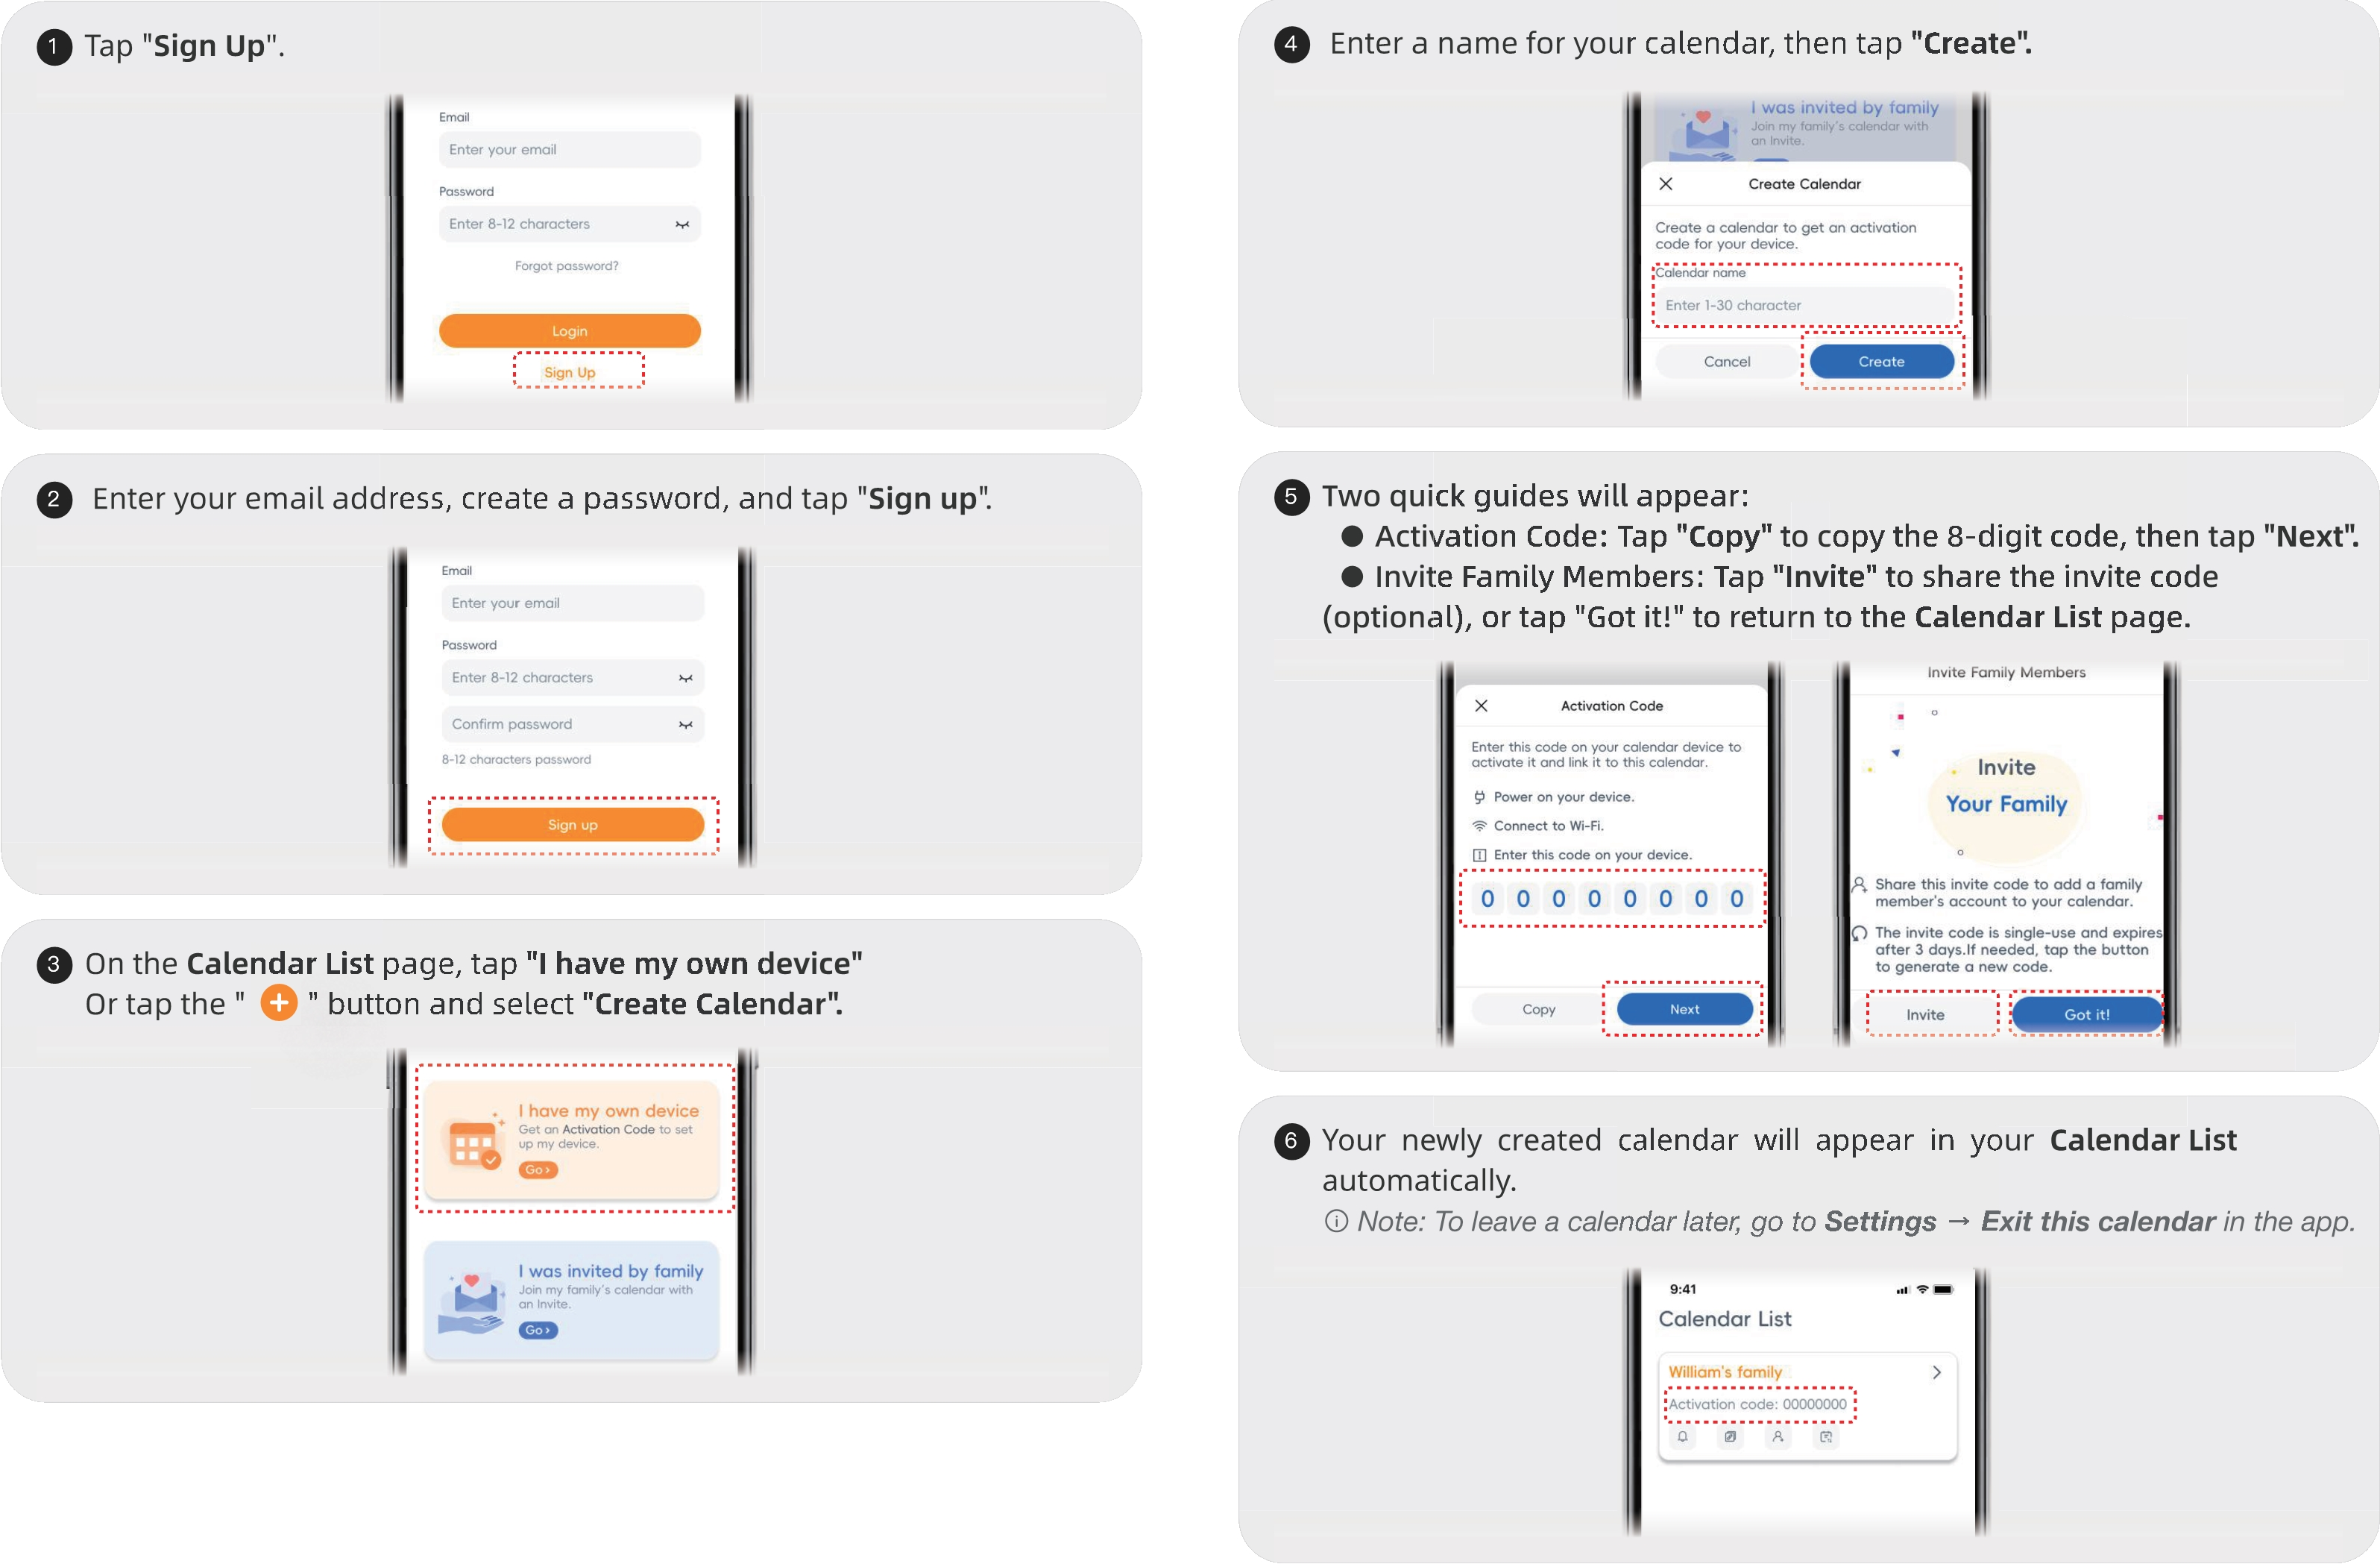
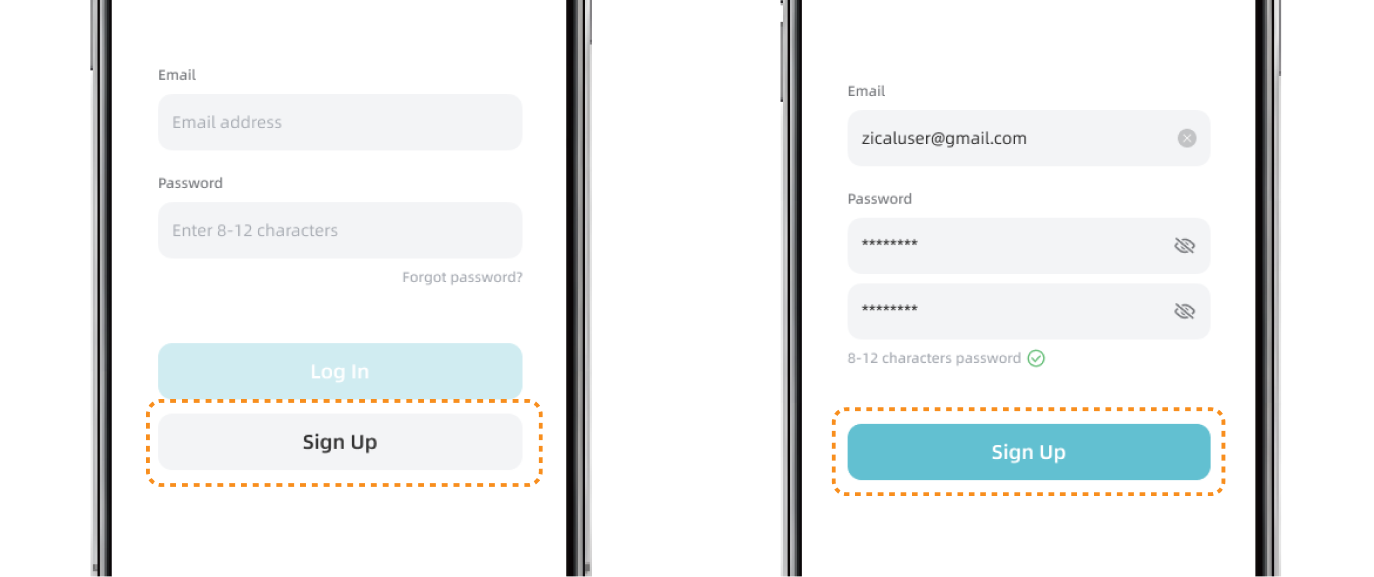
Once installed, open the app. Tap Sign Up, enter an email address you can access, create a password, and enter the same password again to confirm it. Then tap Sign Up to create your account.
Note: When signing in, enter your email address exactly as registered, including uppercase and lowercase letters
2.1.3 Create a Zical Calendar
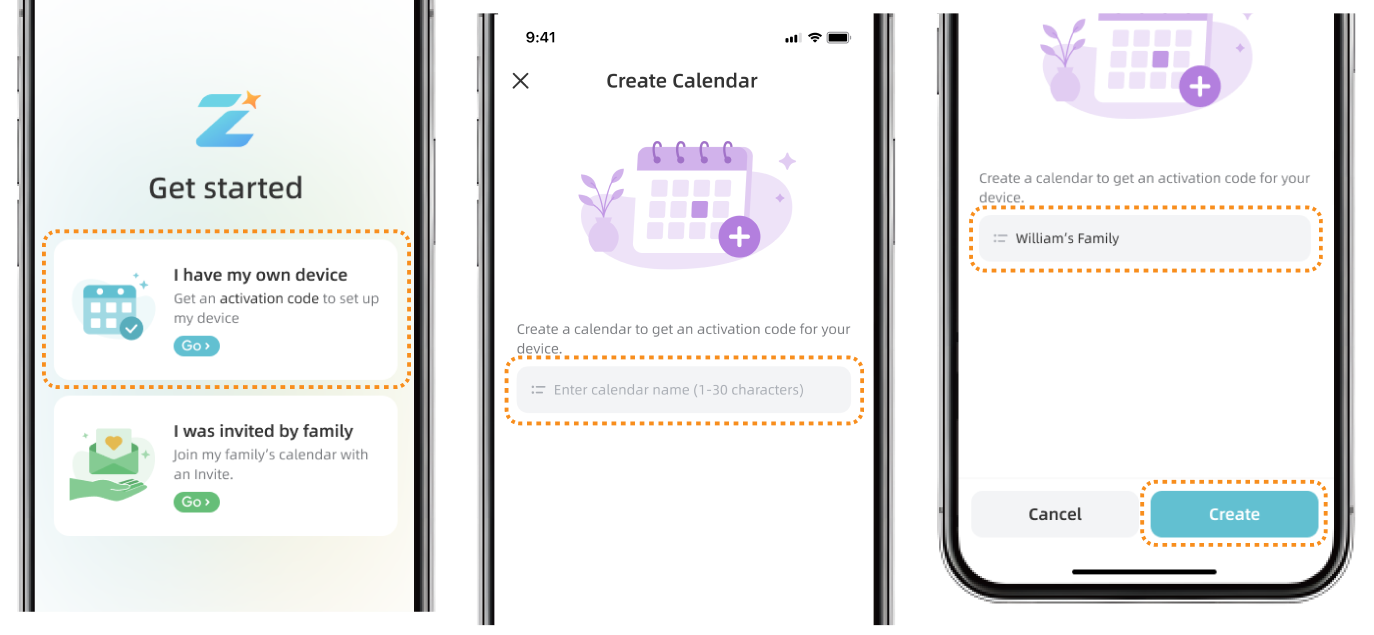
After you sign in for the first time, tap I have my own device. Enter a name your family will recognize, then tap Create.
2.1.4 Get the Activation Code
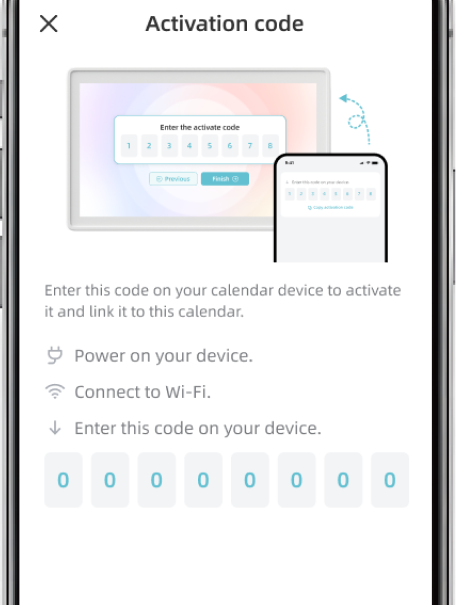
Once you create a calendar, an 8-digit activation code is generated and linked to that calendar.
You can get the code in any of the following ways:
① Quick Guide: The activation code appears in the Quick Guide after you create the calendar
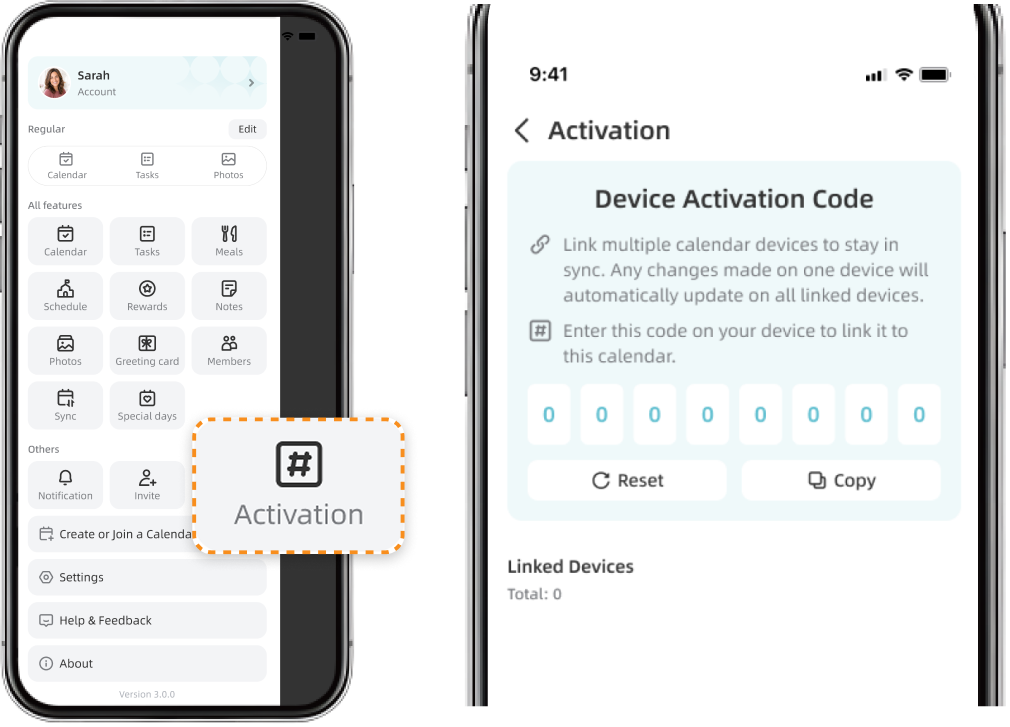
② Side Navigation: In the Zical App, select the calendar, open the side navigation, and tap Activation.
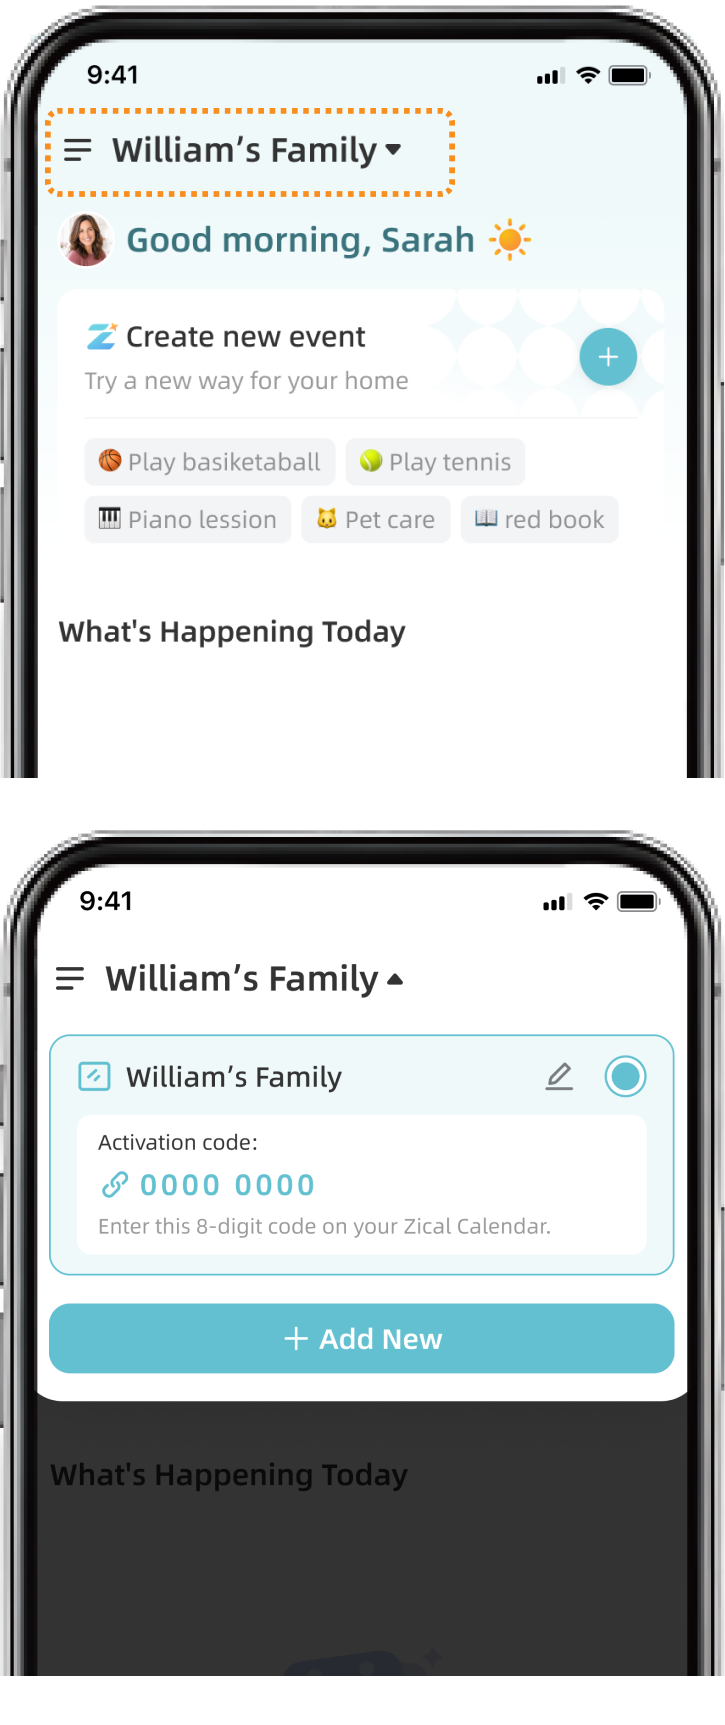
③ Home Page: Tap the calendar name at the top of the Home page to view the activation code.
2.1.5 Activate Your Home Display
① Plug in the display and wait for the startup screen to appear.

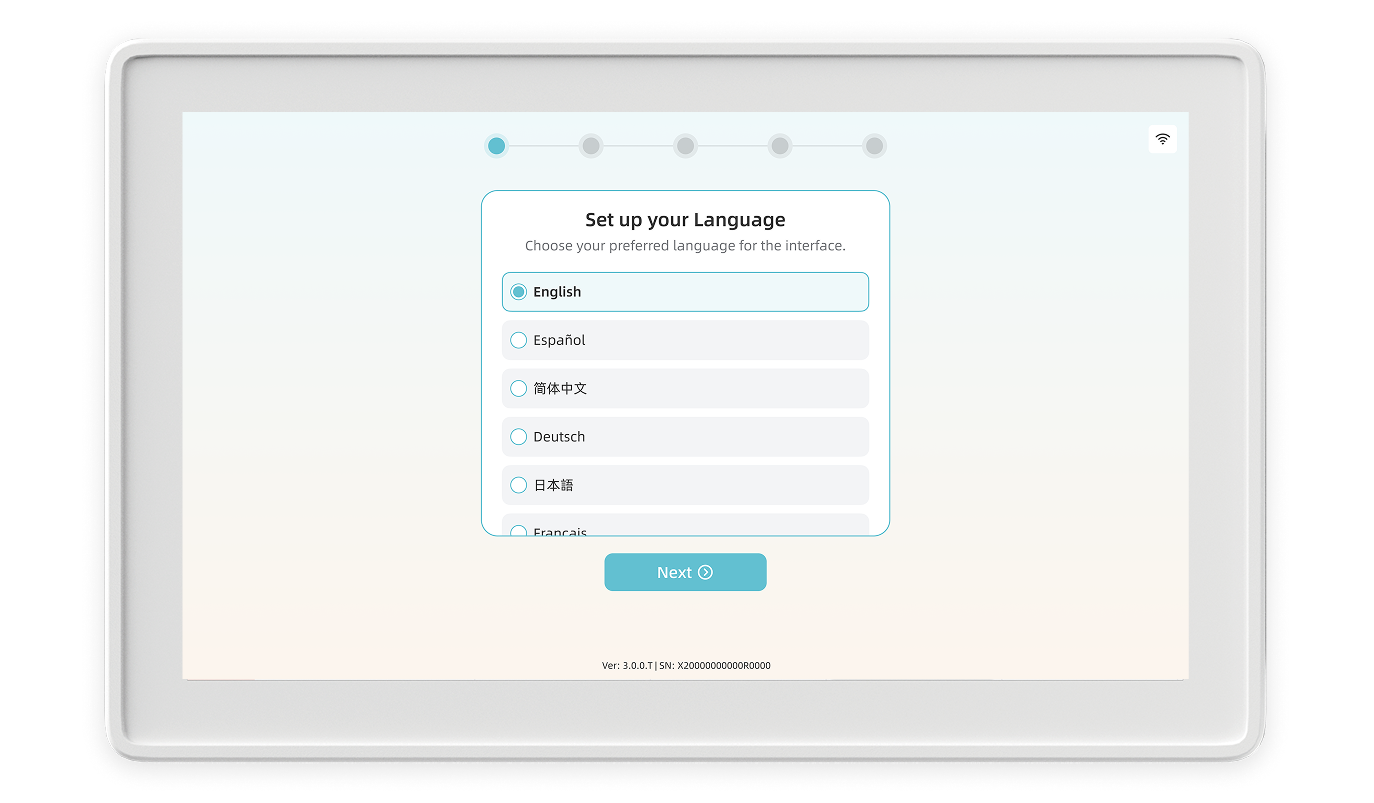
② Choose your preferred language, then tap Next.
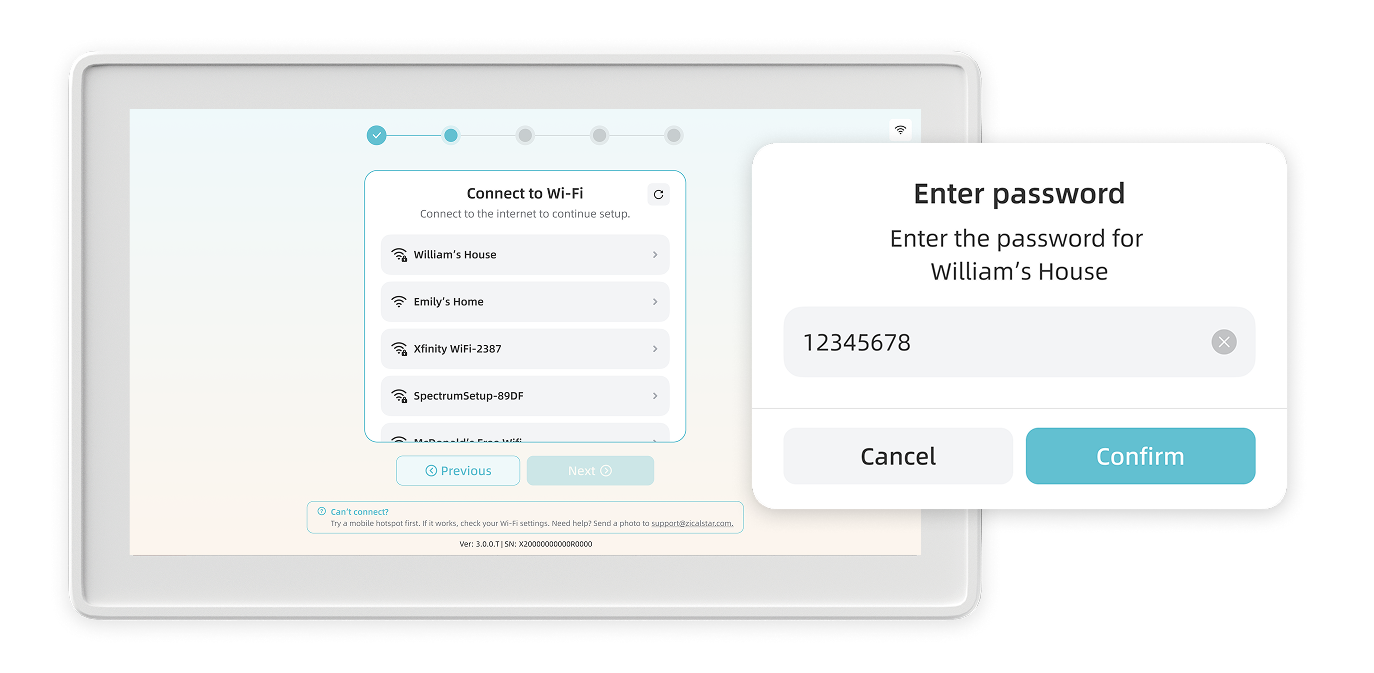
③ Select your Wi-Fi network, enter the password, and tap Next.
Note: Public Wi-Fi networks are not supported. Connect to a home Wi-Fi network instead. If you have trouble connecting, try a mobile hotspot. If the issue continues, contact Zicalstar Support.
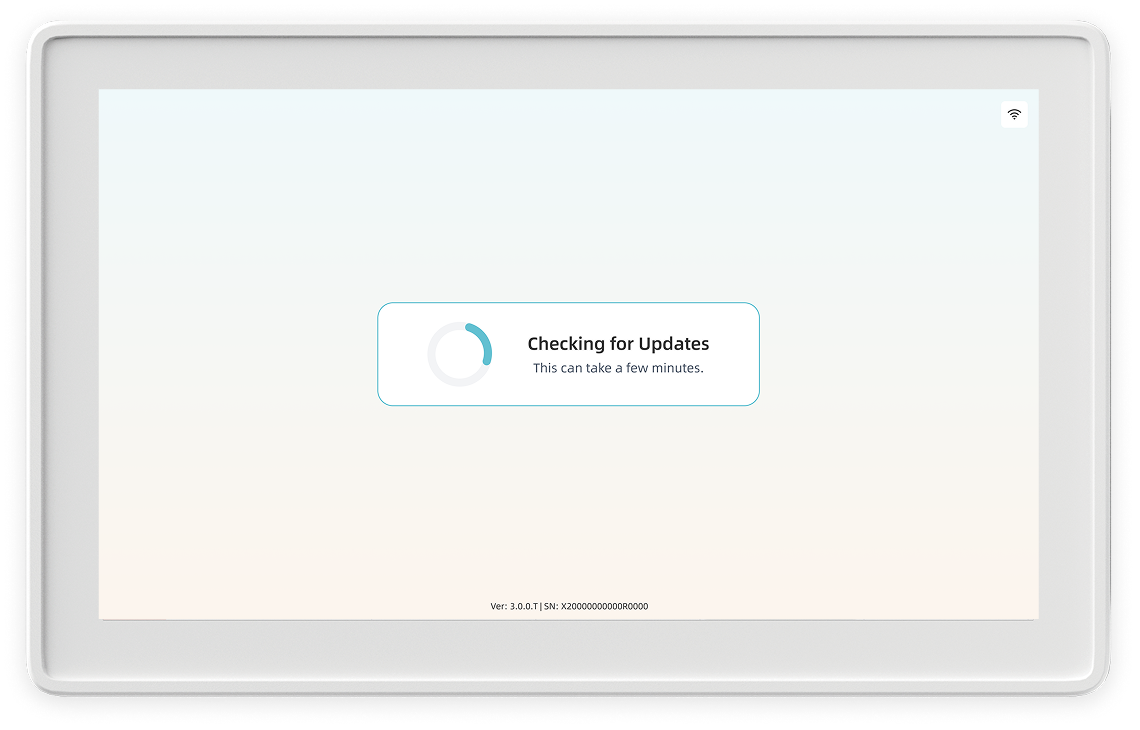
④ The display will check for software updates. This may take a few minutes. If an update is available, it will install automatically. Otherwise, the display will continue to the next step.
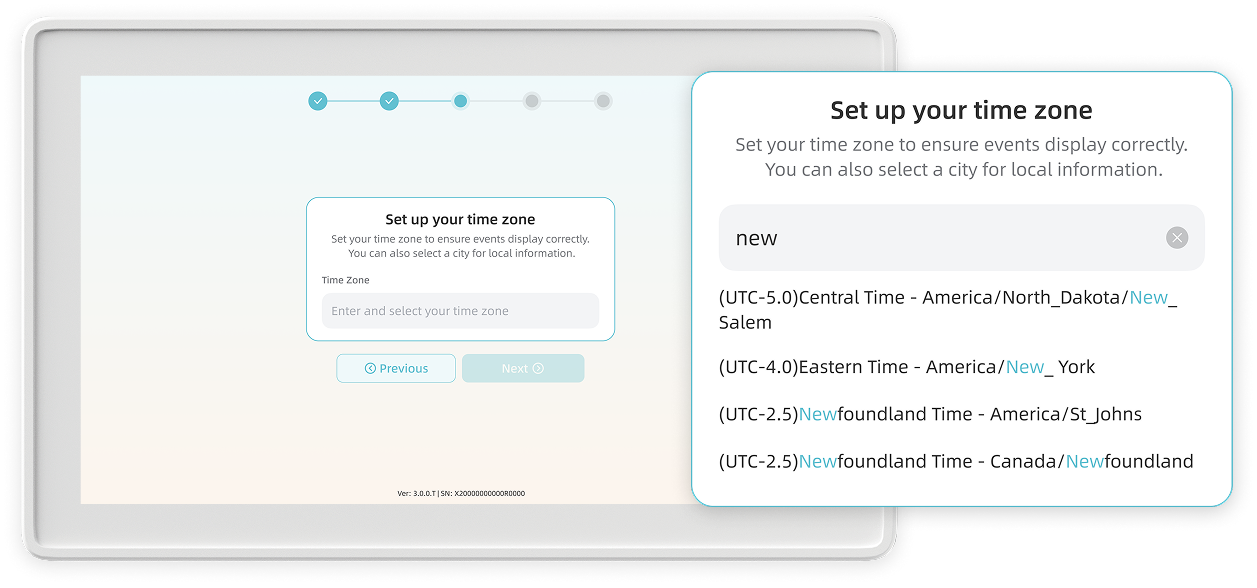
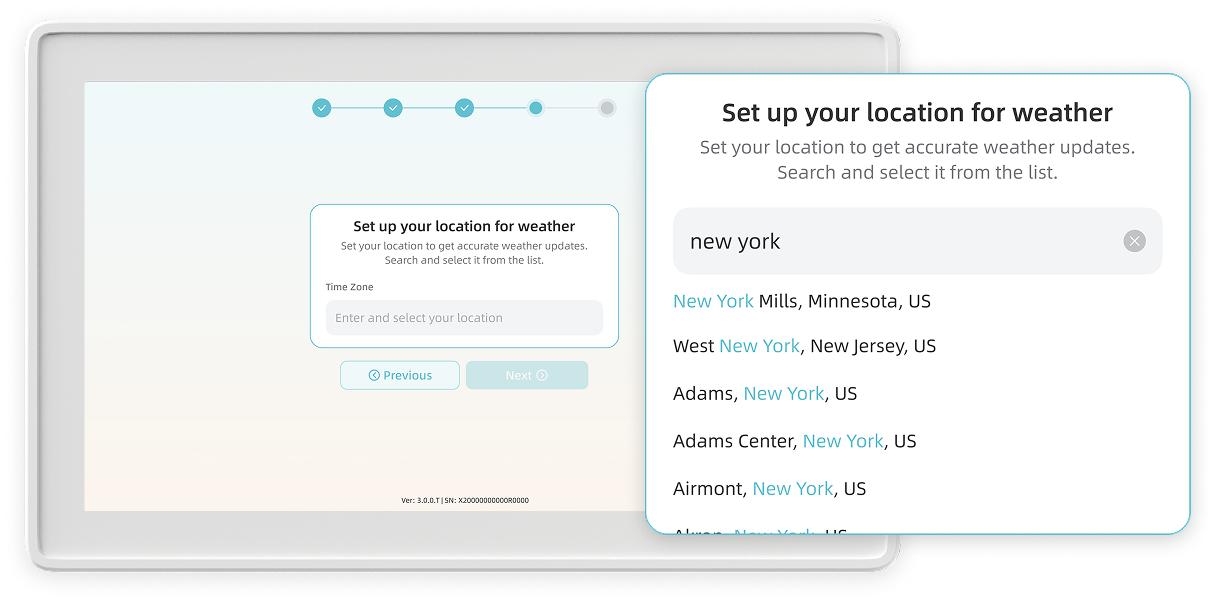
⑤ In the search field, enter a major city (such as New York), a time zone name (such as Eastern Time), or a UTC offset (such as -4). Select the correct time zone from the results, then tap Next.
Note: Not every city is listed. If your city does not appear, search for your time zone directly or select a listed city in the same time zone.
⑥ Enter your location in the search field, select it from the results, then tap Next.
Note: If your location is not listed, select the nearest available location or contact Zicalstar Support for help.
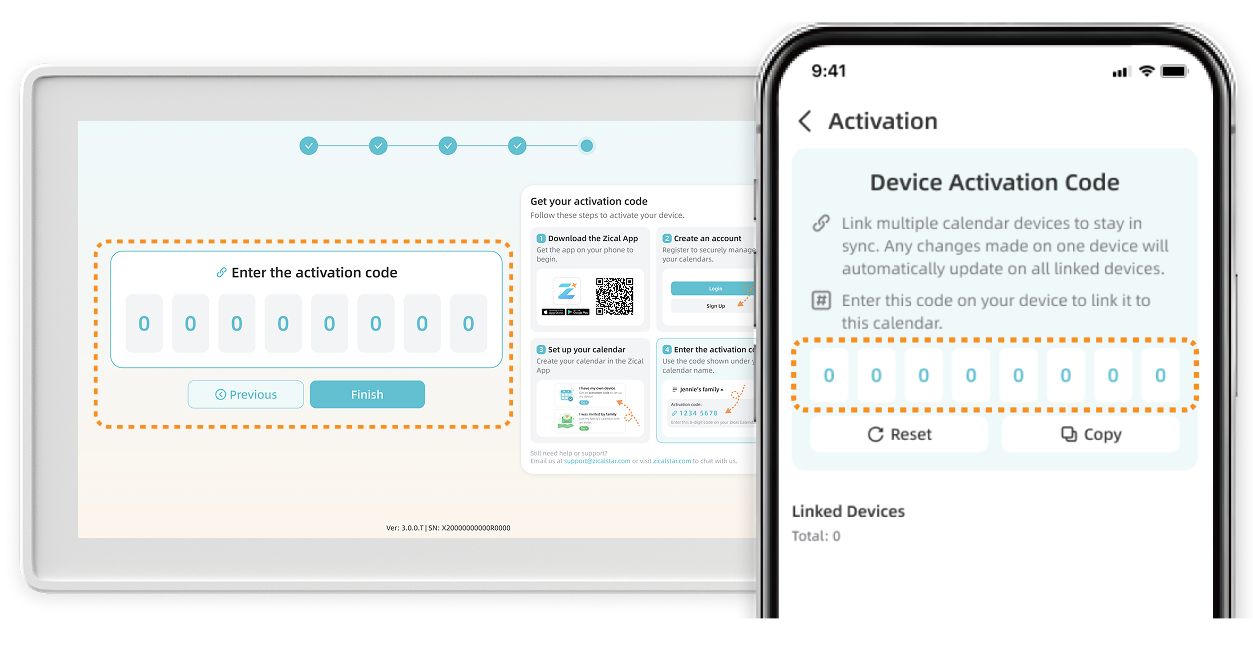
⑦ In the Zical App, select the calendar you want to display. Tap Activation in the side navigation, or tap the calendar name at the top of the Home page to find its 8-digit activation code. Enter the code on the display, then tap Finish.
Note: The activation code links the display to the selected Zical calendar. Each Zical calendar has its own activation code.
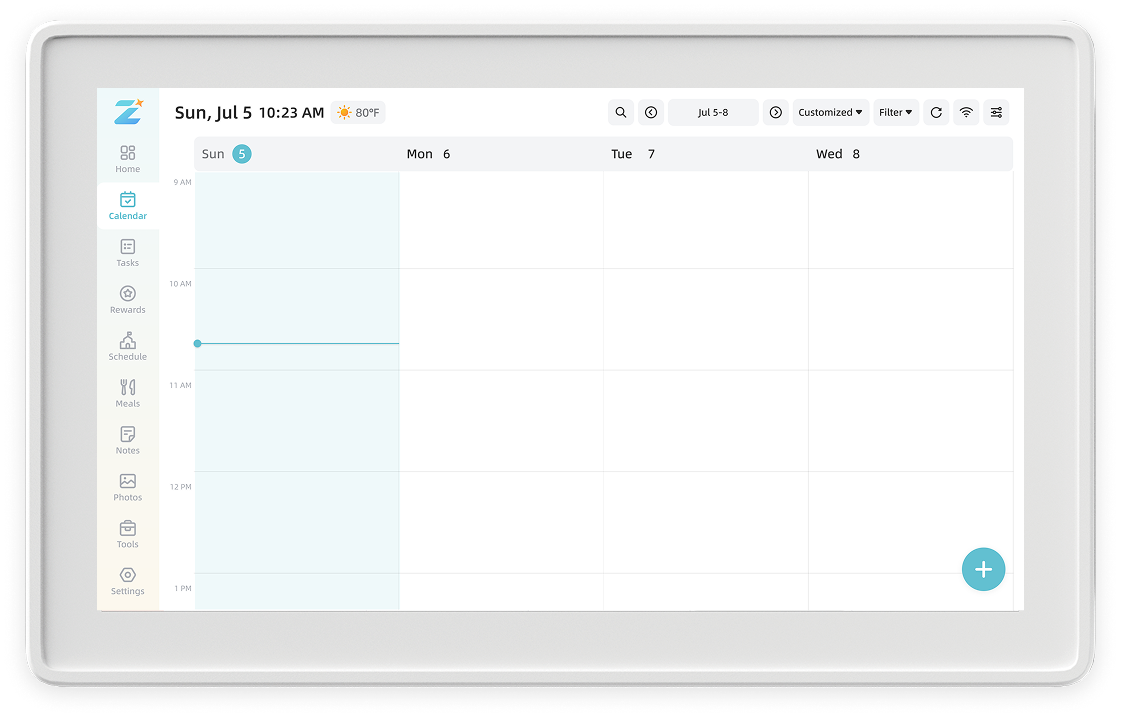
⑧ After activation, the display will open the Calendar screen automatically.
2.1.6 Activation FAQs
Why do I need the Zical App?
The app is where you set up and manage your Zical calendar. Use it to create or join calendars, find activation codes, invite family or friends, and connect calendars from other services.
Why do I need an activation code?
The activation code tells your home display which Zical calendar to show. After activation, the display shows the members, events, tasks, photos, and other content saved in that calendar.
2.2 Complete Your Calendar Setup
Create family members, invite family or friends, and optionally connect an external calendar.
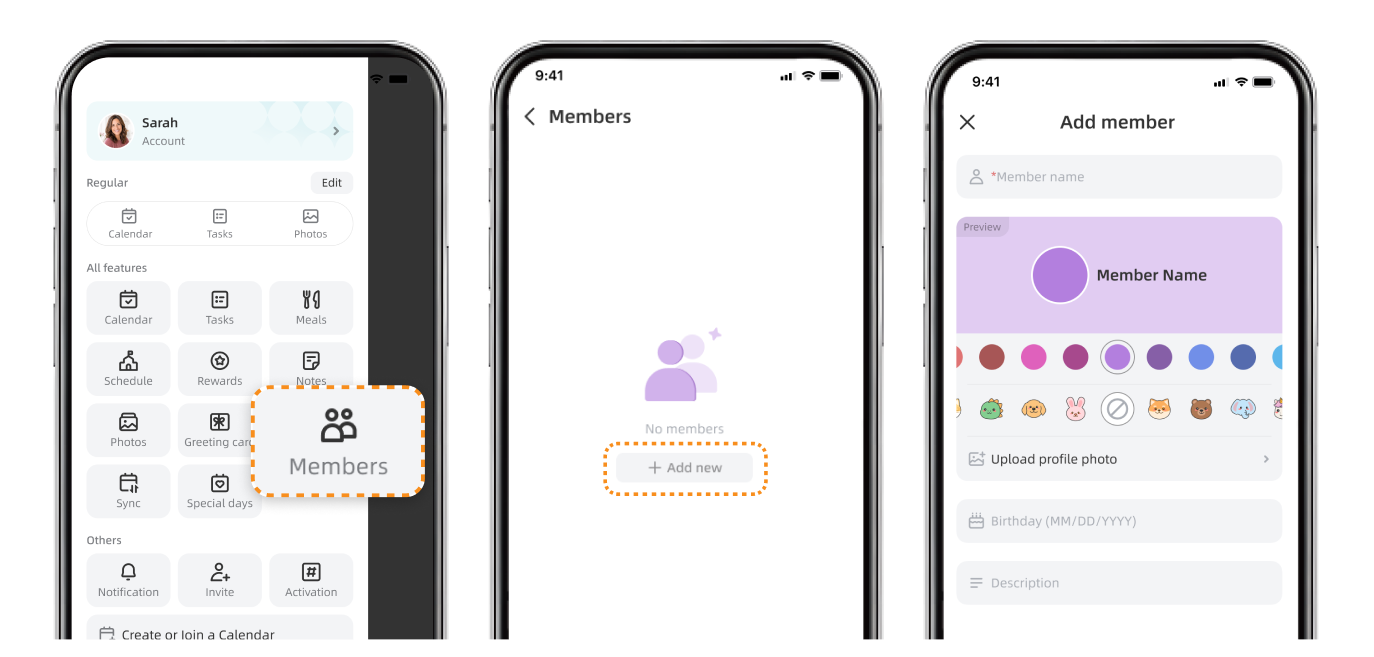
2.2.1 Create Family Members
① On the home display, go to Settings > Members.
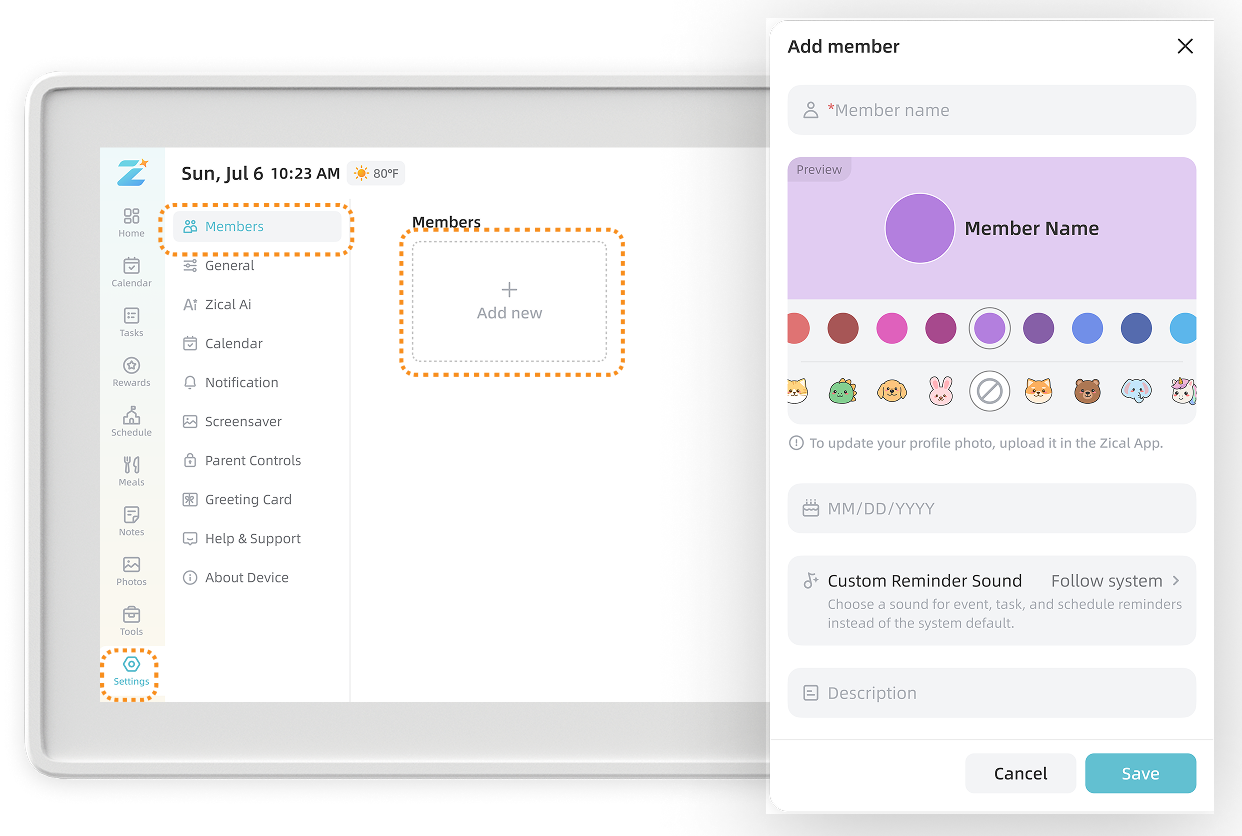
② In the Zical App, tap Members in the side navigation. Create a Member profile for each person who needs a color or may be assigned events, tasks, schedule entries, or rewards.
Note: Custom avatars can only be uploaded through the Zical App.
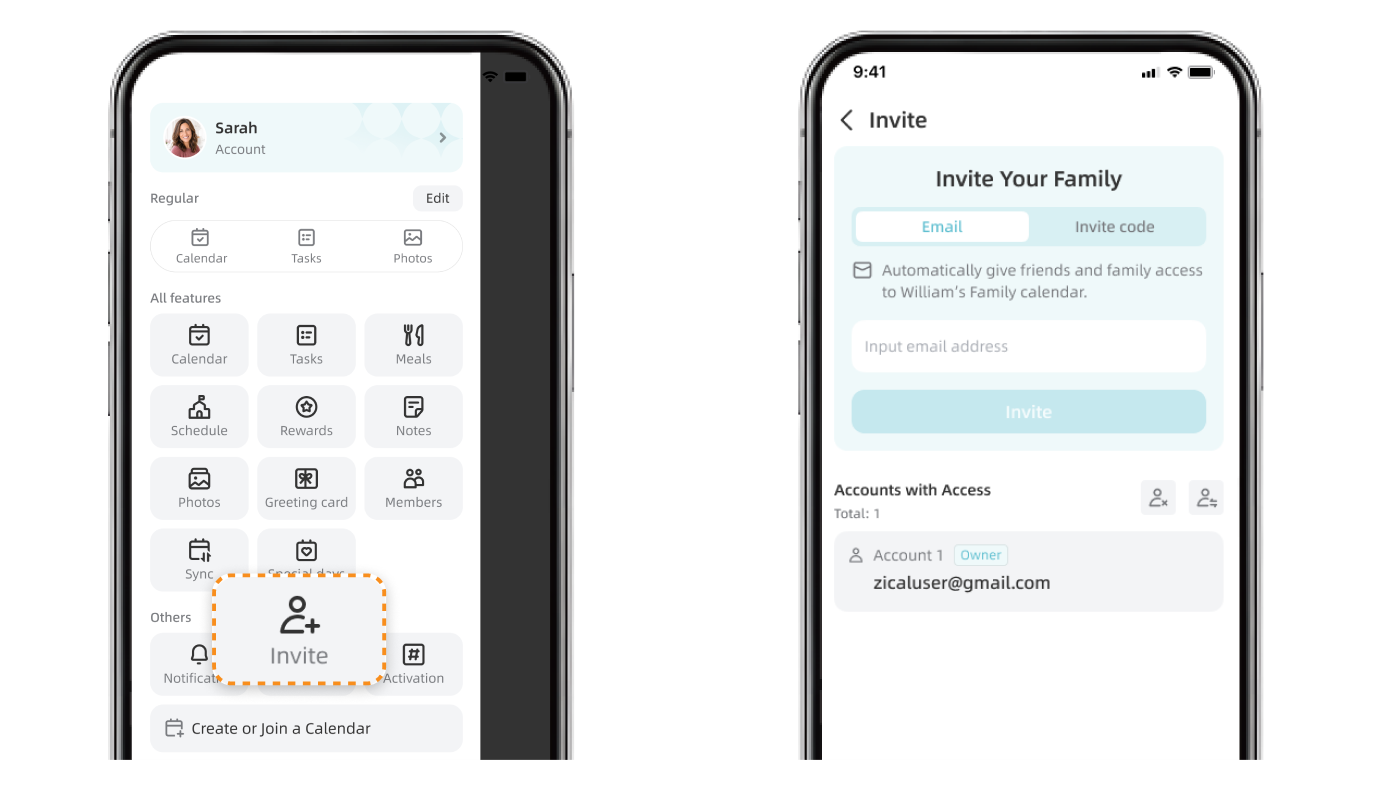
2.2.2 Invite Family or Friends
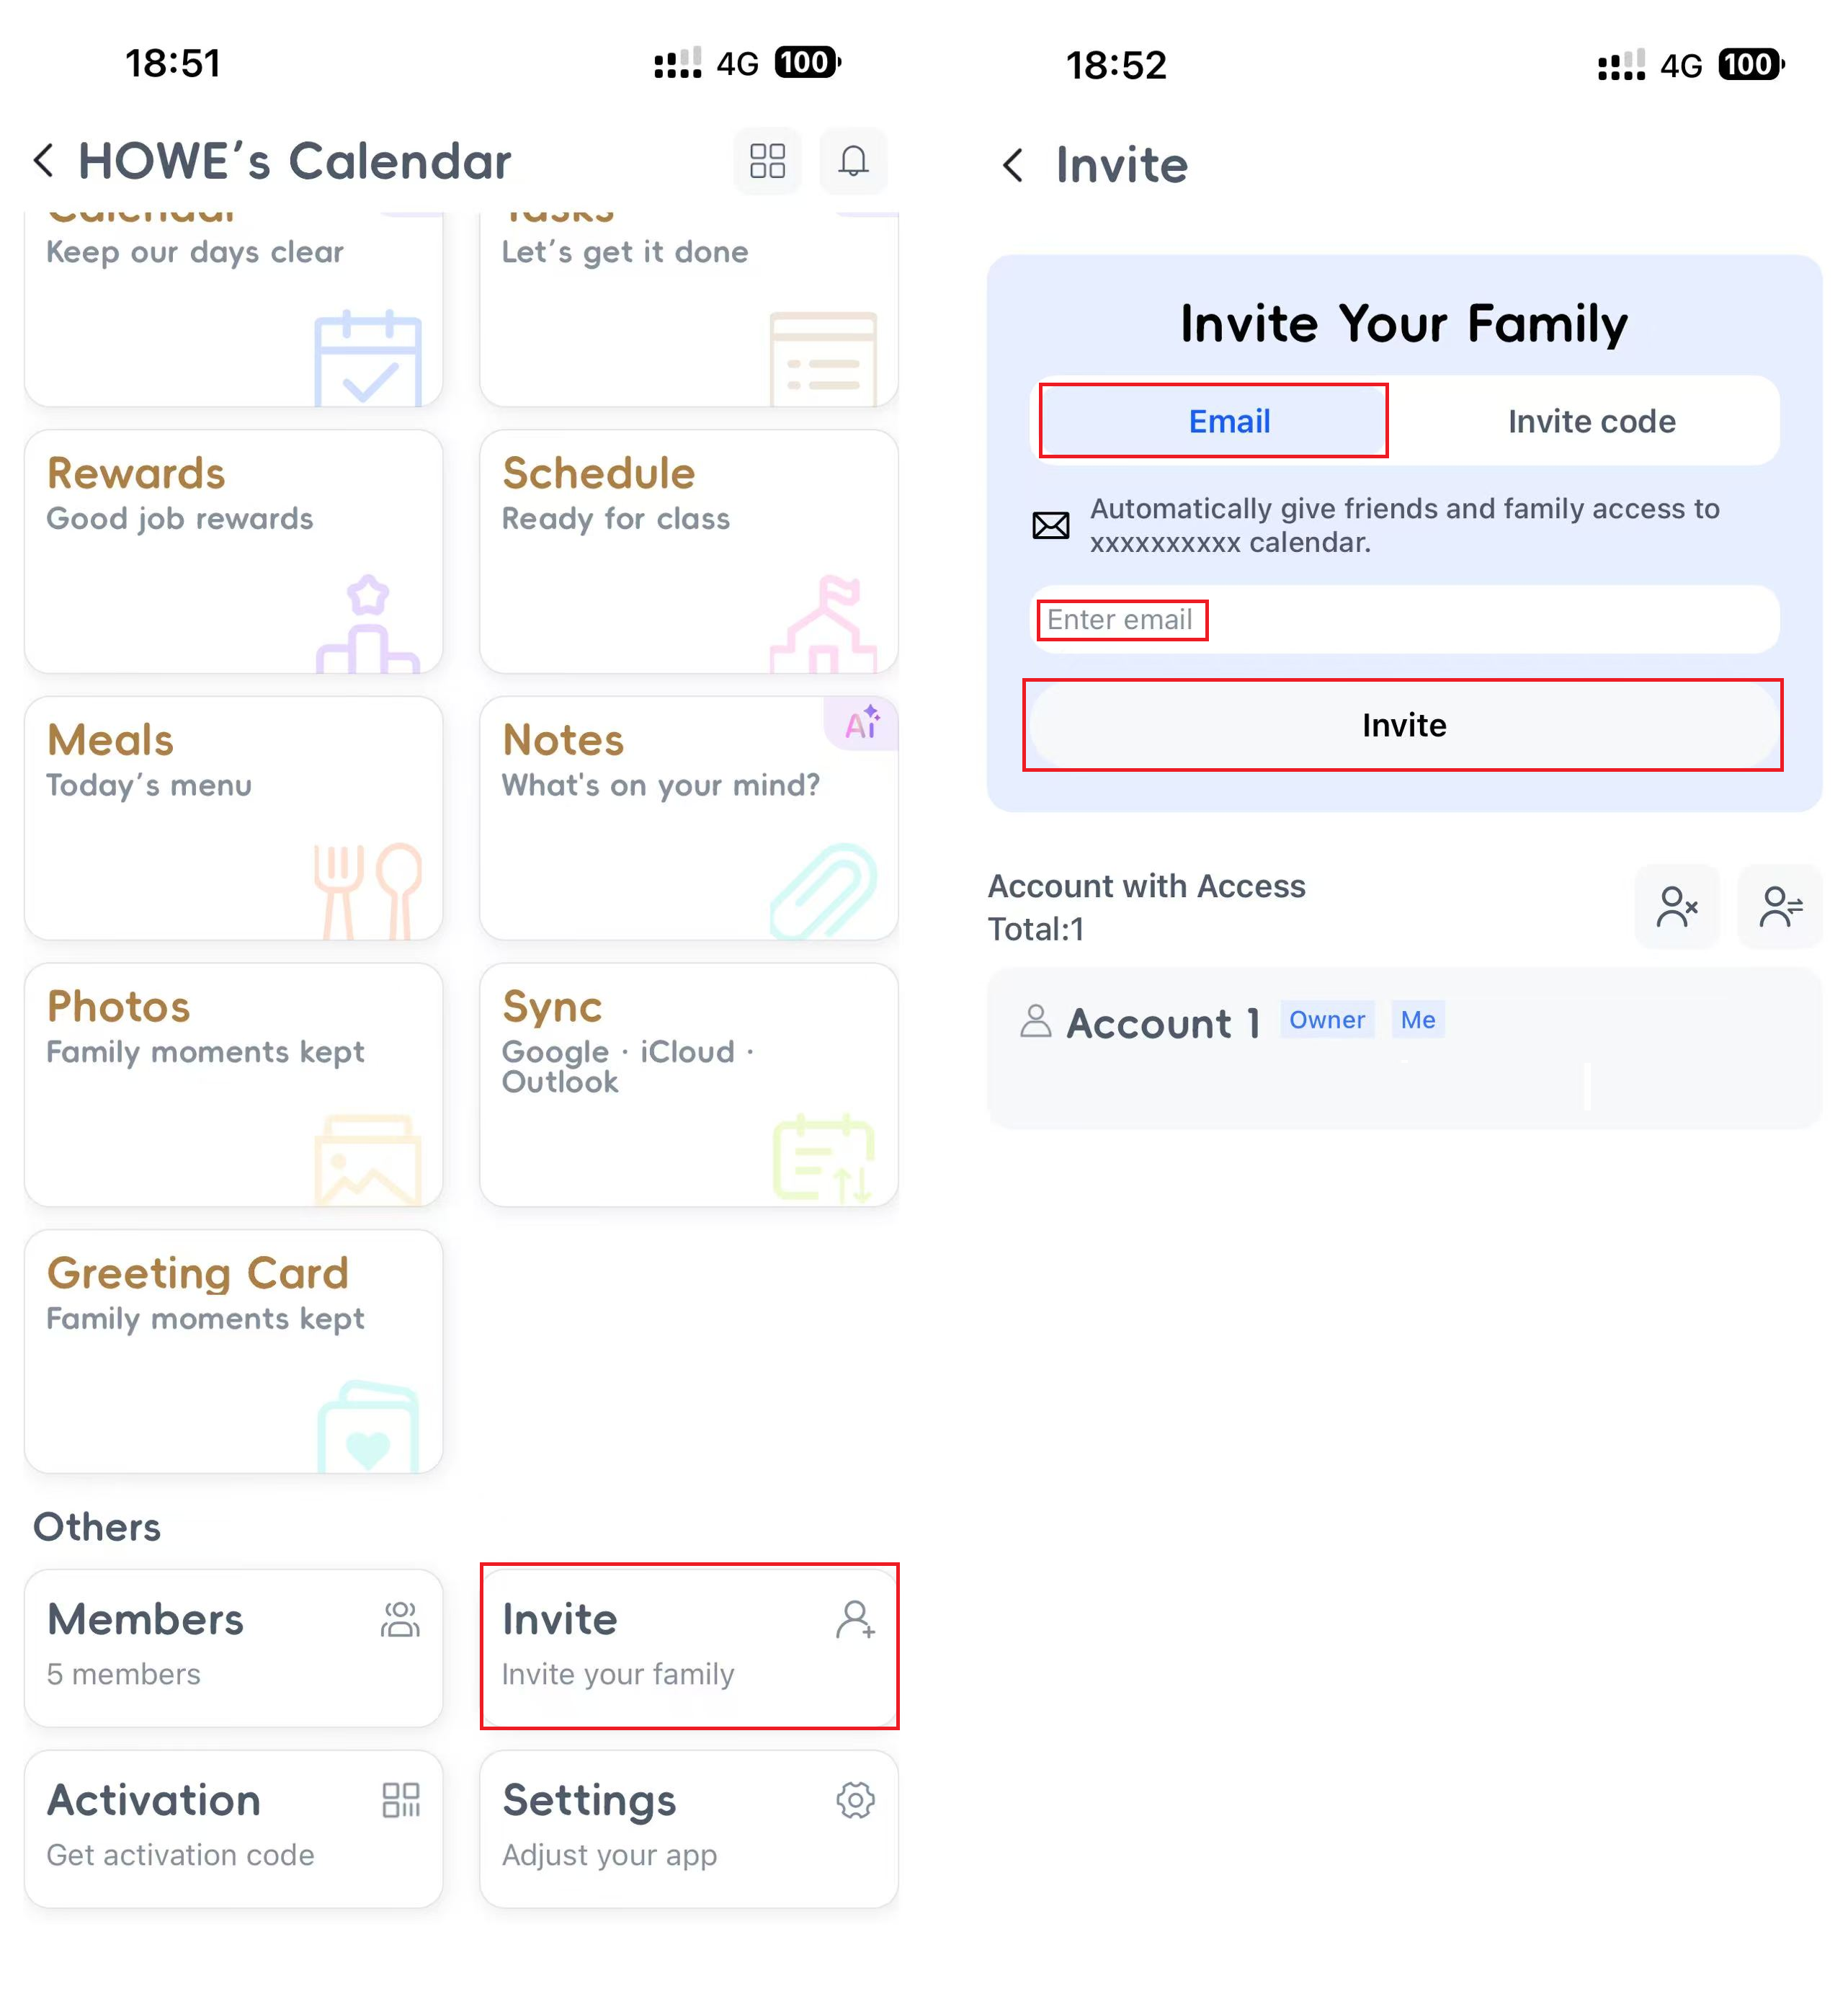
In the Zical App, tap Invite in the side navigation. Invite family members or friends who need their own login and access to the shared calendar.
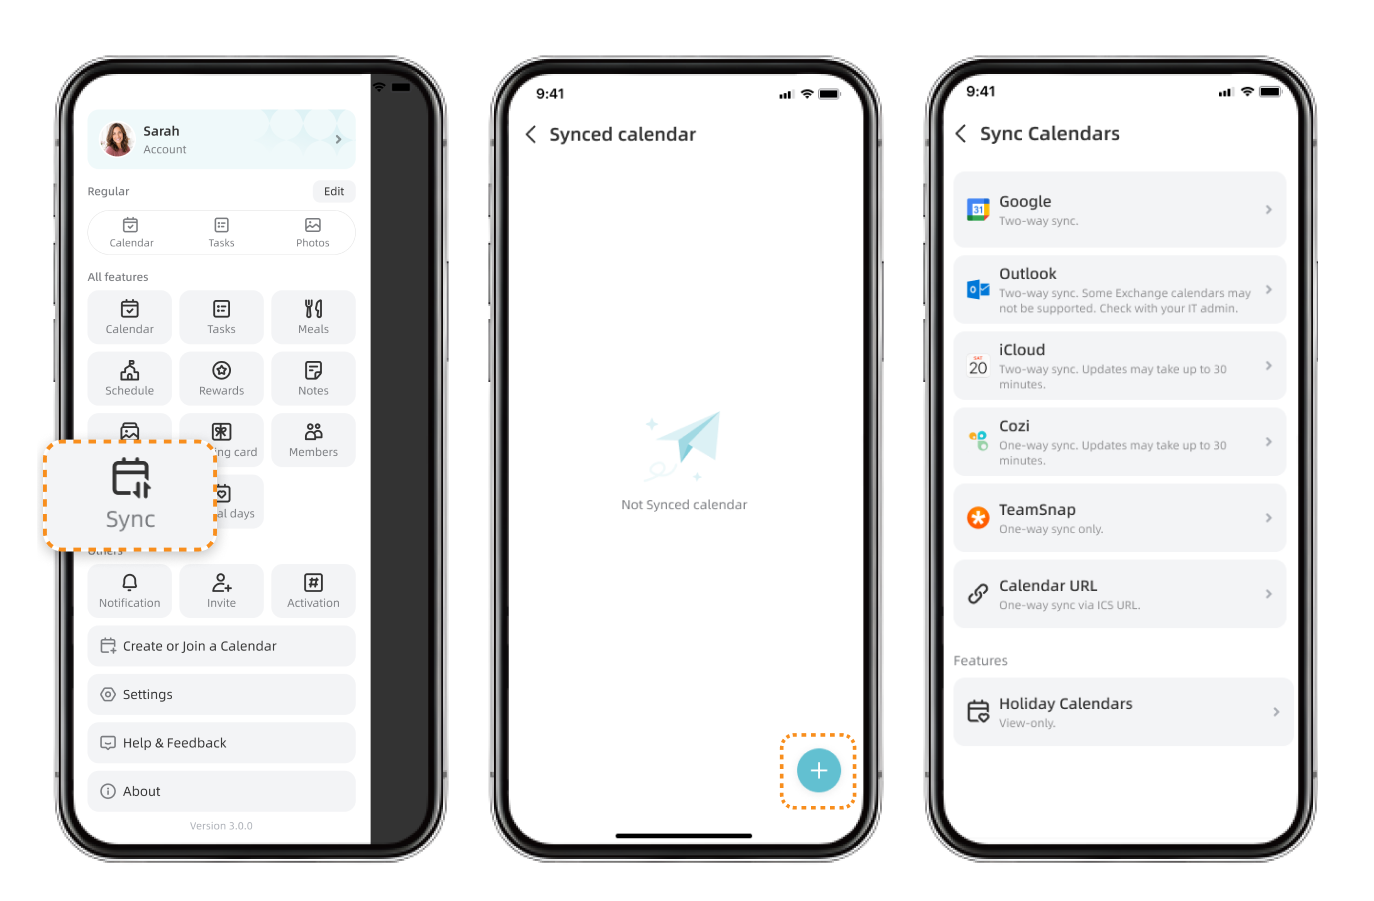
2.2.3 Optional: Connect an External Calendar
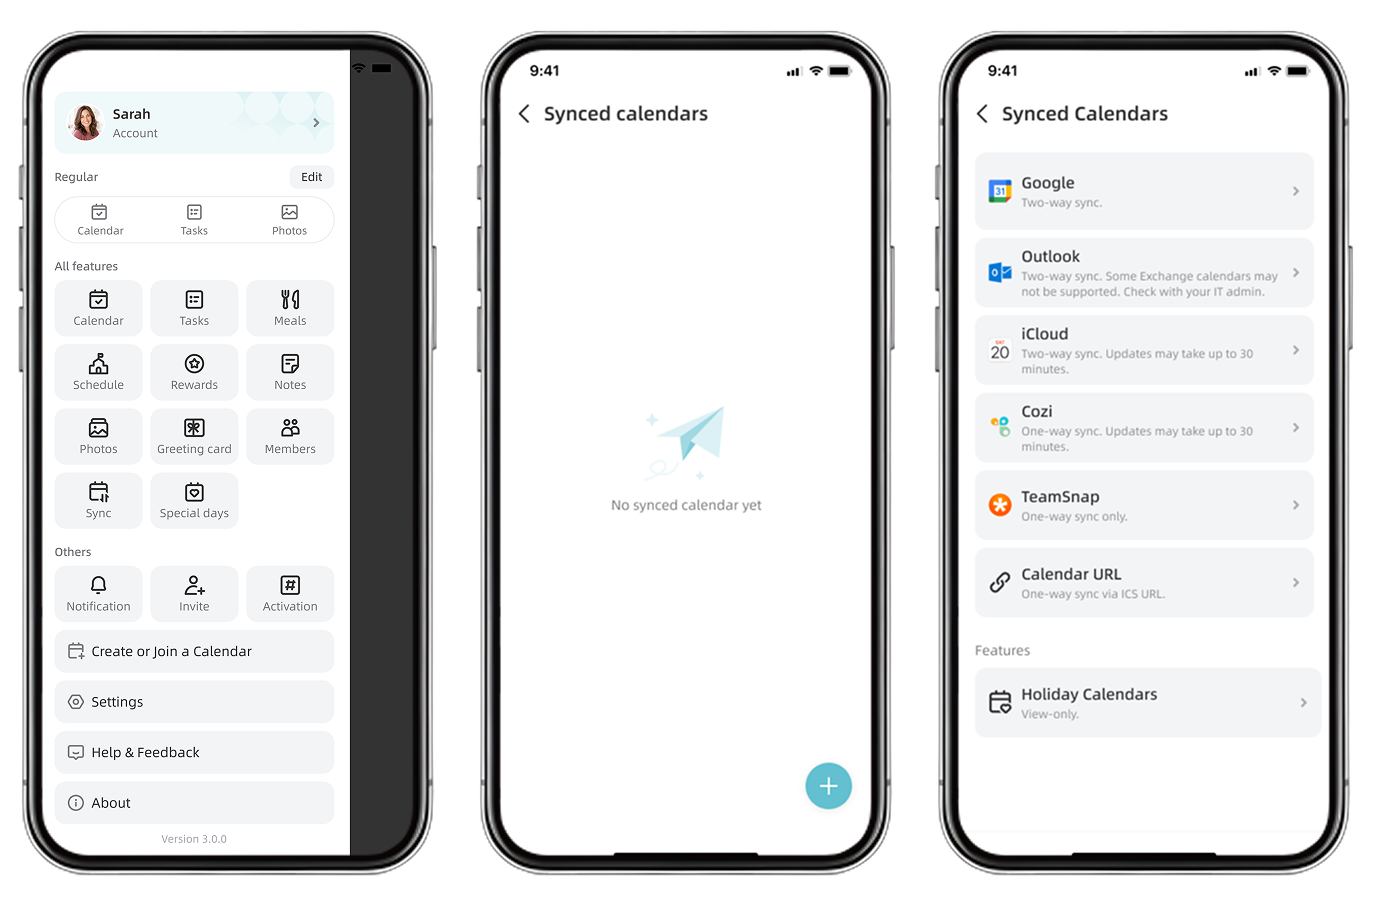
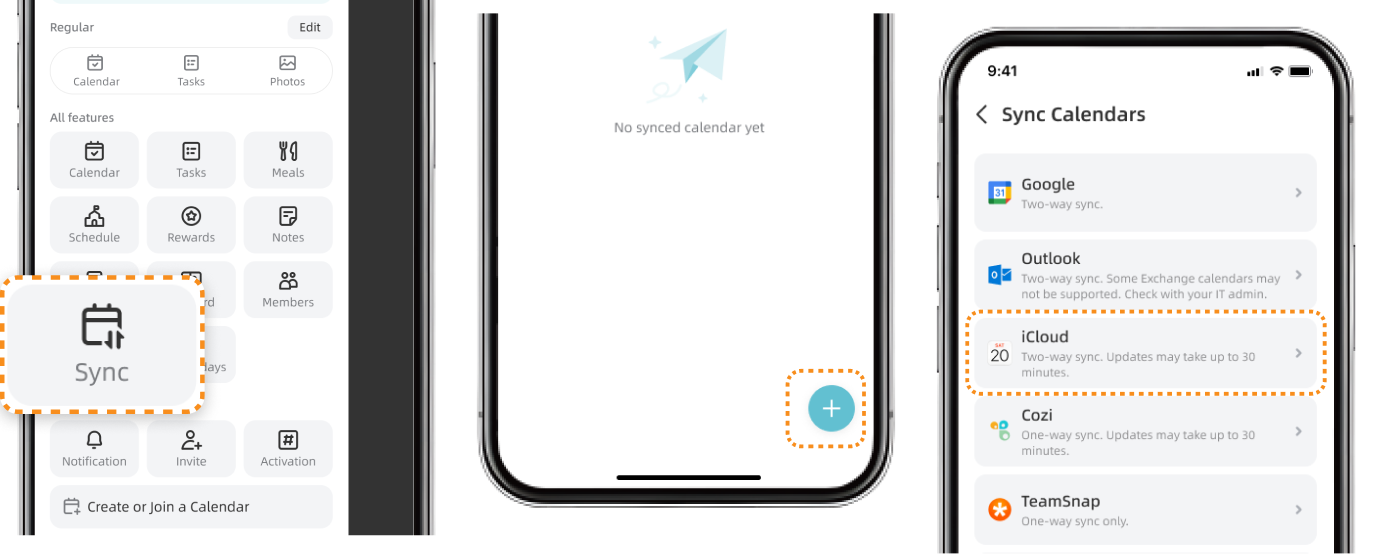
In the Zical App, tap Sync in the side navigation. Connect Google, iCloud, Outlook, or another available calendar service if you want your existing events to appear in Zical. See <u>Chapter 6</u> for detailed instructions.
3. Manage Your Account
Manage your sign-in, password, profile photo, and account settings.
3.1 Accounts and Members
An Account is used to sign in to the Zical App with an email address. One Account can access multiple Zical calendars.
A Member is a family profile that belongs to a specific Zical calendar. It is used to organize events, tasks, and other content by person. Each Member can have a name, color, avatar, and birthday.
Note: Adding a Member does not create a Zical Account or give that person access to the calendar. To give someone access, invite their Account to the shared calendar
3.2 Sign In and Sign Out
Sign in with the email address and password registered to your Zical account. To sign out, tap Account in the side navigation, then tap Log out.
Note: Enter your email address exactly as registered, including uppercase and lowercase letters.
3.3 Reset Your Password
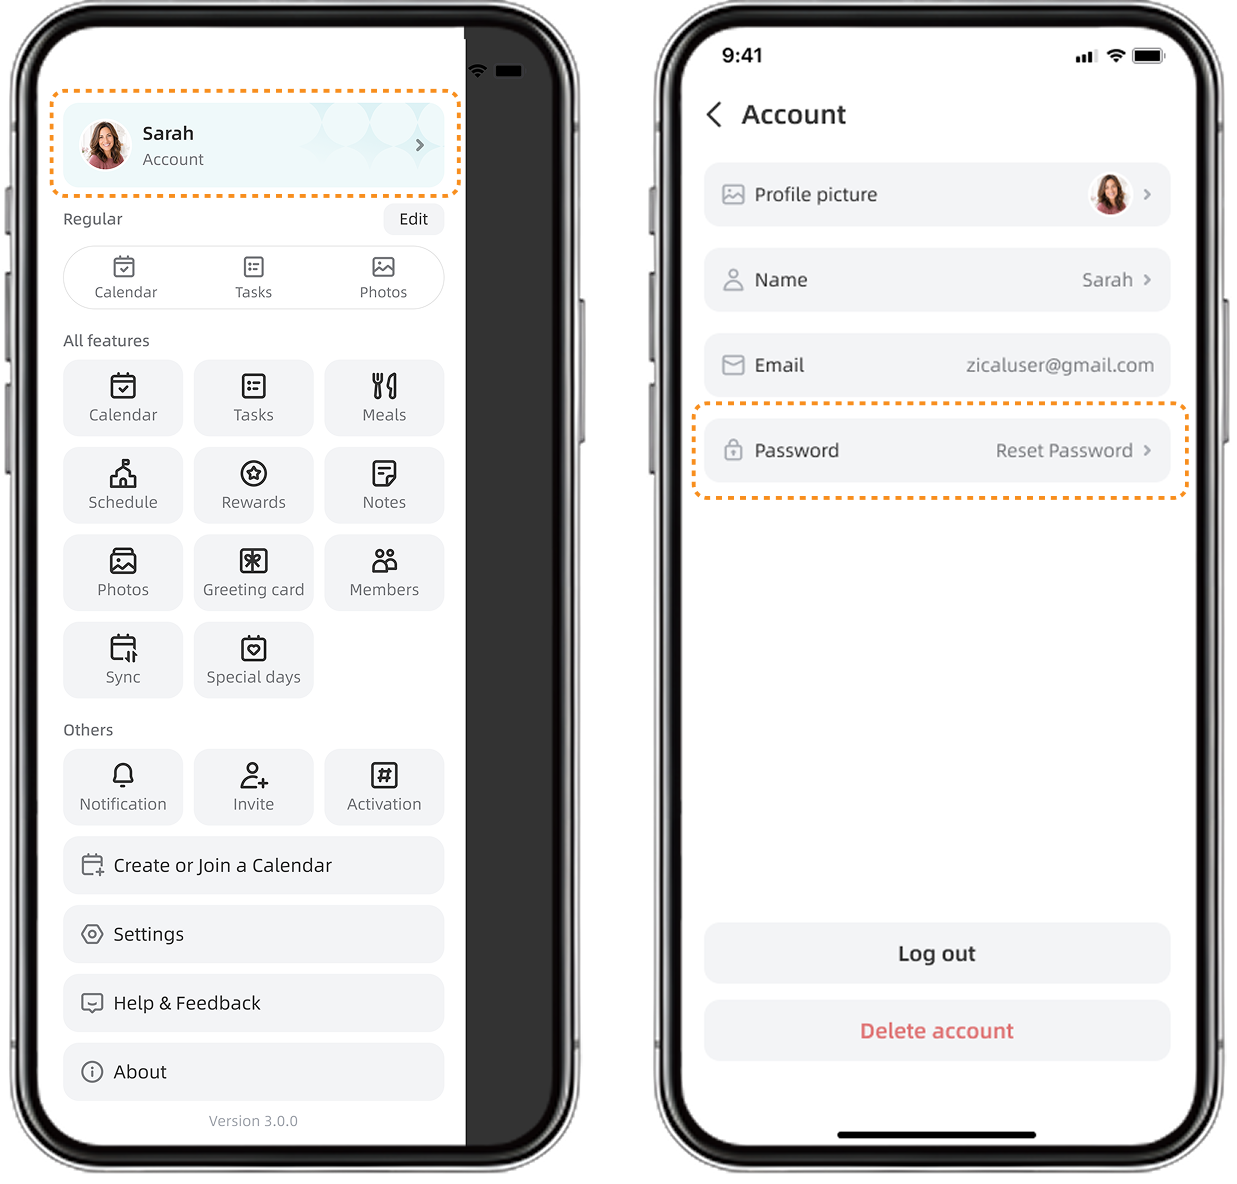
① On the sign-in screen, tap Forgot Password. If you are already signed in, tap Account in the side navigation, then select Reset Password.
② Follow the on-screen instructions: enter the verification code sent to your email, create a new password, then sign in again.
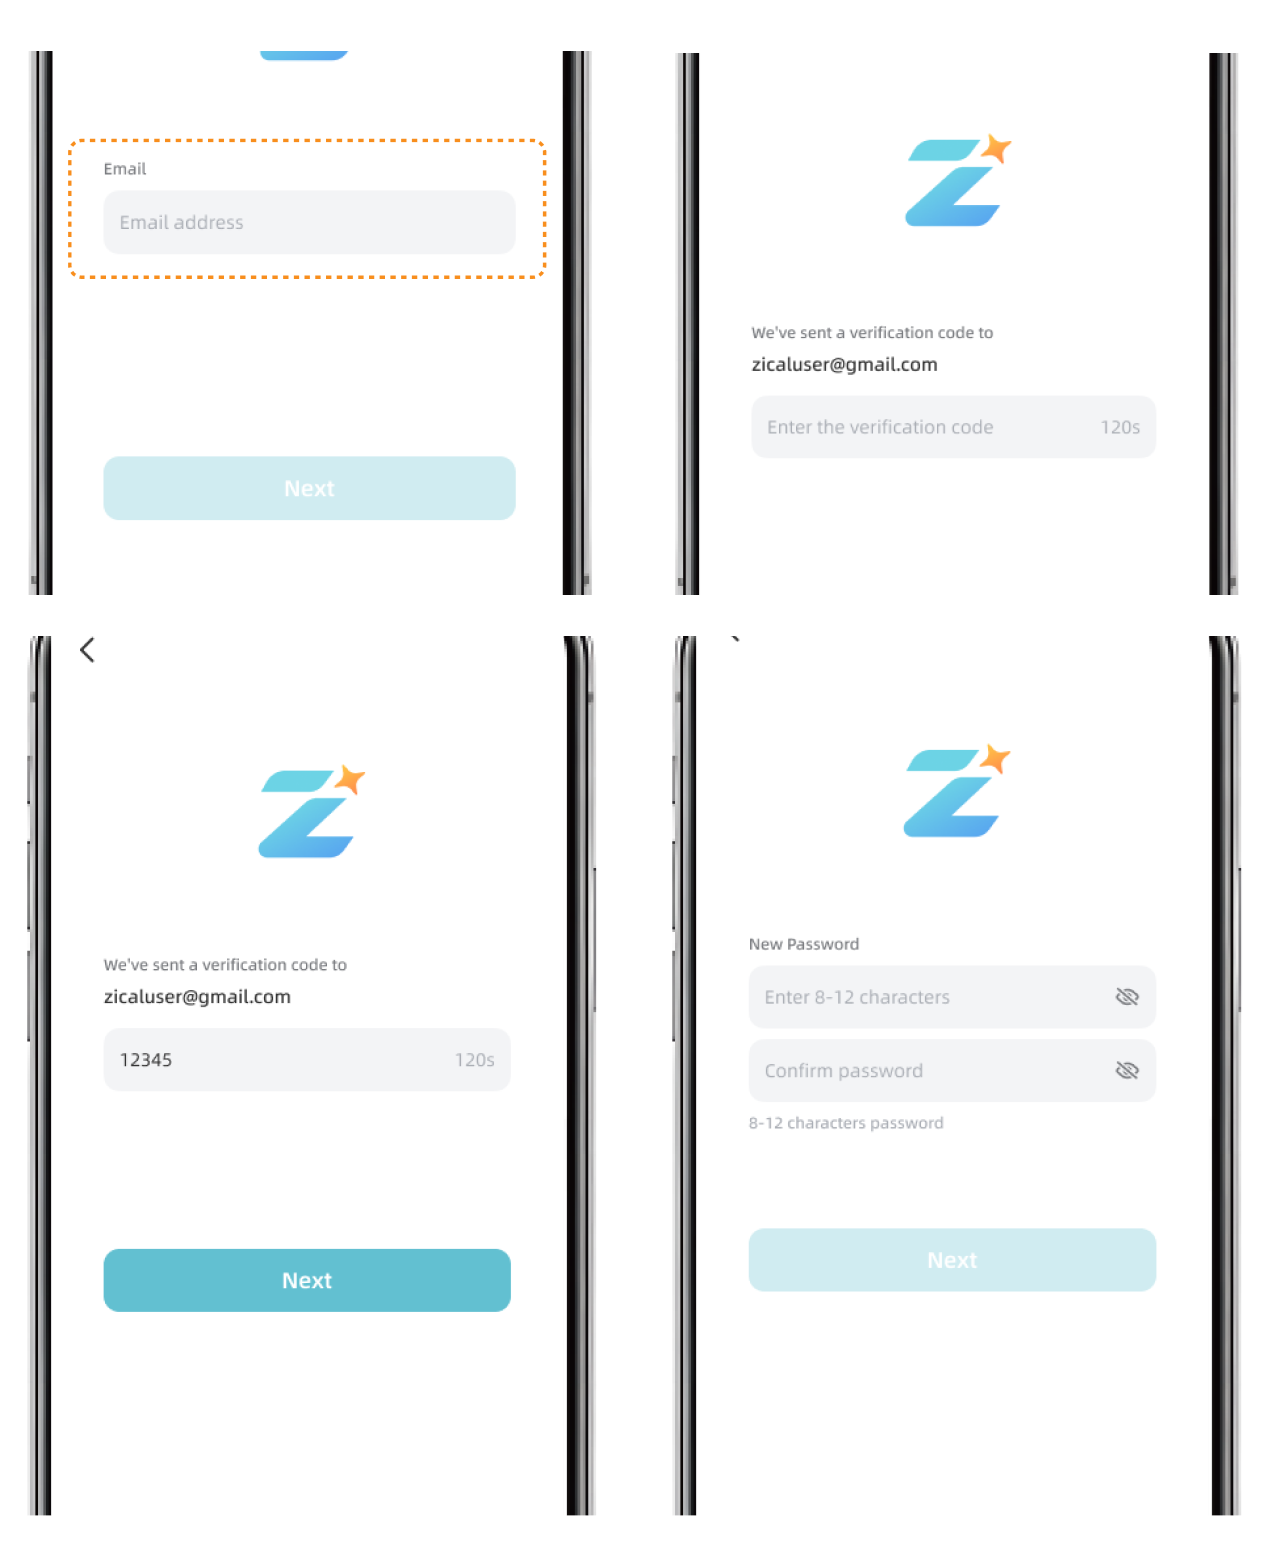
Note: If you do not receive the email, check your Spam, Junk, Promotions, and other filtered folders. If it still does not arrive, contact Zicalstar Support
3.4 Change Your Account Profile Photo
In the Zical App, tap Account in the side navigation, then select Profile Picture to change your account photo.
Note: Your account photo is separate from Member profile avatars. Changing it will not affect any Member profile avatars in your Zical calendars.
3.5 Delete Your Account
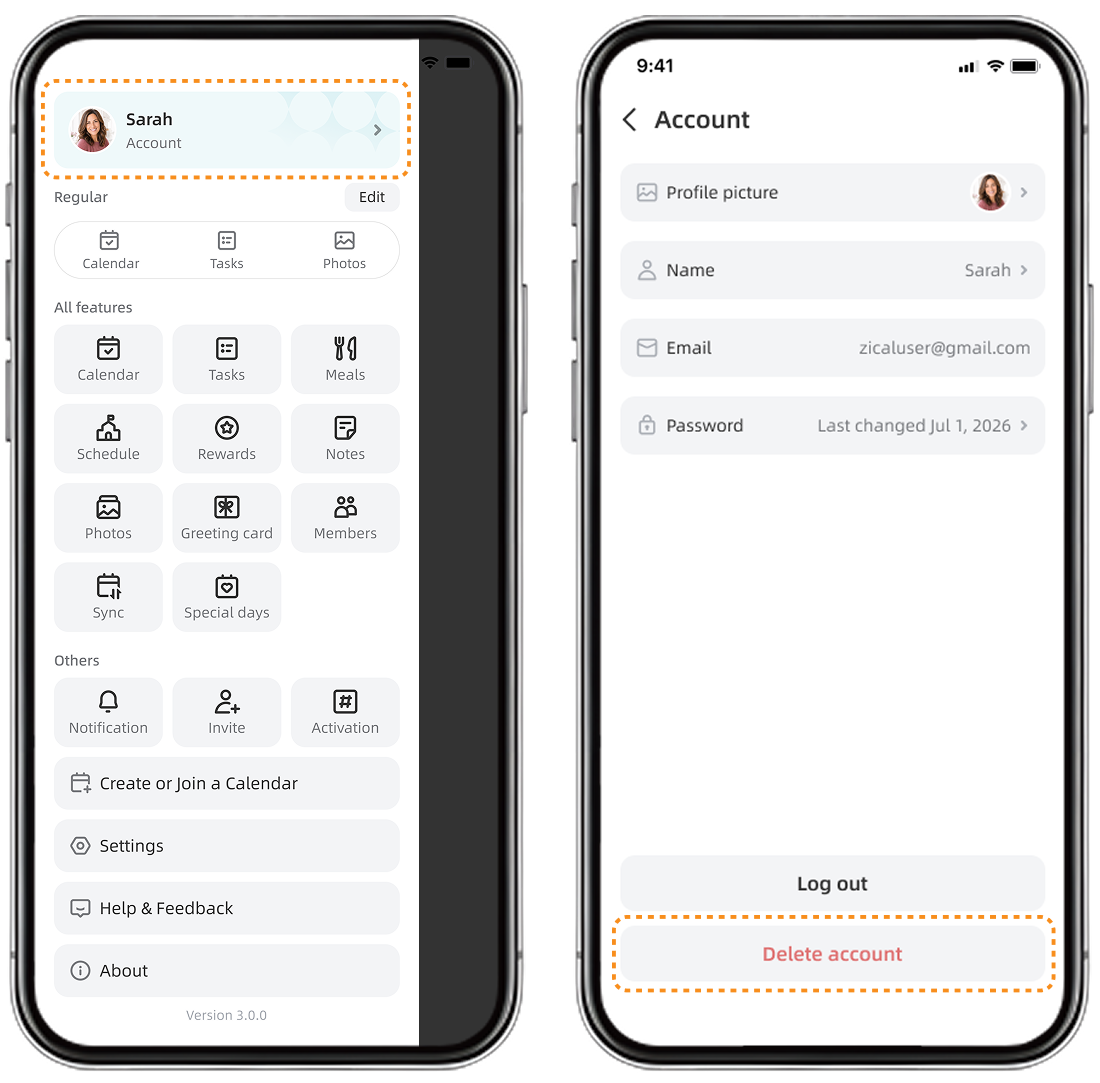
In the Zical App, tap “Account” in the side navigation, then select “Delete Account”.
Note: Account deletion is permanent and cannot be undone. If you own a shared calendar, transfer ownership before deleting your account.
3.6 Change the Account Email Address
You cannot change the email address linked to your account directly in the Zical App. To request a change, contact Zicalstar Support and provide your current email address and the new email address you want to use.
4. Manage Calendars and Sharing
Create and share calendars, and choose which one appears on your home display.
4.1 Create a Zical Calendars
Create a Calendar
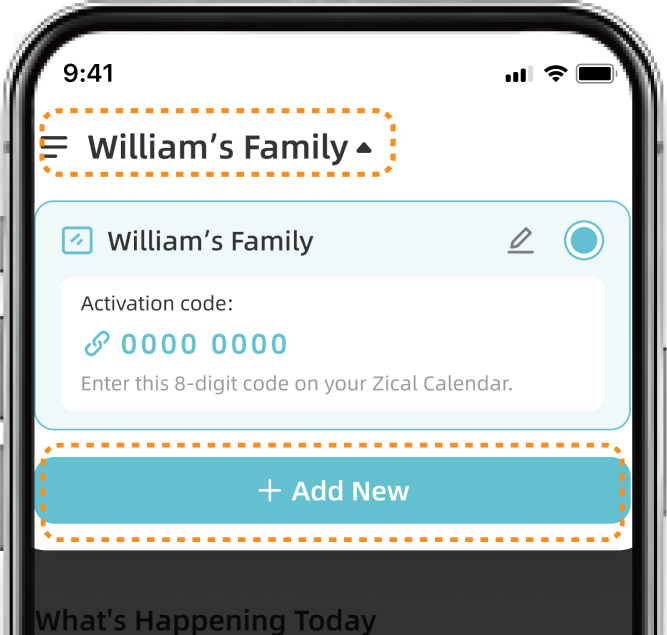
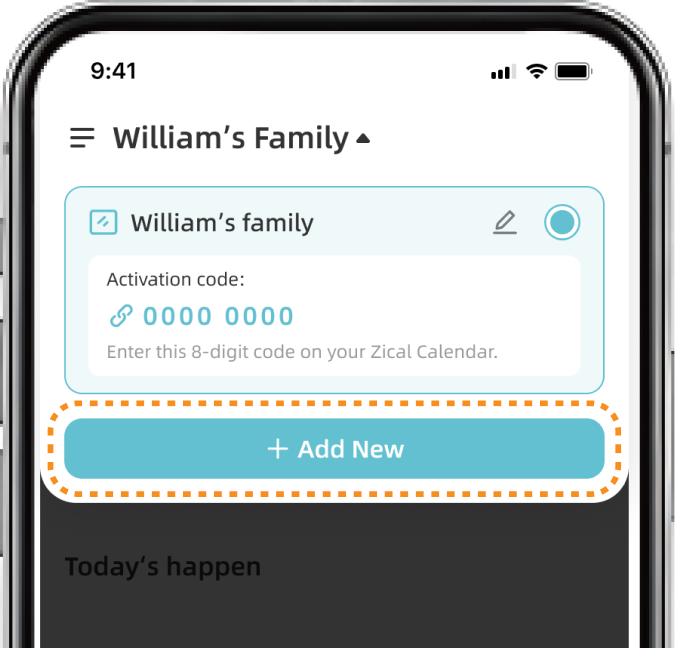
① In the Zical App, open the calendar creation page in either of these ways: Tap the calendar name at the top of the Home page, then tap “Add New”.
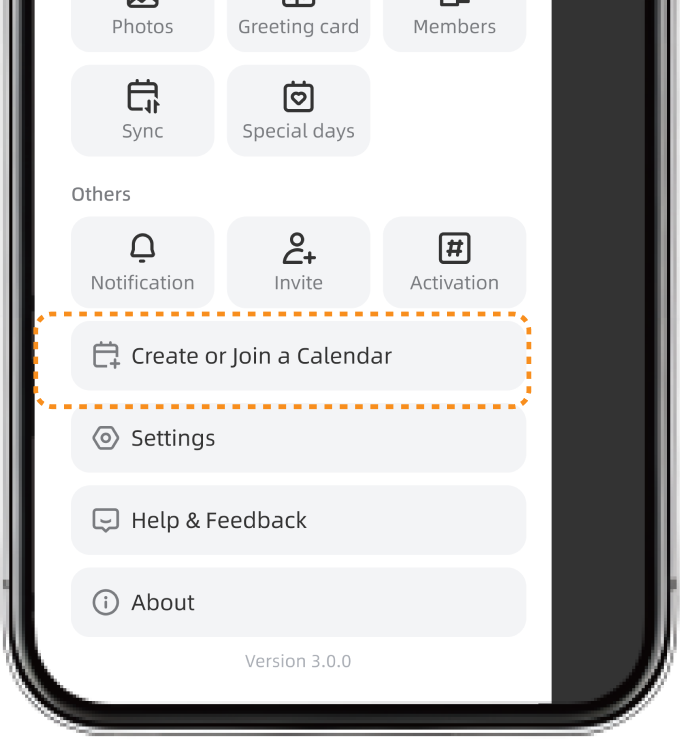
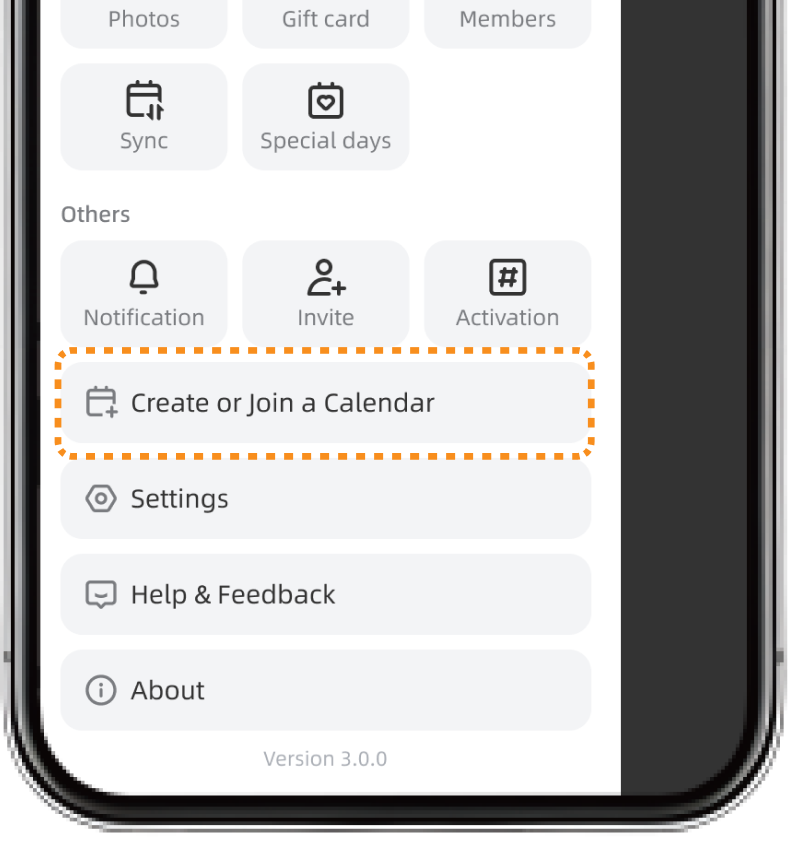
② Open the side navigation and tap “Create or Join a Calendar”.
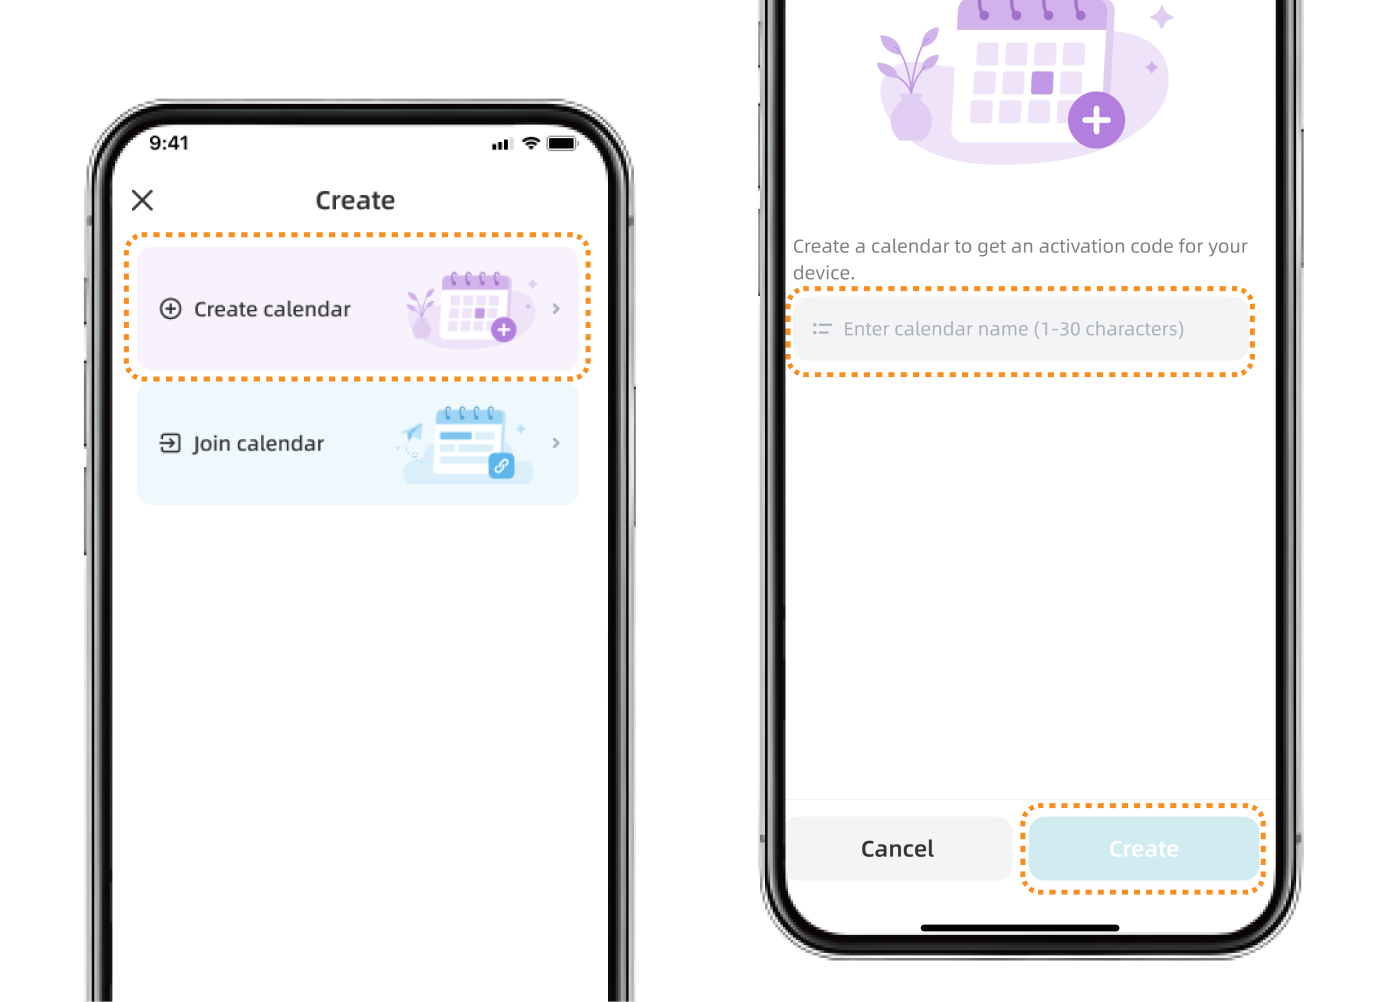
③ Tap “Create Calendar”, enter a calendar name, then tap “Create”.
Notes: 1. We recommend using one shared Zical calendar per household. Connect each family member's Google, Apple, or other external calendar to it and assign the calendar to the corresponding Member. You can then use the Member tabs to view each person's schedule separately. 2. A home display can be connected to only one Zical calendar at a time. Content from other Zical calendars will not appear or sync on the current home display
4.2 Change Calendar Settings
In the Zical App:
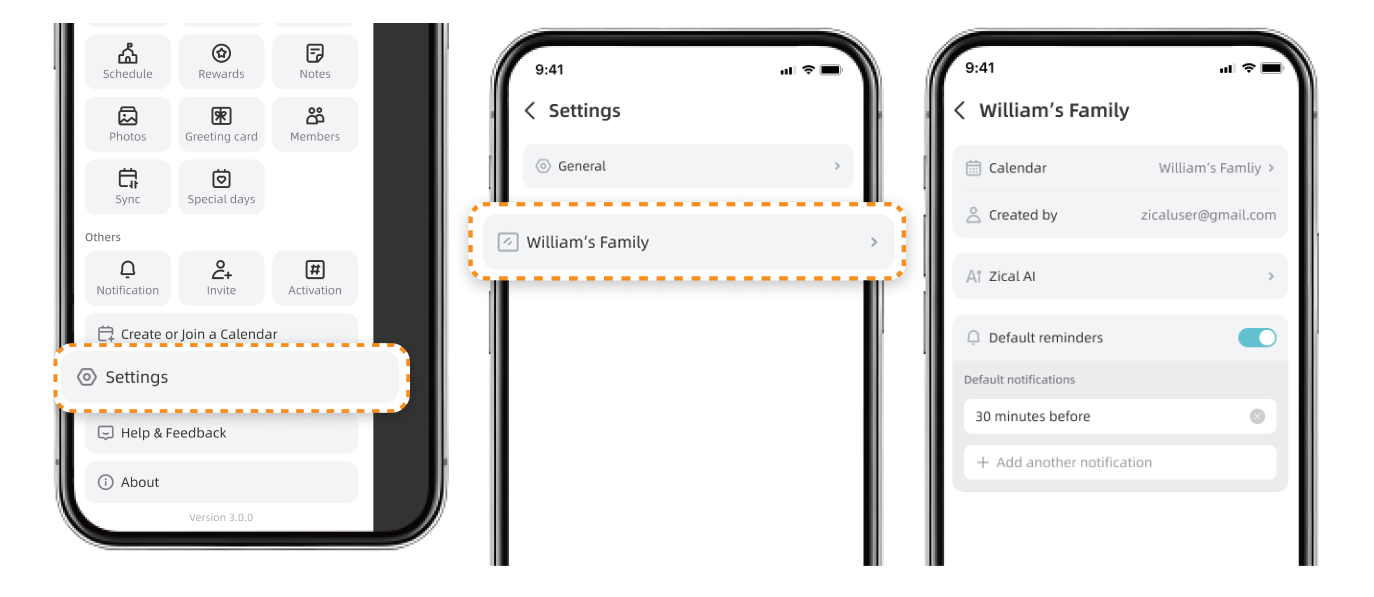
Open the side navigation and tap “Settings”. Select the calendar you want to manage. From there, you can change the calendar name and manage other calendar-specific settings.
On the home display:
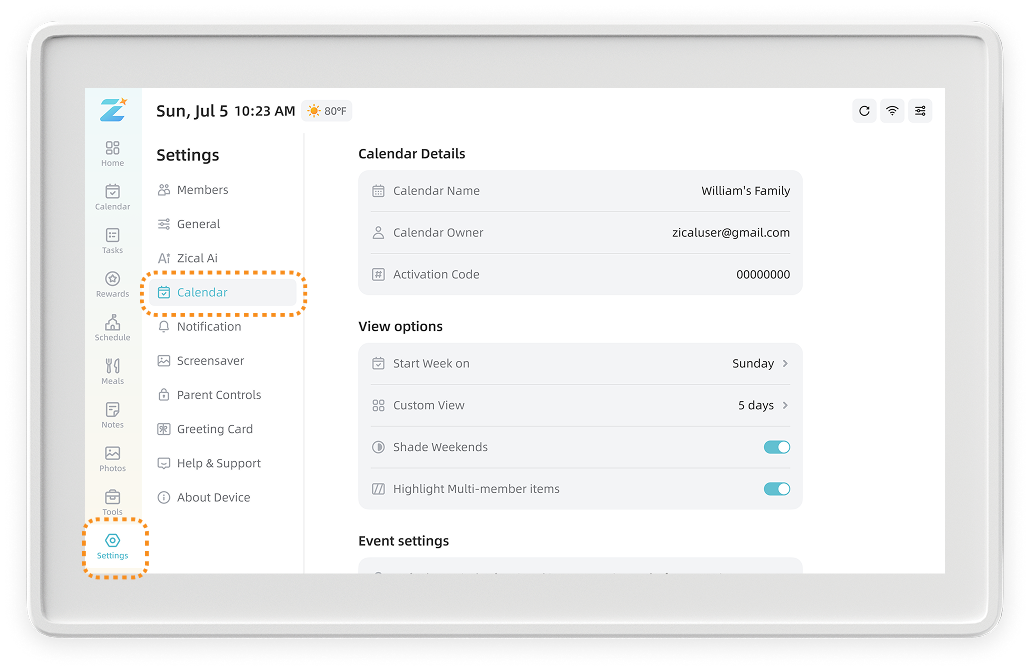
Go to “Settings” > “Calendar”. From there, you can manage common calendar settings, such as the week start day, calendar view, weekend shading, and default reminders. Note: The calendar name can be changed only in the Zical App.
Note: The calendar name can be changed only in the Zical App.
4.3 Invite or Join a Shared Calendar
Each person who joins a shared calendar uses their own Zical account. One account can access multiple Zical calendars.
4.3.1 Invite Family or Friends
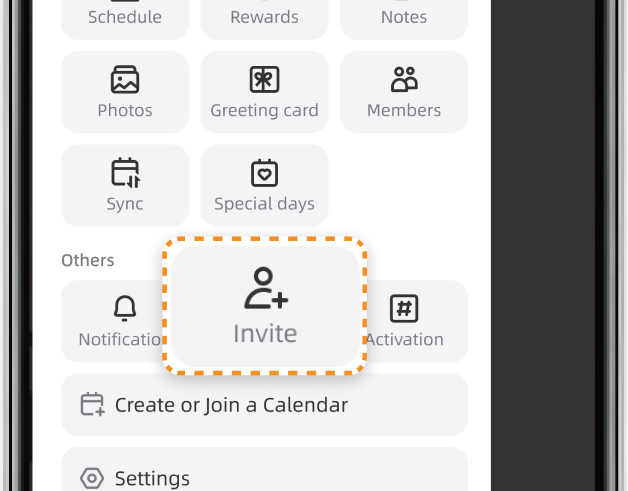
In the Zical App, switch to the calendar you want to share. Then open the side navigation and tap “Invite”.
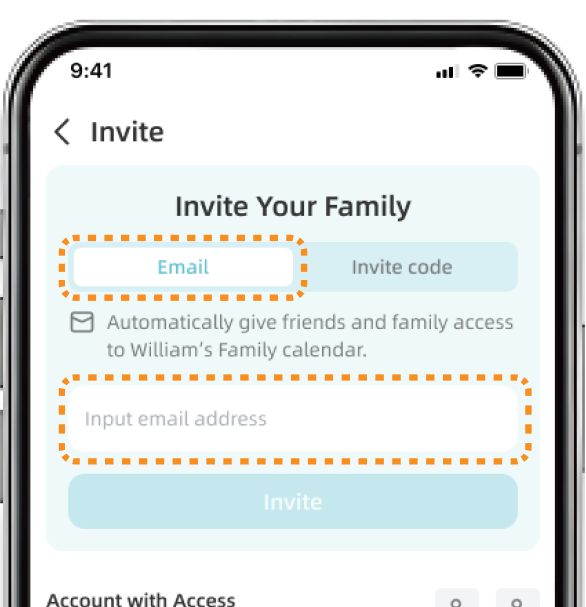
Invite by email:
On the Invite page, enter the person's email address and send the invitation.
Note: You can send an invitation even if the person has not created a Zical account. When they sign up or sign in with the same email address, the shared calendar will appear automatically.
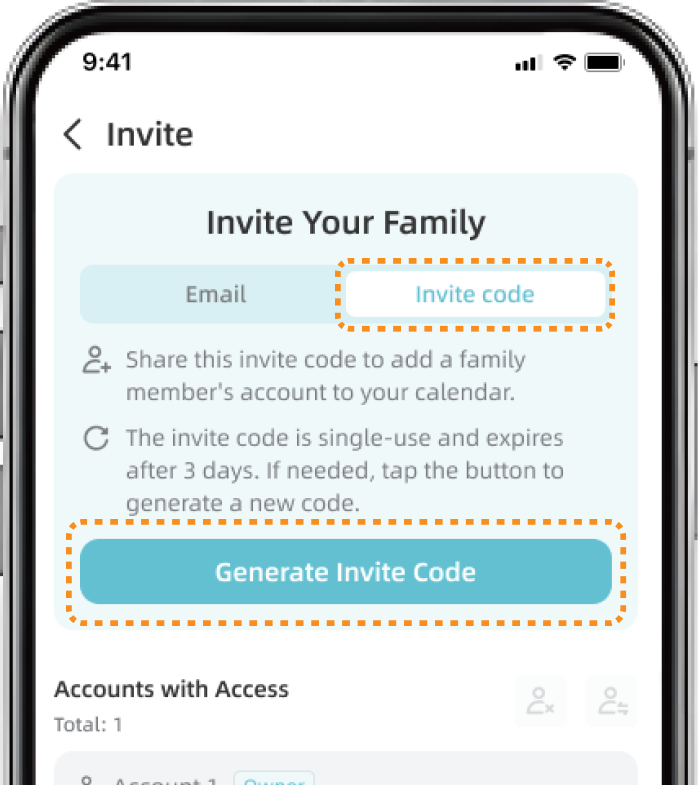
Invite with a code:
① Tap “Generate Invite Code”.
② Tap “Copy Code”, then send the 6-digit code to the person you want to invite.
Note: An invite code can be used only once and expires after 3 days. If the code has been used or has expired, generate a new one.
4.3.2 Join a Shared Calendar
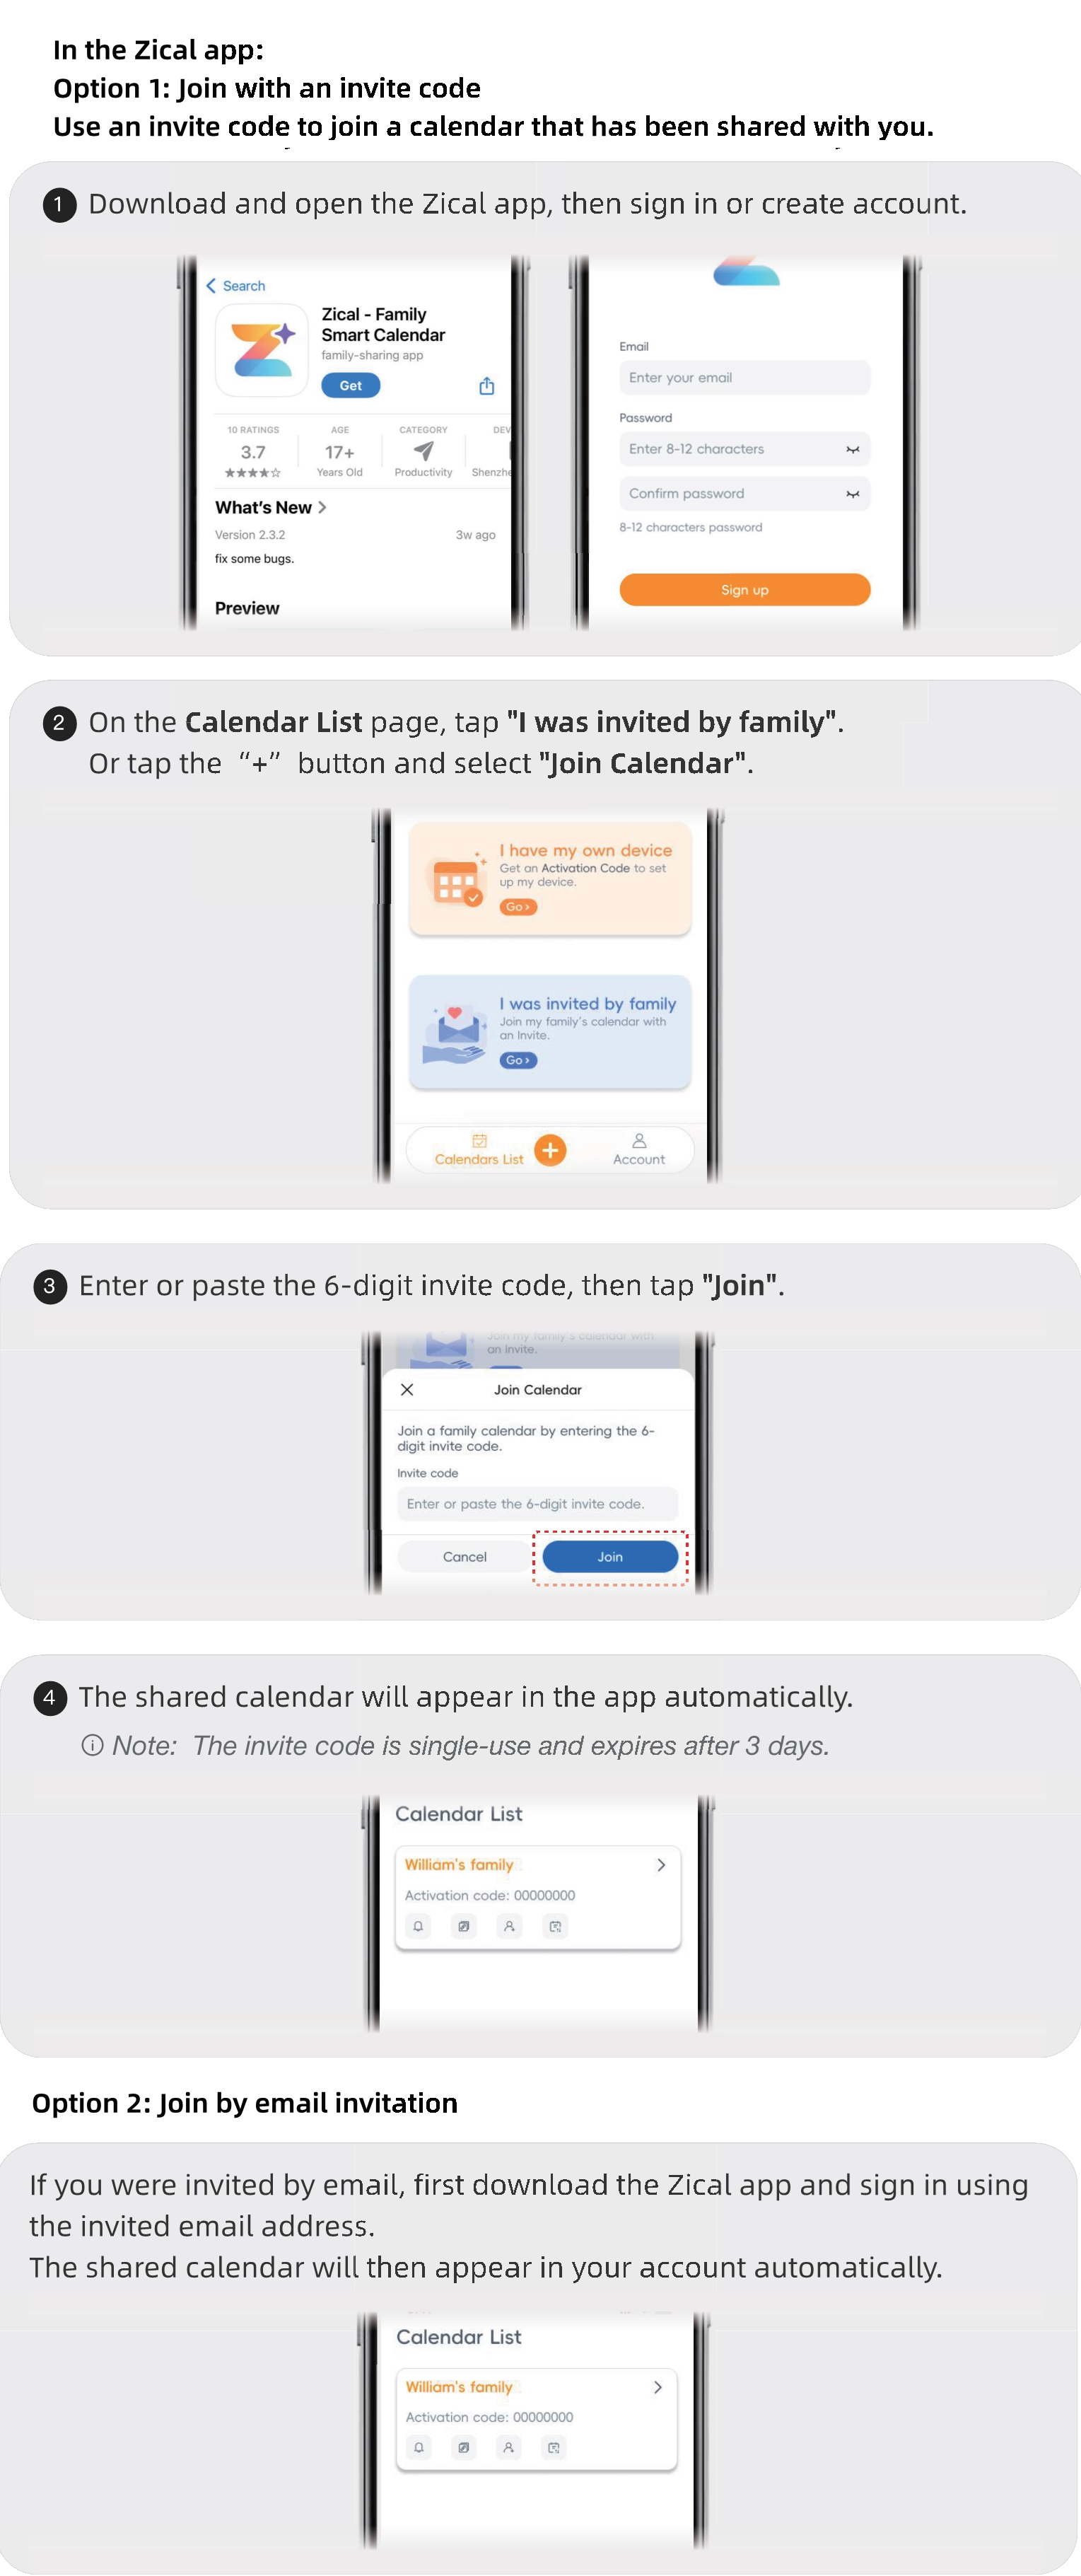
Download the Zical App and sign in to your account. If you do not have an account, create one first.
Join by Email Invitation
Sign up or sign in with the email address that received the invitation. The shared calendar will appear in your account automatically.
Join with an Invite Code
You can access the calendar joining page in any of these three ways:
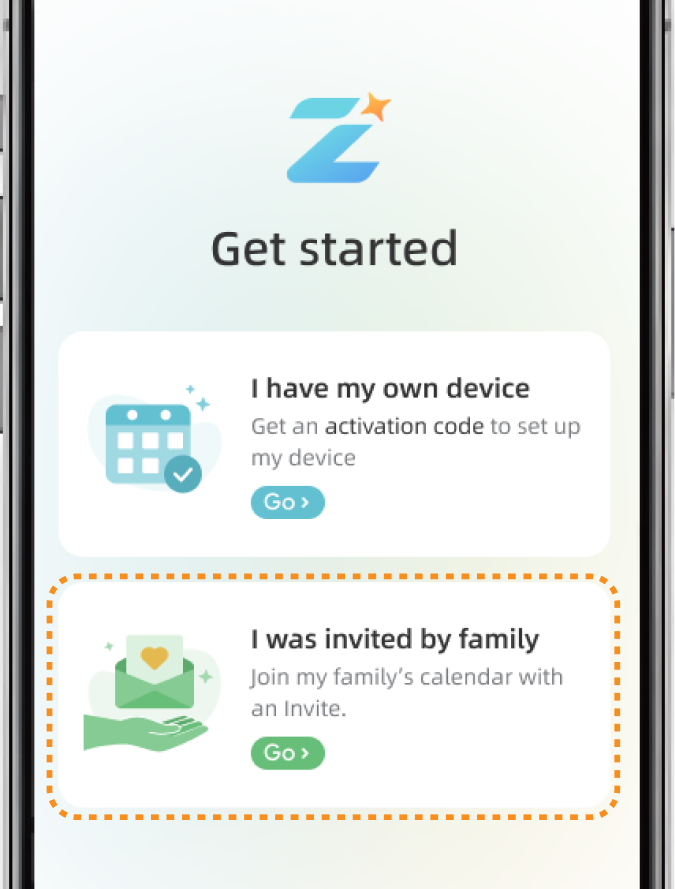
① When signing in for the first time: Tap “I was invited by family”.
② From the Home page: If your account already has a calendar, tap the calendar name at the top of the Home page, then tap “Add New”.
③ From the side navigation: Open the side navigation and tap “Create or Join a Calendar”.
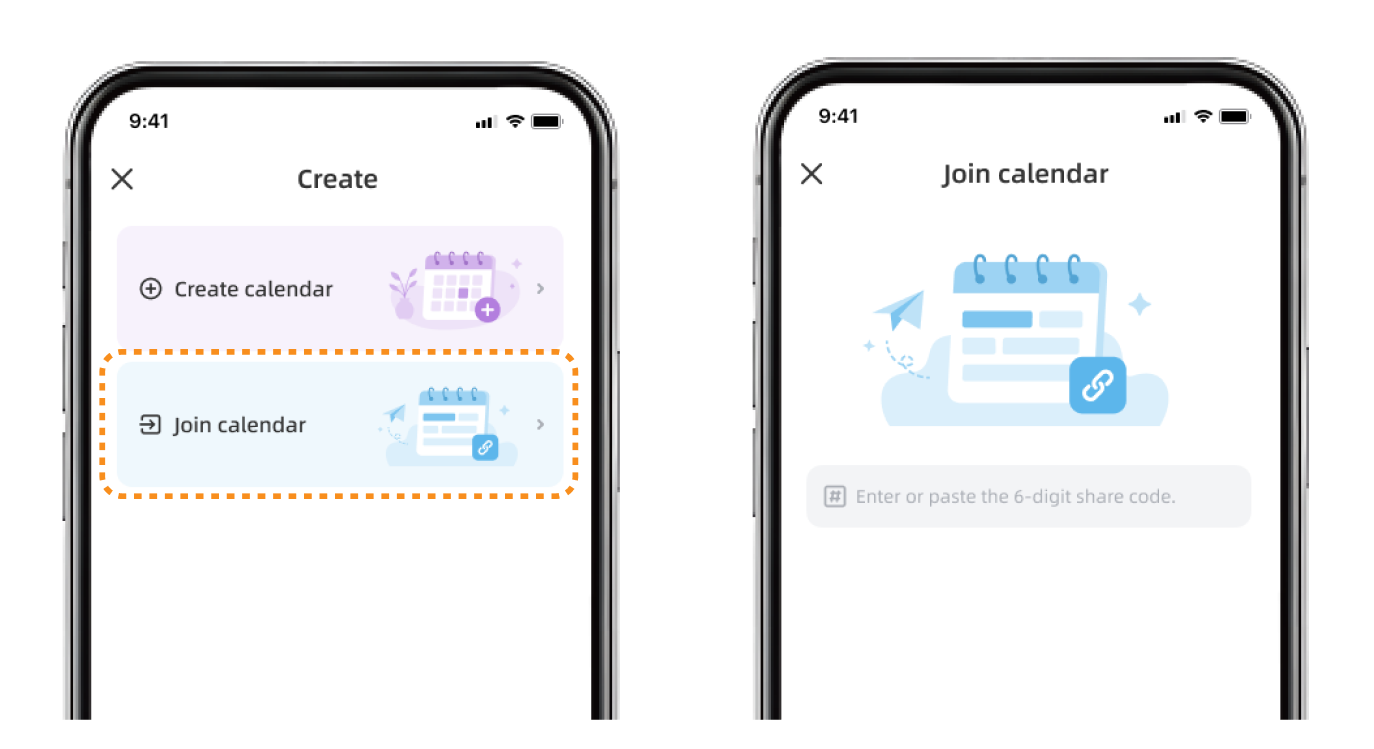
④ Tap “Join Calendar,” enter the 6-digit share code, then tap “Join”. The shared calendar will appear in the Zical App.
Note: An invite code can be used only once and expires after 3 days.
4.4 Manage Calendar Access
The account that creates a calendar becomes its Owner by default. The Owner can view the accounts with access, remove an account, or transfer calendar ownership.
4.4.1 Transfer Calendar Ownership
The Owner can transfer ownership to another account that already has access to the same calendar.
① In the Zical App, select the calendar you want to manage.
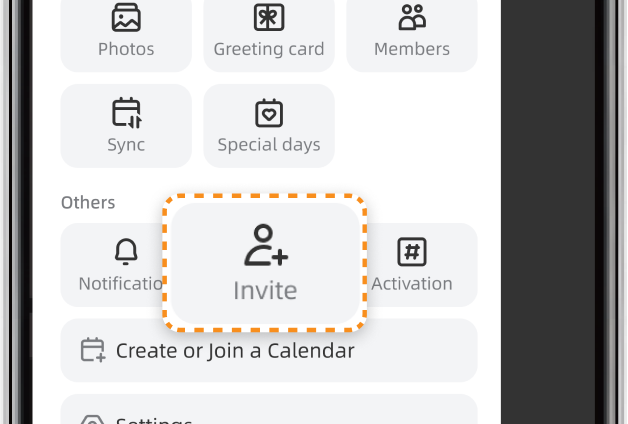
② Open the side navigation and tap “Invite.”
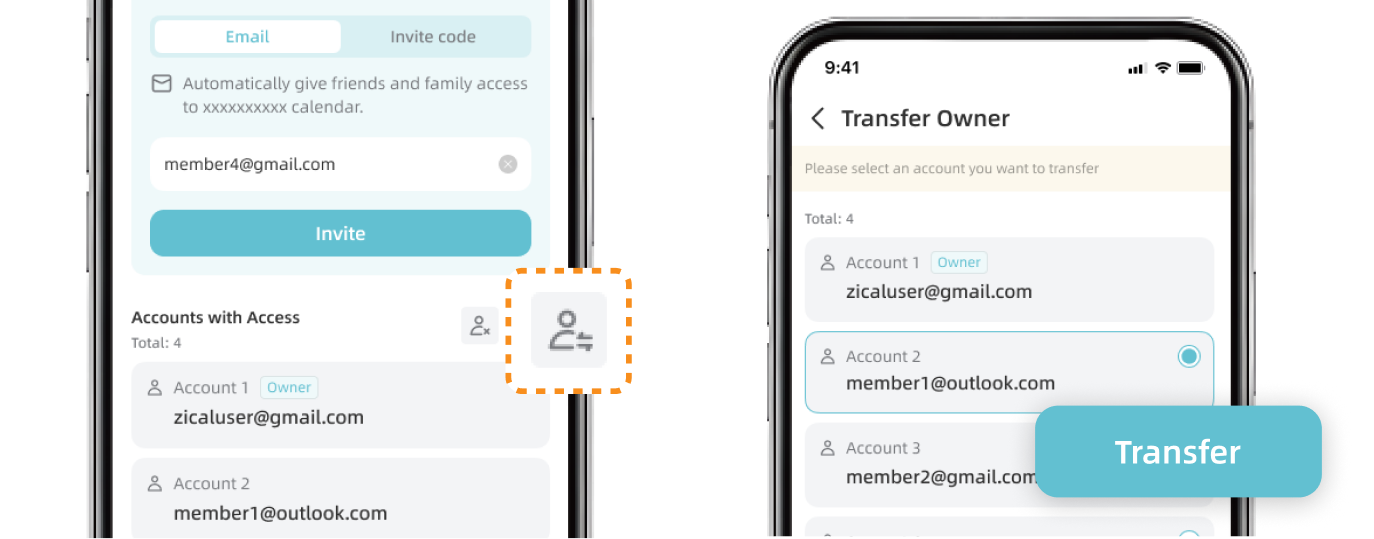
③ Under “Accounts with Access”, tap the Transfer icon next to the account you want to make the new Owner.
④ Confirm the new Owner, then tap “Transfer”.
Note: After the transfer, the new Owner controls calendar access. The previous Owner remains a participant but can no longer manage access unless ownership is transferred back.
4.4.2 Remove an Account from a Calendar
Only the calendar Owner can remove another account.
① In the Zical App, select the calendar you want to manage.
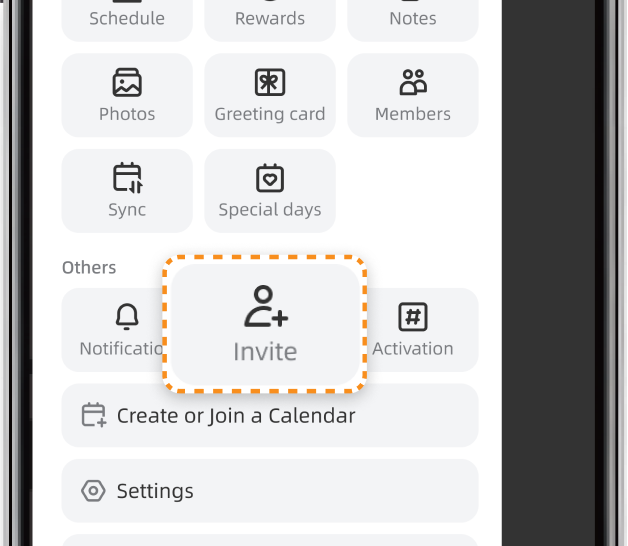
② Open the side navigation and tap “Invite”.
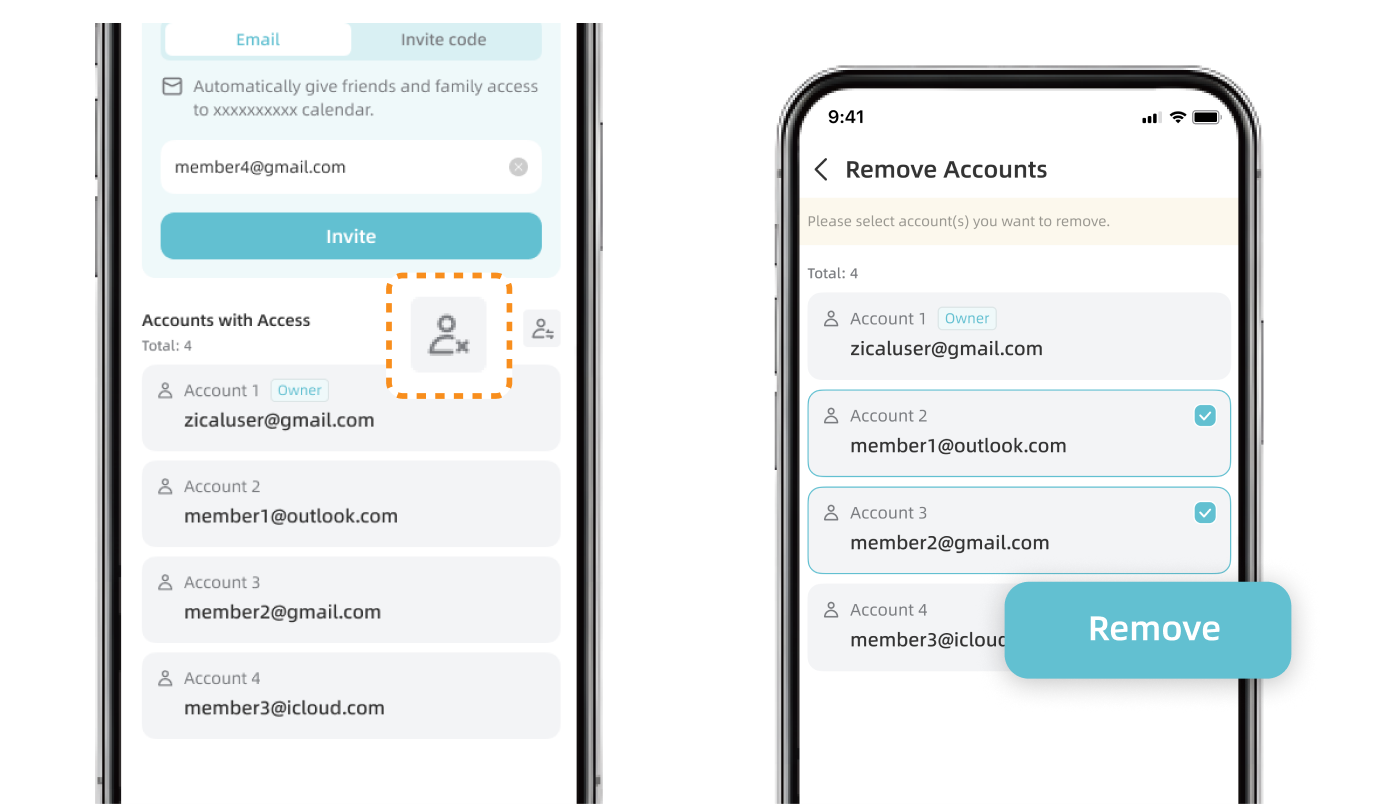
③ Under “Accounts with Access”, tap the Delete icon next to the account you want to remove.
④ Tap “Remove” to confirm.
Note: After removal, the account can no longer view or edit the calendar. Removing an account does not delete Member profiles or content associated with that person.
4.4.3 Leave a Calendar
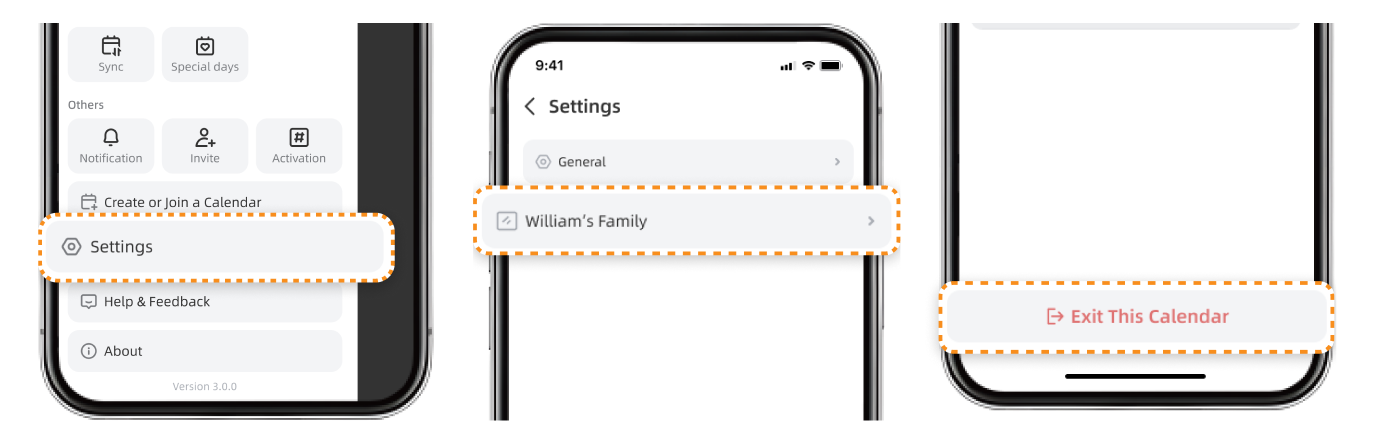
In the Zical App, open the side navigation from the Home page and tap “Settings”. Select the calendar you want to leave, then tap “Exit This Calendar”.
Note: A participant can leave a shared calendar at any time. If you are the Owner, transfer ownership before leaving. Leaving removes your account's access but does not delete the calendar for the Owner or other participants.
4.5 Change the Calendar Shown on a Display
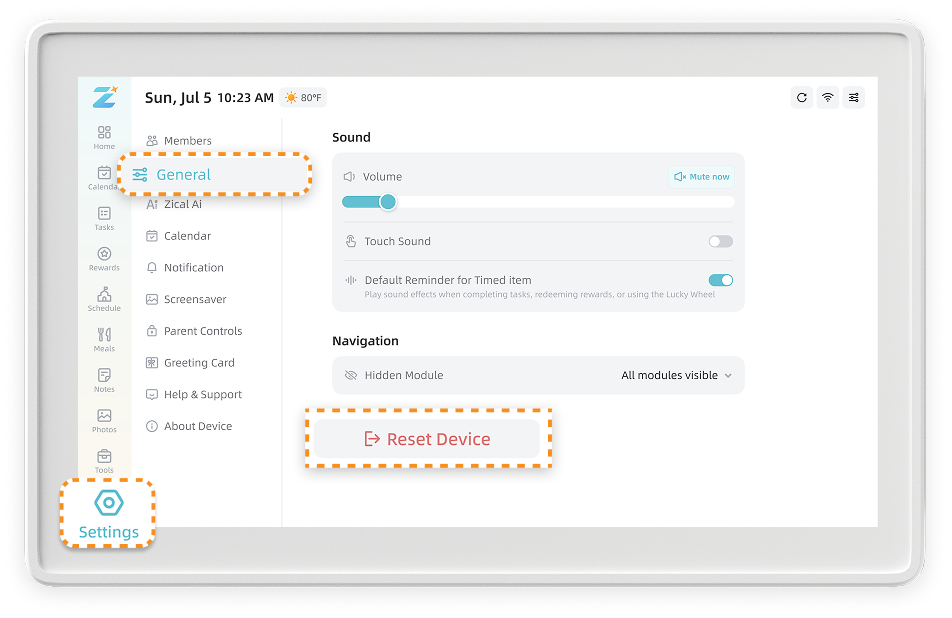
A home display can show one Zical calendar at a time. To show a different calendar, go to Settings > General > Reset Device on the home display. After the reset, complete the setup again and enter the activation code for the calendar you want to show.
5. Set Up Your Family
Keep your family organized at a glance with a profile and color for each person.
5.1 Add or Delete Members
Member profiles are managed separately for each Zical calendar.
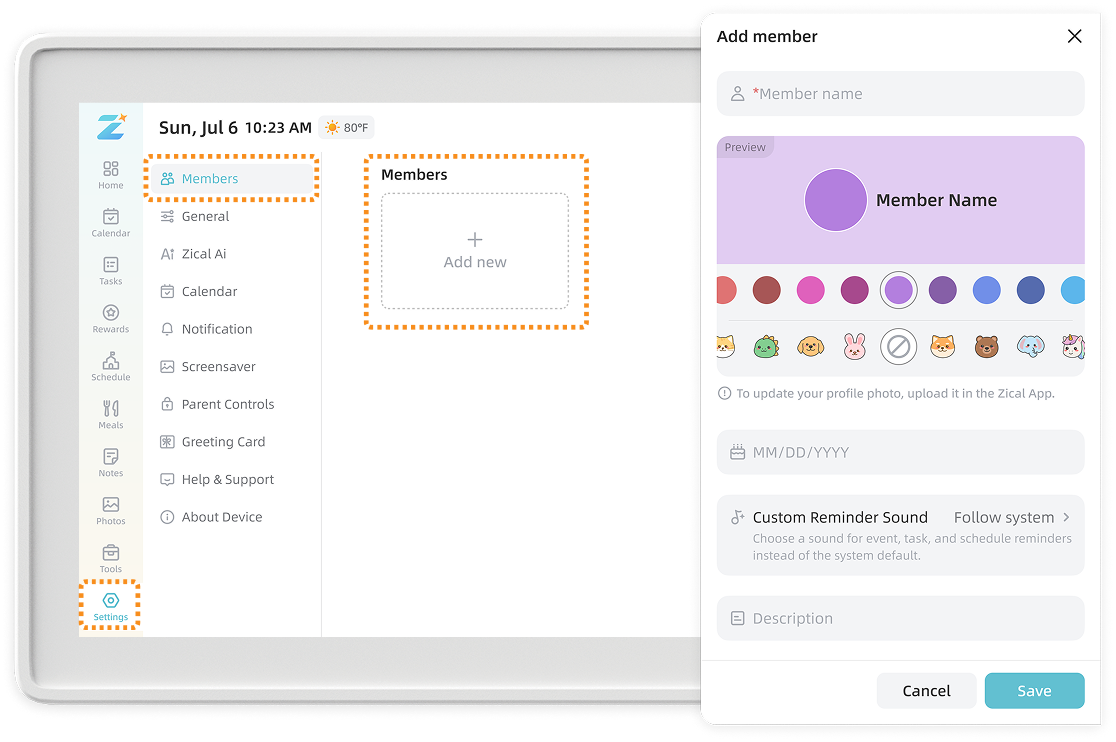
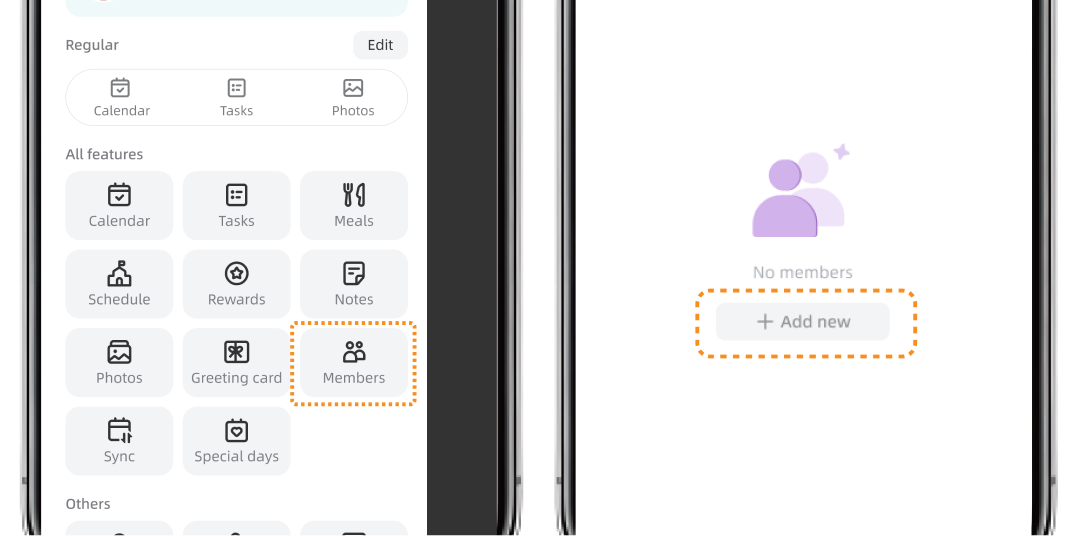
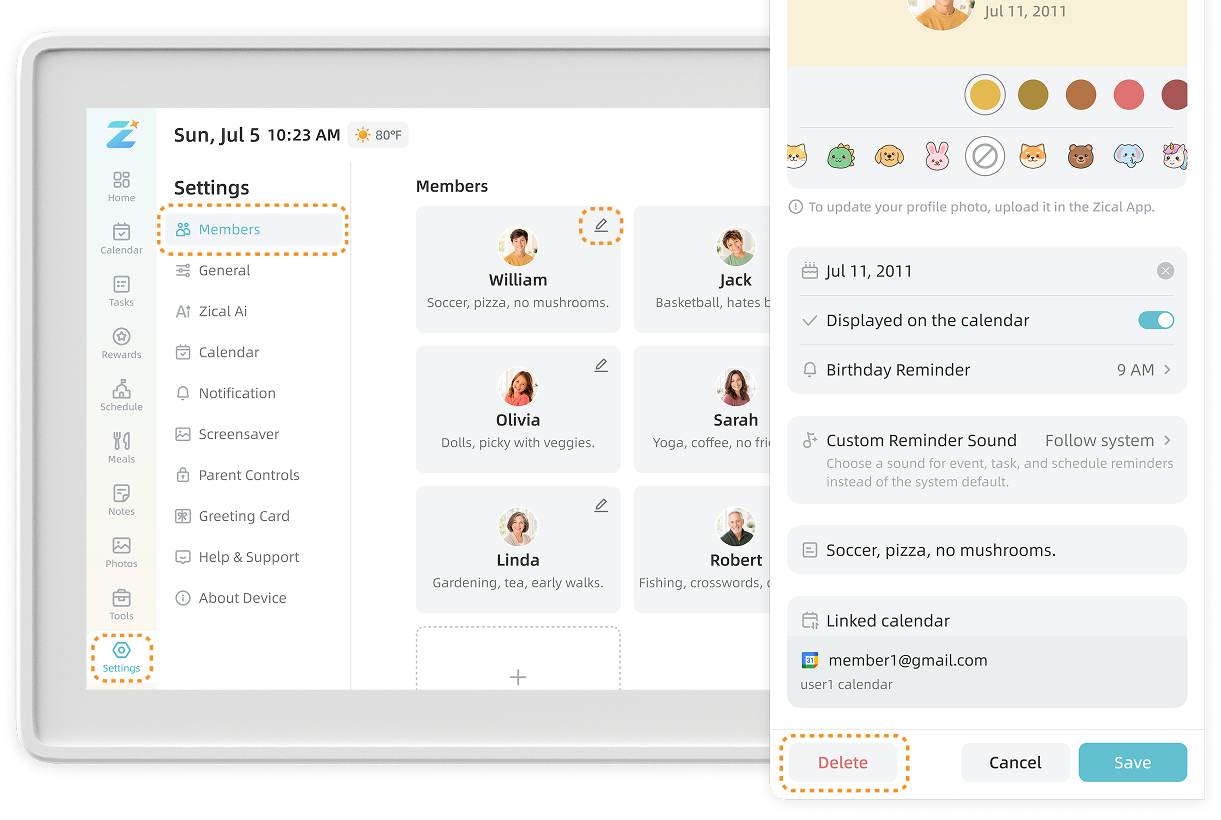
On the home display, go to Settings > Members. In the Zical App, first switch to the calendar you want to manage, then open the side navigation and tap “Members”.
Add a Member:
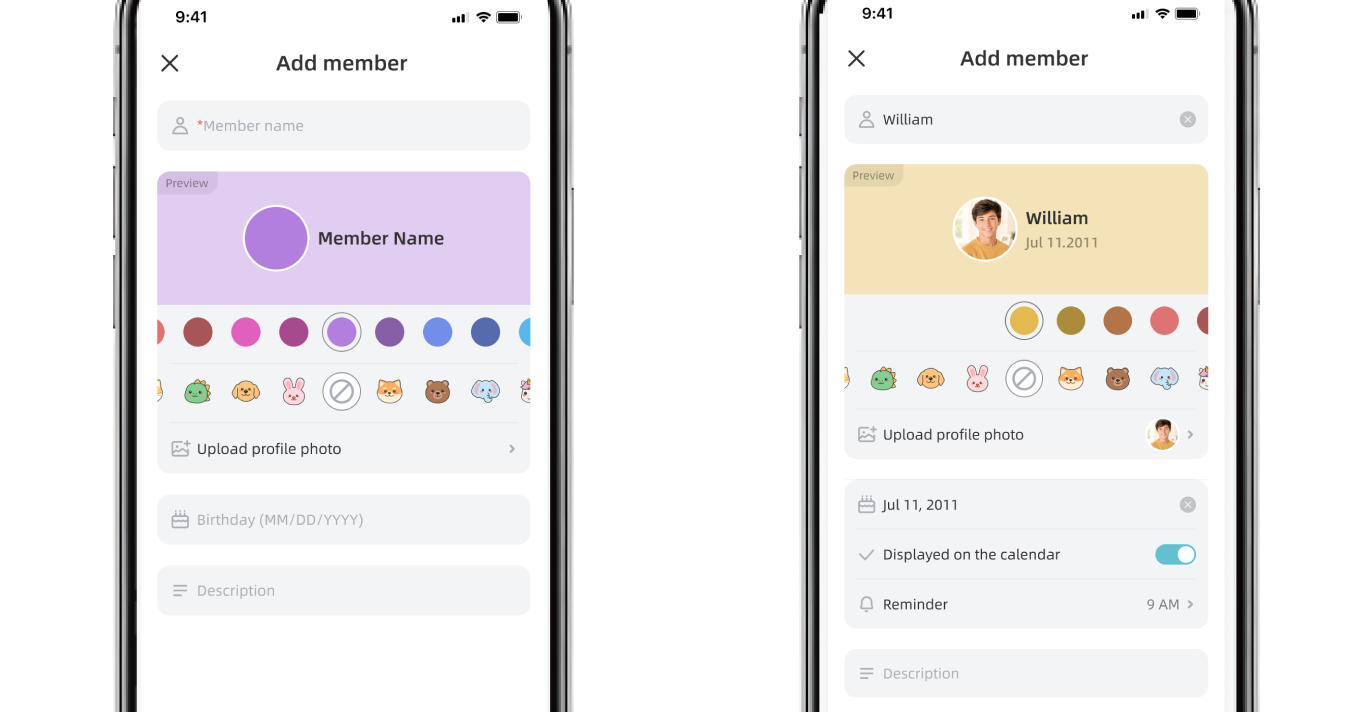
Tap “Add New”, enter the Member's name, and choose a color. You can also add a birthday, description, or avatar.
Note: Custom Member avatars can be uploaded only through the Zical App.
Delete a Member:
Select the Member, tap “Delete”, then confirm.
Note: If the Member is linked to a third-party calendar, open the side navigation in the Zical App, tap “Sync,” select the corresponding third-party calendar, and remove the link. Then return to “Members,” select the Member, tap “Delete” and confirm.
5.2 Use Member Colors
Each Member has a color that appears on events, tasks, and other content assigned to them. This helps your family see who each item belongs to at a glance.
If an event is assigned to multiple Members, their colors appear together to show that the event is shared.
To change a Member's color, go to Settings > Members, select the Member, choose a new color, then save your changes.
5.3 Add Birthdays and Set Reminders
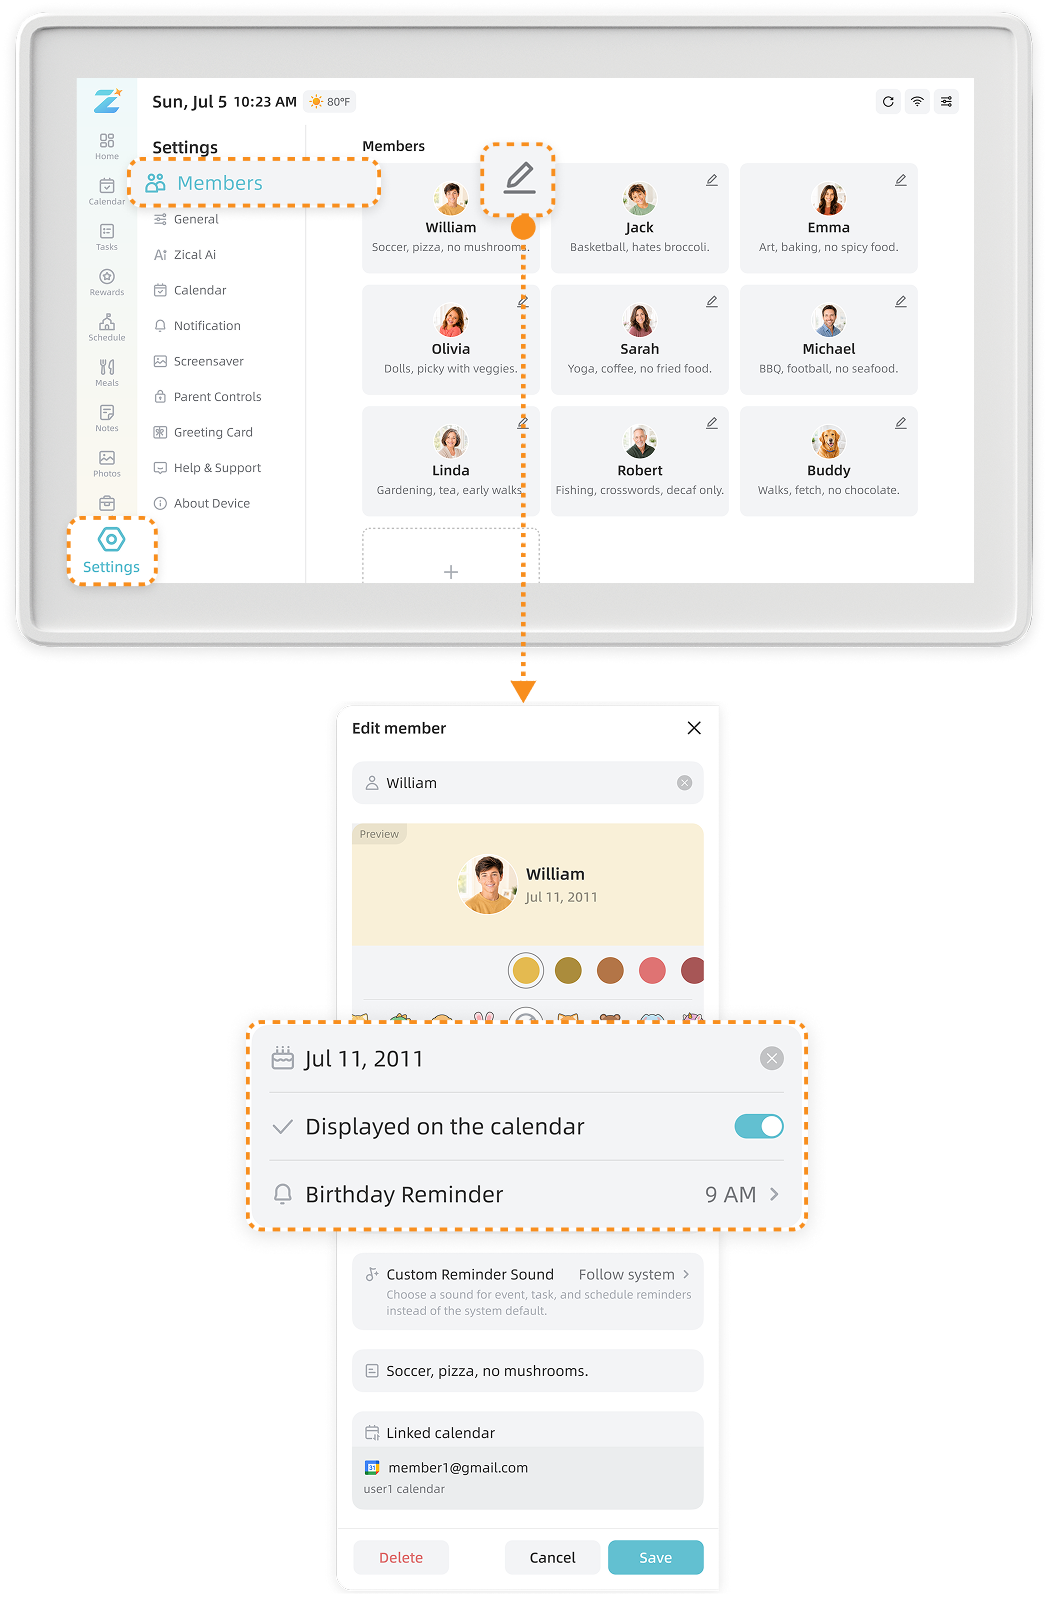
Go to Settings > Members and select a Member.
Add their birthday and turn on Birthday Reminder. Zical automatically adds the birthday to the calendar each year and reminds you at the time you choose.
6. Sync External Calendars
Connect your work, school, and personal calendars so your family can see everything in one place.
6.1 Supported Calendar Services
You can connect the following calendars in the Zical App:
Google Calendar — one-way or two-way sync
Outlook Calendar — one-way or two-way sync
iCloud Calendar — one-way or two-way sync
Cozi Calendar — one-way sync
TeamSnap Calendar — one-way sync
Calendar links (ICS) and other subscription calendars Holiday calendars
Note: All calendar connections are managed in the Zical App.
6.2 Sync Google Calendar
In the Zical App, open the side navigation and tap “Sync.” Tap “+” to sync a new calendar, then select “Google”.
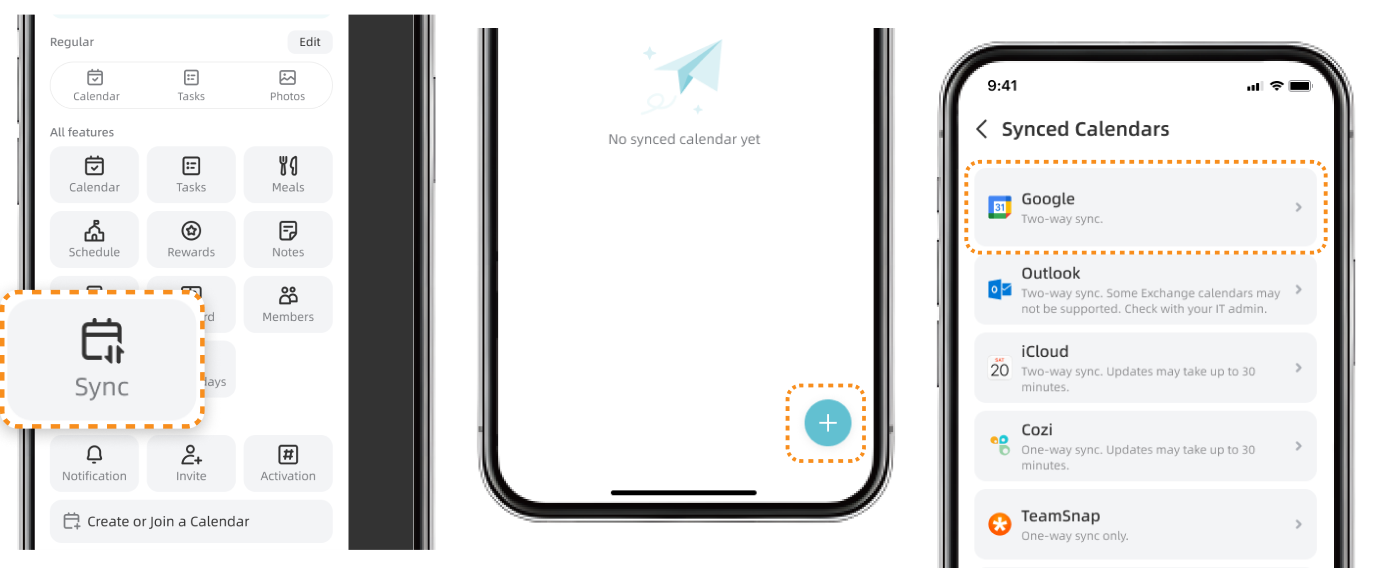
① Choose a sync type:
One-Way Sync: Google events appear in Zical, but they can only be added, edited, or deleted in Google Calendar.
Two-Way Sync: Supported changes sync between Zical and Google Calendar
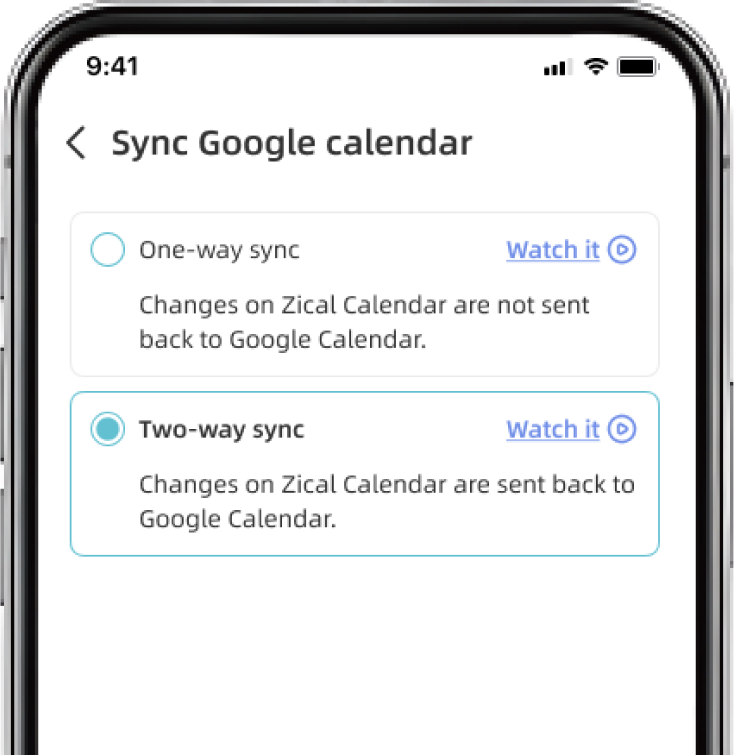
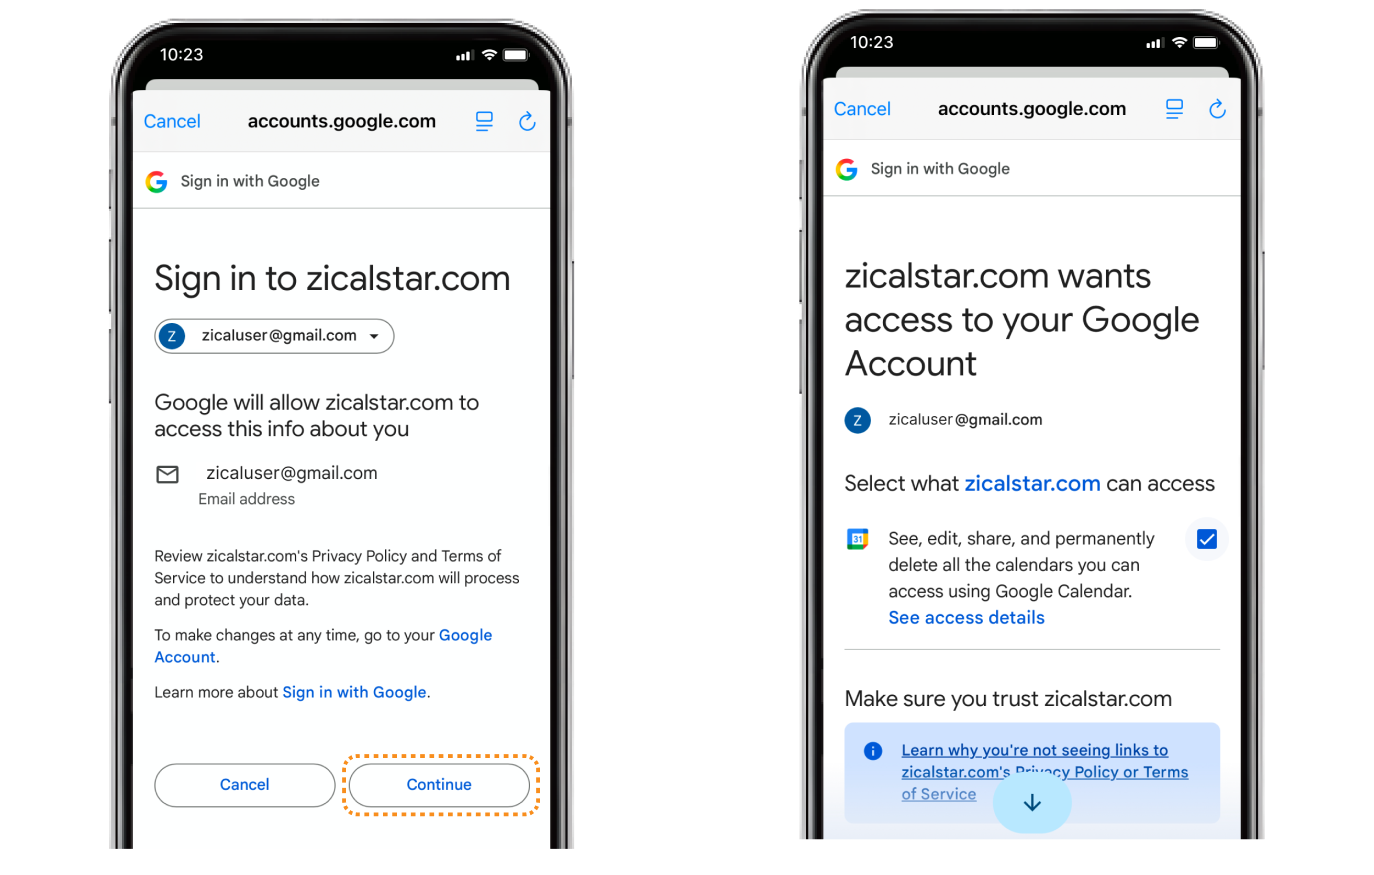
② On the Google sign-in page, select or enter the Google Account you want to connect, then sign in.
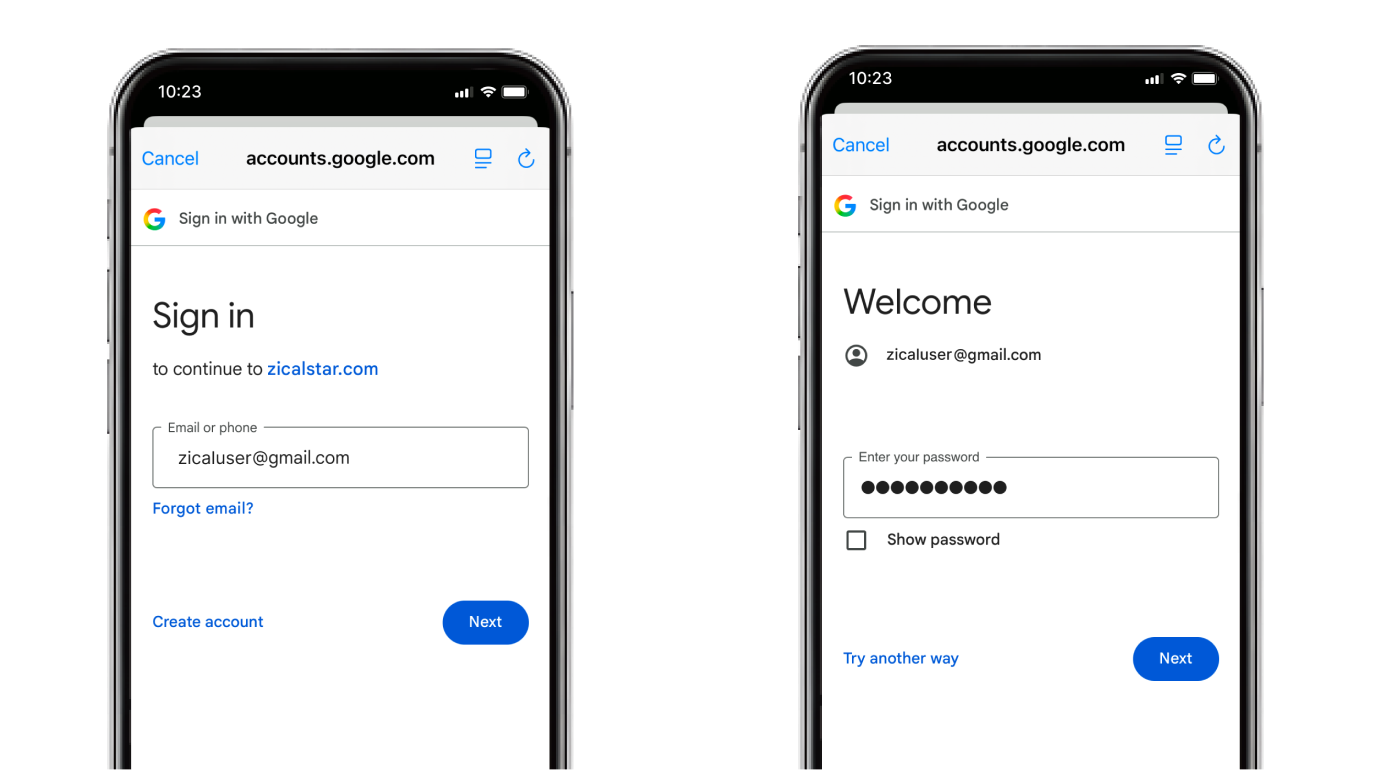
③ Review the requested permissions. Tap “Allow” for each permission, then tap “Continue”.
Note: Zical cannot load your Google calendars unless calendar access is allowed.
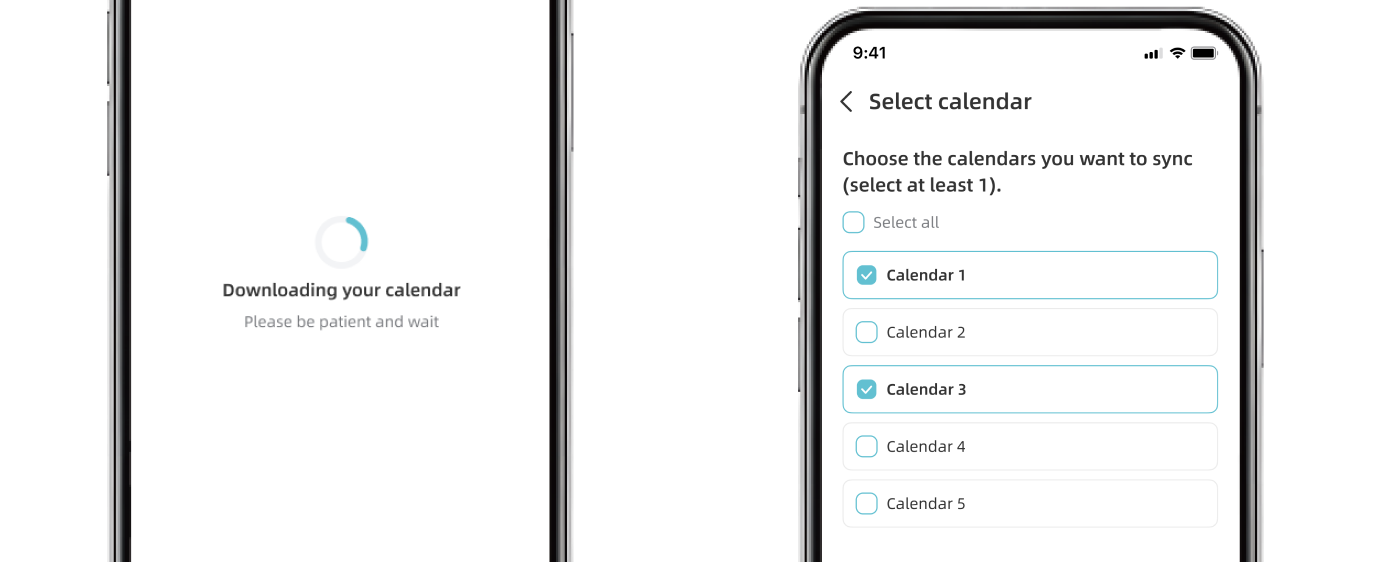
④ Wait for your Google calendars to load.
⑤ Select the calendars you want to sync.
⑥ Assign each selected calendar to a Member, then tap “Sync”.
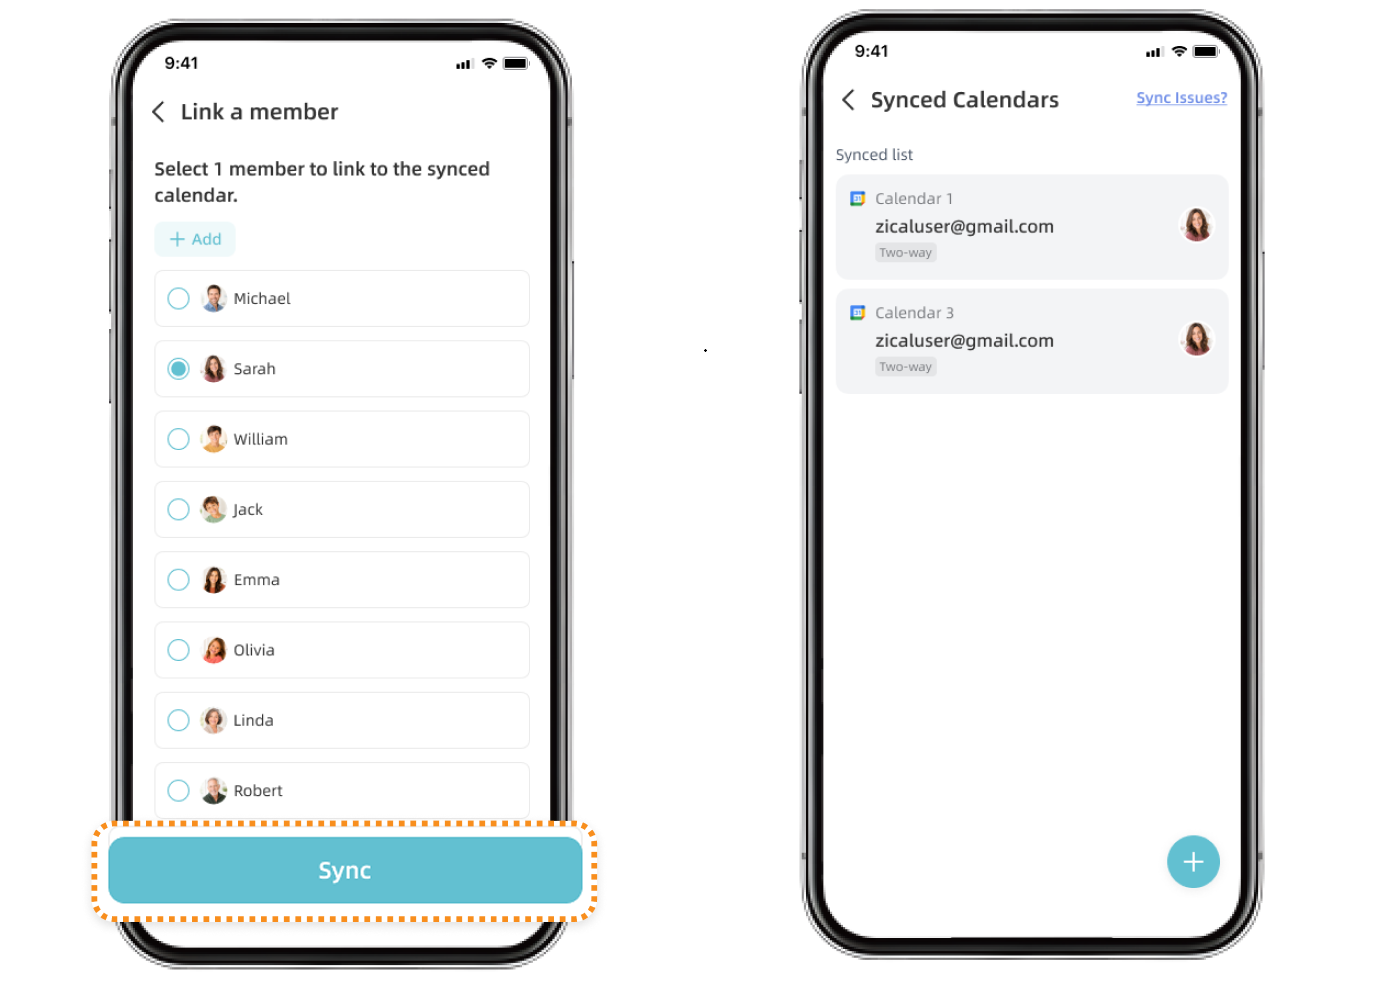
To create an event in a two-way synced Google calendar from Zical, turn on “Synced Calendar” when creating the event, then select the Google calendar you want to use.
6.3 Sync iCloud Calendar
In the Zical App, open the side navigation and tap “Sync” Tap “+” to sync a new calendar, then select “iCloud” Choose “Two-Way Sync” or “OneWay Sync” then follow the corresponding steps below.
Two-Way Sync
Select “Two-Way Sync” then follow the three setup stages shown in the Zical App.
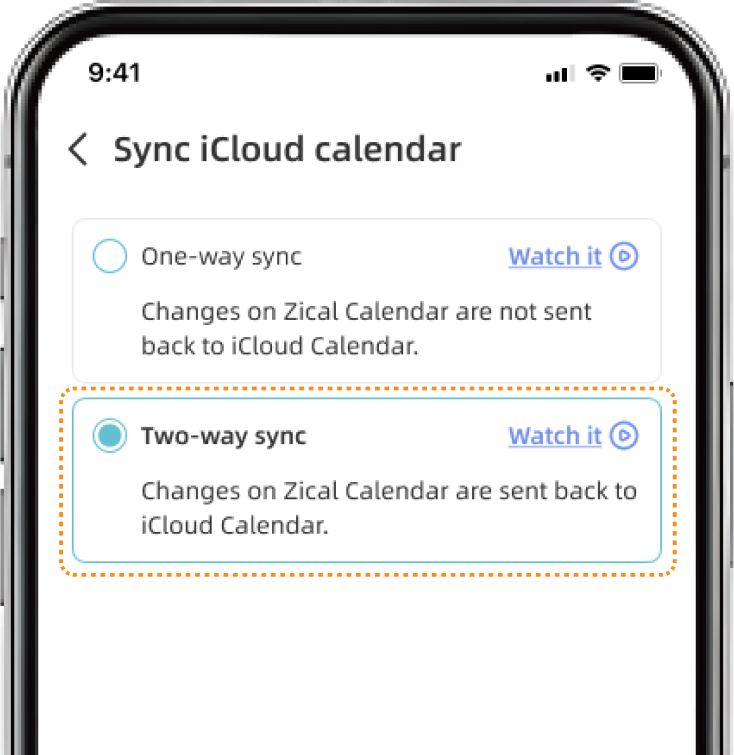
Stage 1 of 3: Turn On Two-Factor Authentication
① Open the Settings app on your iPhone or iPad.
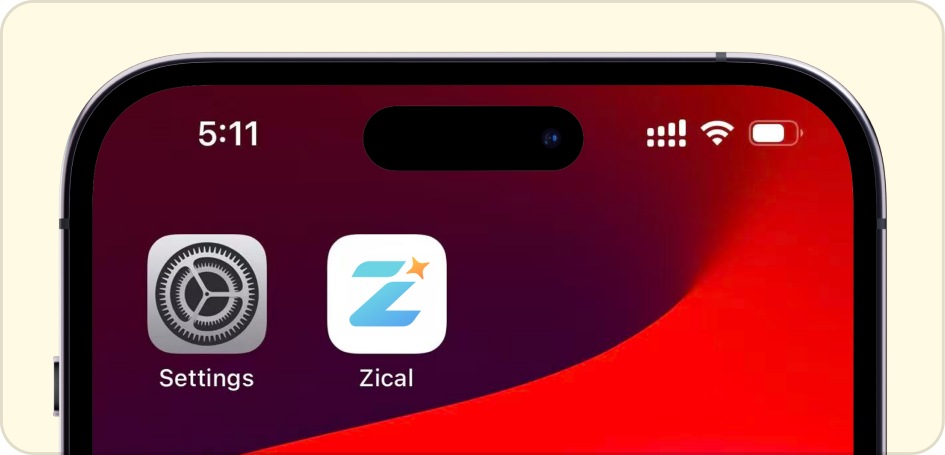
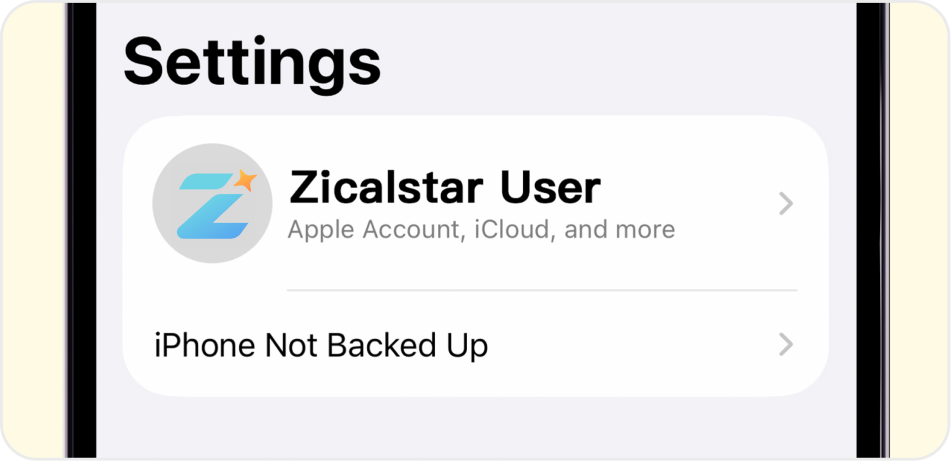
② Tap your Apple Account at the top of the Settings page.
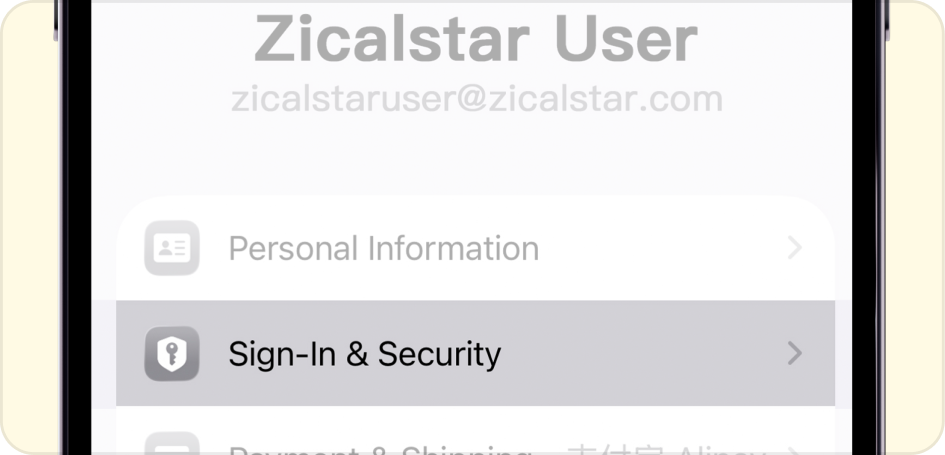
③ Tap “Sign-In & Security”.
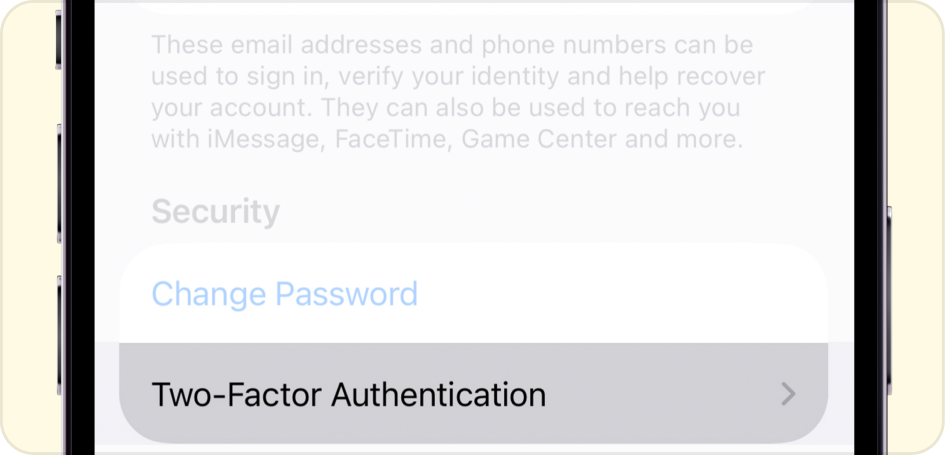
④ Tap“Two-Factor Authentication”.
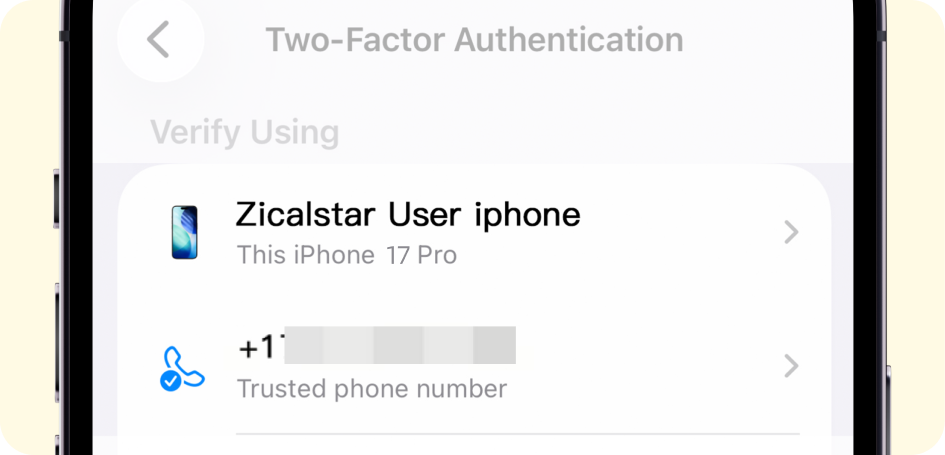
⑤ Under VERIFY USING, make sure at least one trusted device or phone number is listed.
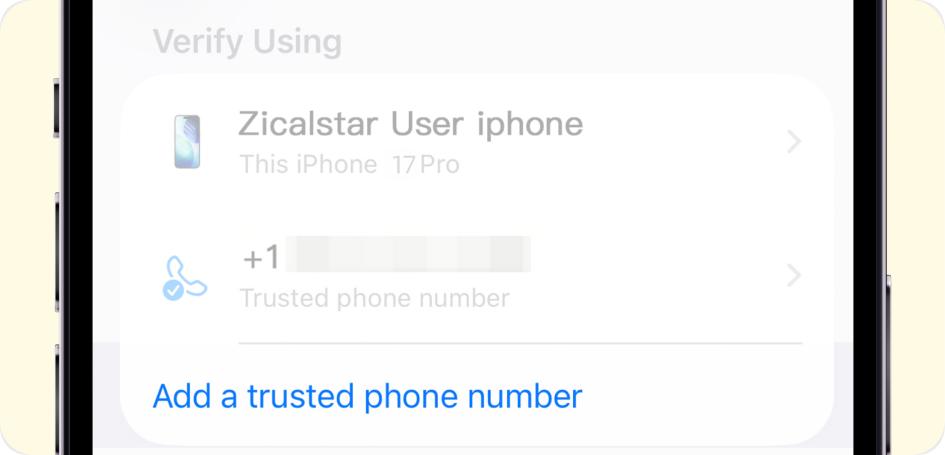
⑥ If none are listed, tap “Add a Trusted Phone Number” and follow the on-screen instructions.
Stage 2 of 3: Create an App-Specific Password
Tip: Complete the following steps on an iPad or computer.
① Sign in to [account.apple.com](account.apple.com) using your Apple Account password.
Note: Sign in with your Apple Account password, not Face ID. If you use Face ID, Apple may ask you to sign in again before you can generate an app-specific password.
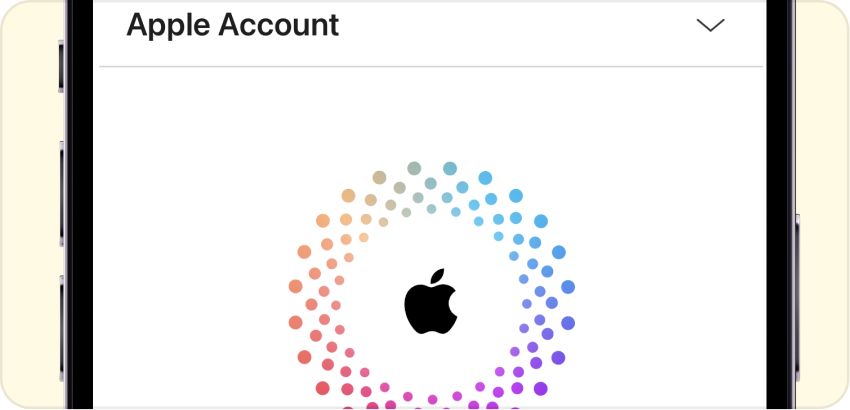
② Scroll down and select “App-Specific Passwords”.
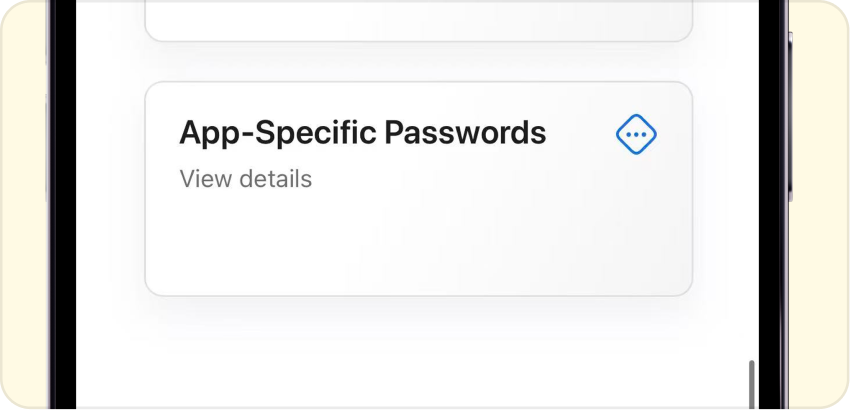
③ Tap the “+” icon or select “Generate an app-specific password”.
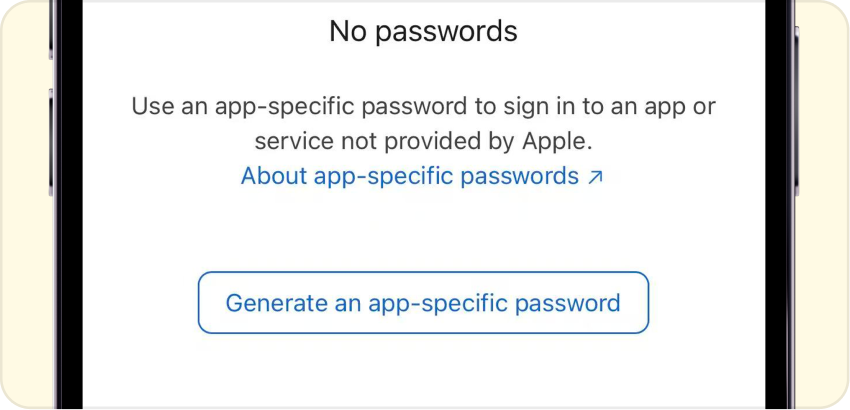
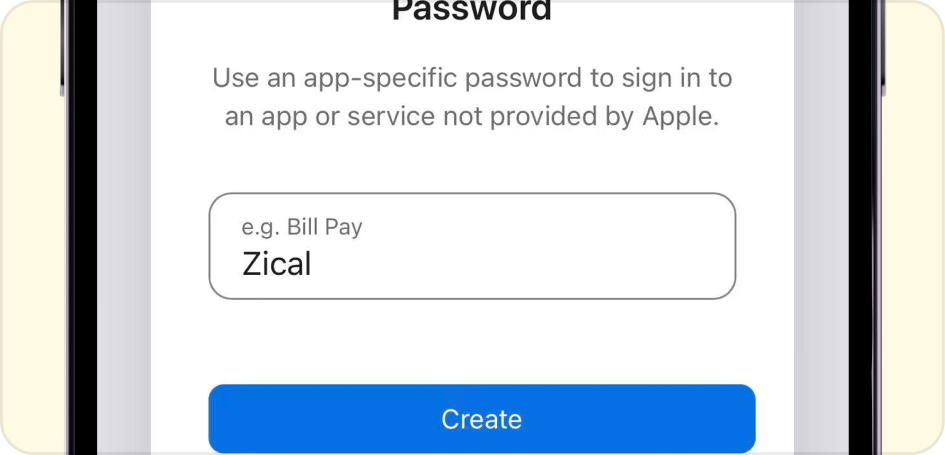
④ Enter “Zical” as the password label, then select “Create”.
Important: Enter “Zical” exactly as shown. If you use a different label, the generated app-specific password will not work with Zical.
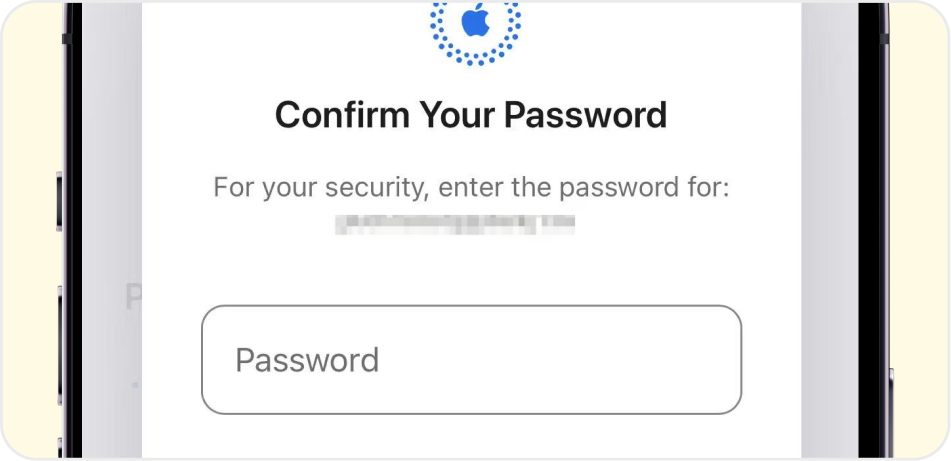
⑤ Enter your Apple Account password to confirm.
⑥ Press and hold the generated app-specific password, then tap “Copy”. When finished, return to the Zical App and tap “Next”.
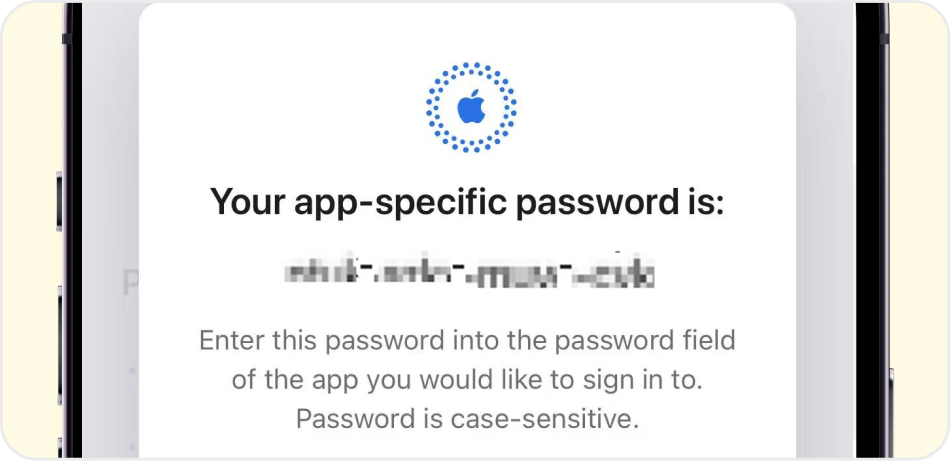
Stage 3 of 3: Connect Your iCloud Calendar
① Enter your Apple Account email address and the Apple App-Specific password you copied, then tap Sign In.
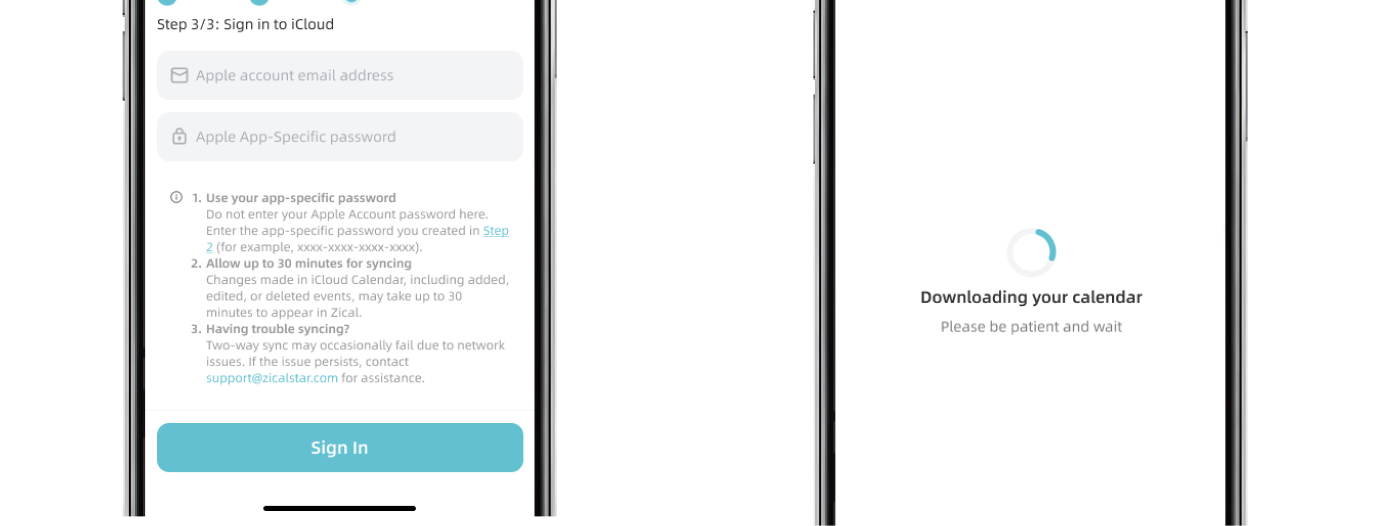
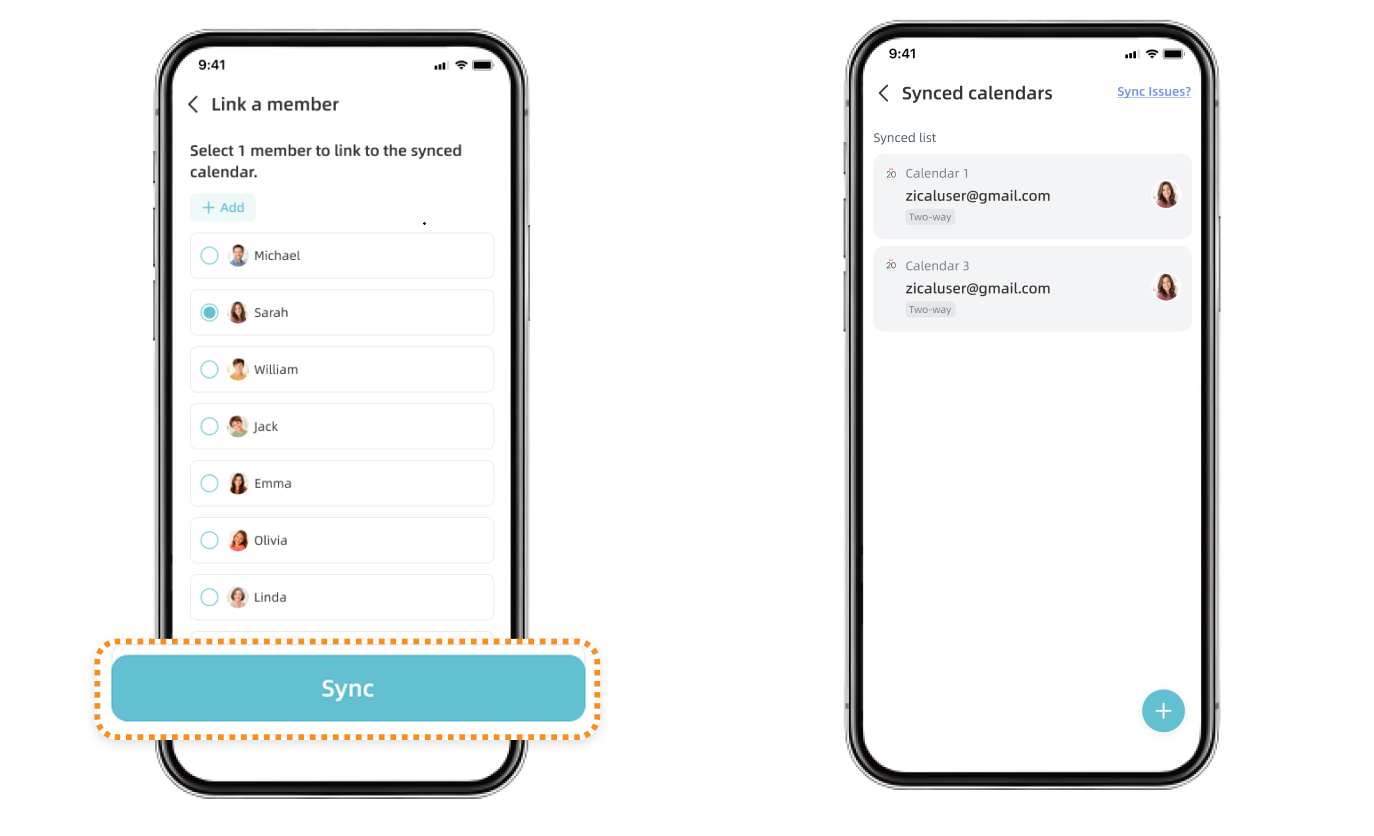
② Select the iCloud calendars you want to sync.
③ Assign each selected calendar to a Member, then tap “Sync”.
Important: Enter the generated app-specific password, usually formatted as xxxx-xxxx-xxxx-xxxx, not your regular Apple Account password.
To create an event in a two-way synced iCloud calendar from Zical, turn on “Synced Calendar” when creating the event, then select the iCloud calendar you want to use.
One-Way Sync with an iCloud Share Link
① Open the Calendar app on your iPhone.
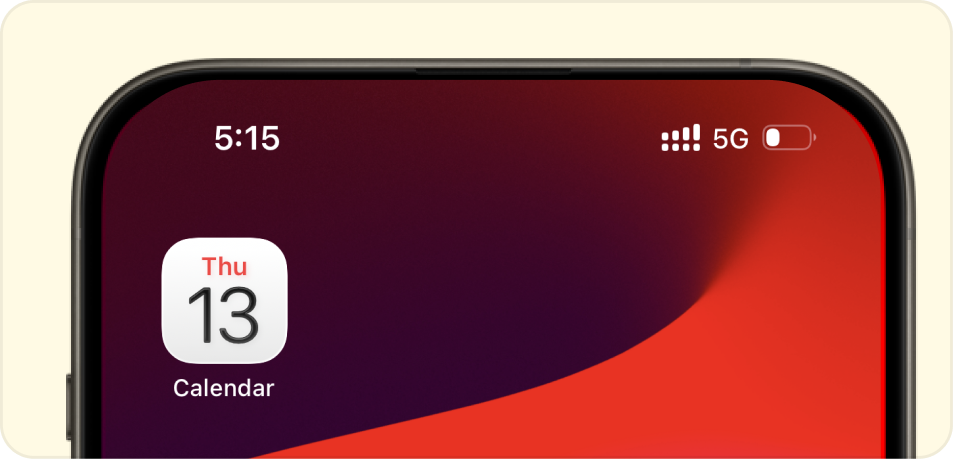
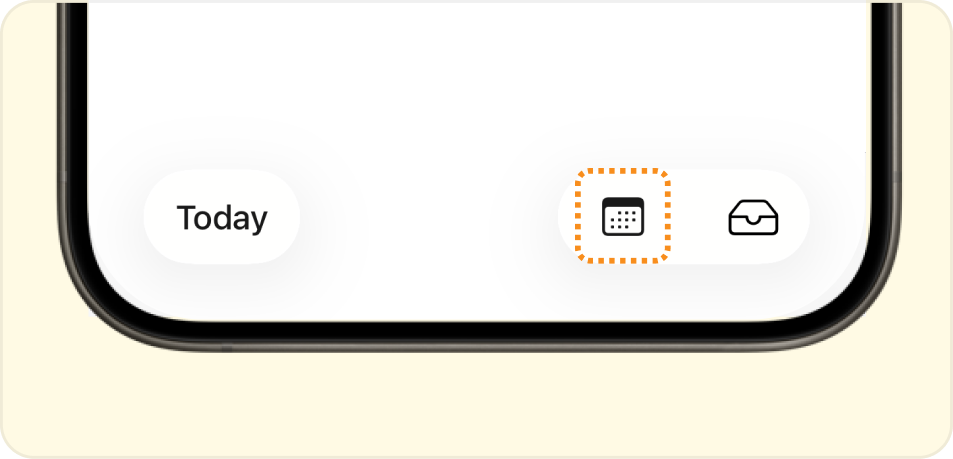
② Open the calendar list. iOS 26 or later:
Tap the Calendar icon in the bottom-right corner.
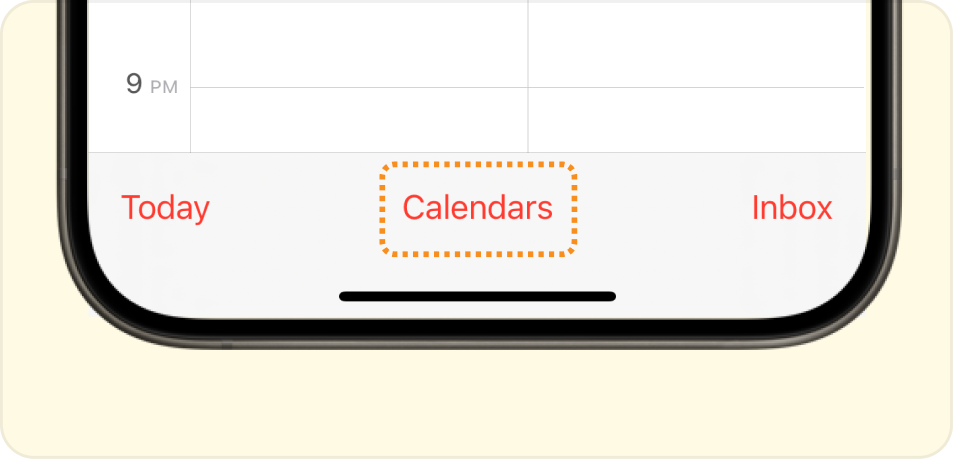
Earlier than iOS 26: Tap“Calendars”at the bottom center of the screen.
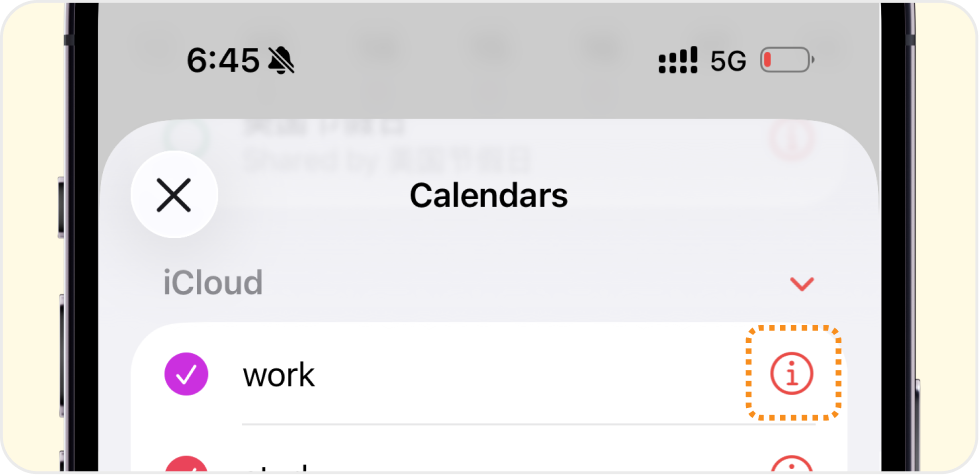
③ Select the calendar you want to sync, then tap the Info button next to it.
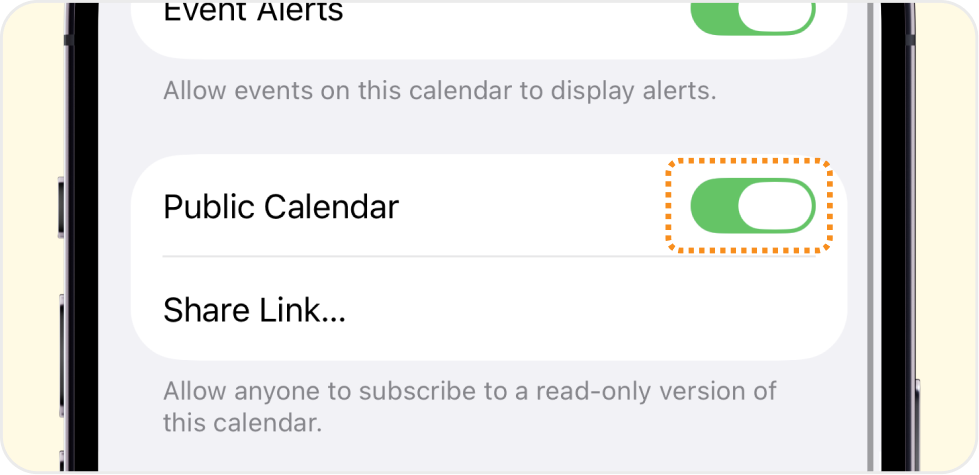
④ Turn on“Public Calendar”.
Note: If you don't see “Public Calendar,” open Settings, tap your name at the top, then go to iCloud > See All > iCloud Calendar and turn on “Use on This iPhone.”
⑤ Tap “Share Link” ,then tap “Copy”.
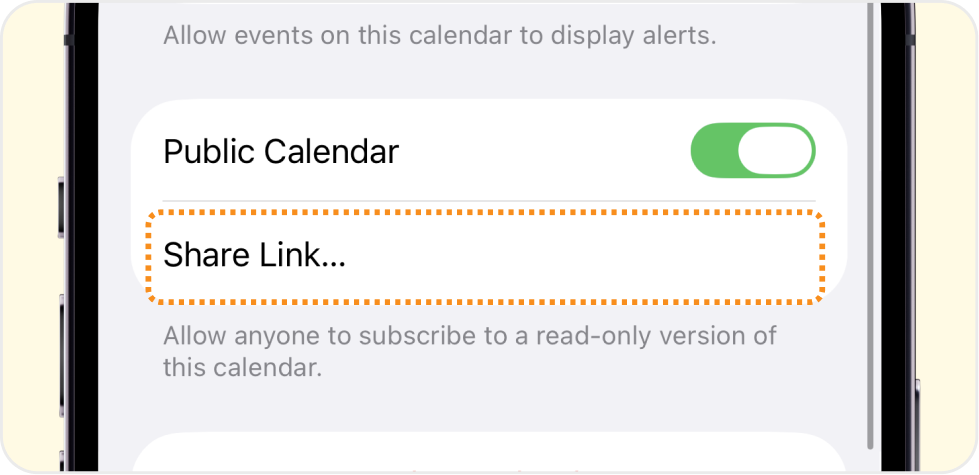
⑥ Return to the Zical App, paste the Share Link, then tap “Sync”.
Notes: One-way synced calendars are read-only in Zical. Add, edit, or delete their events in Apple Calendar. Keep “Public Calendar” turned on. Turning it off will stop future updates from syncing to Zical. Updates from iCloud may take about 30 minutes to appear in Zical. Each Share Link connects only one iCloud calendar to Zical. Repeat these steps for each calendar you want to add. Events from the previous 90 days and future events are imported, up to a total of 5,000 events.
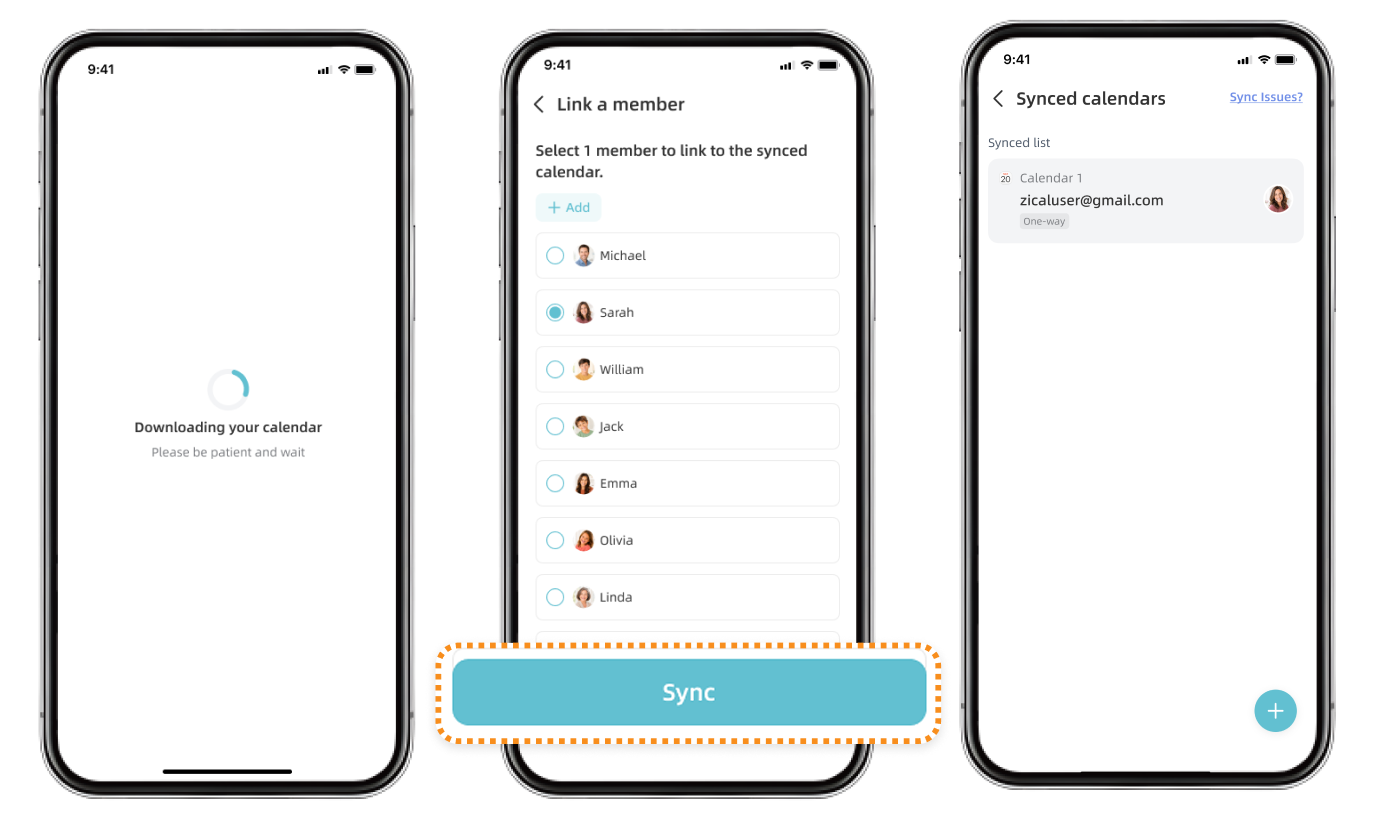
6.4 Sync Outlook Calendar
In the Zical App, open the side navigation and tap “Sync”. Tap “+” to sync a new calendar, then select “Outlook”.
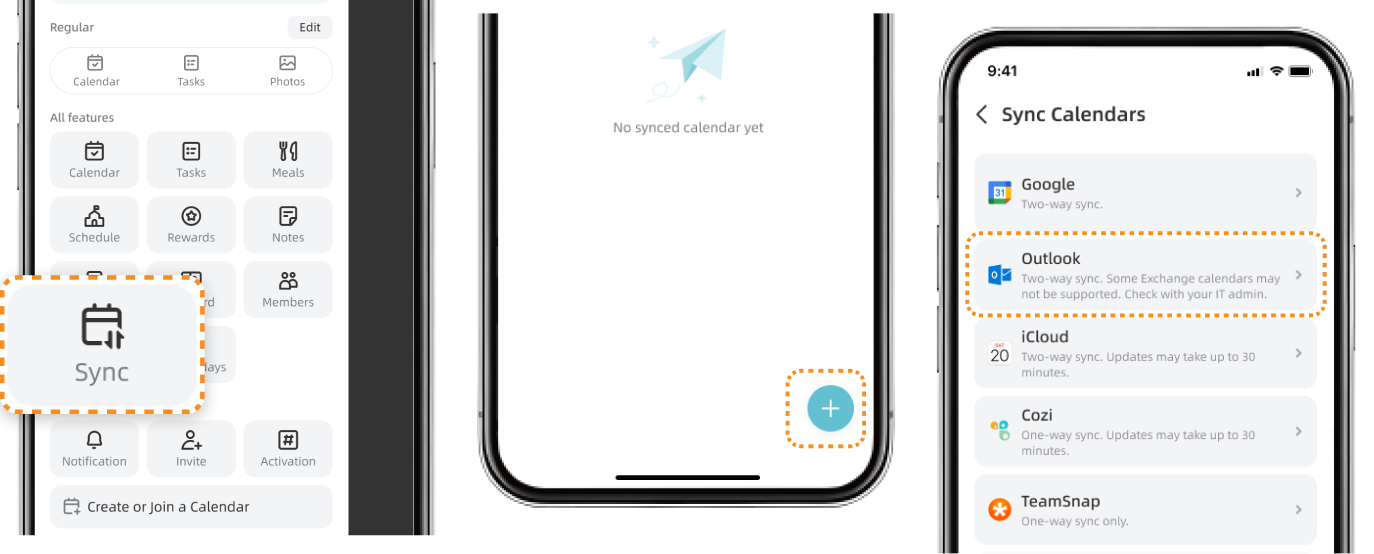
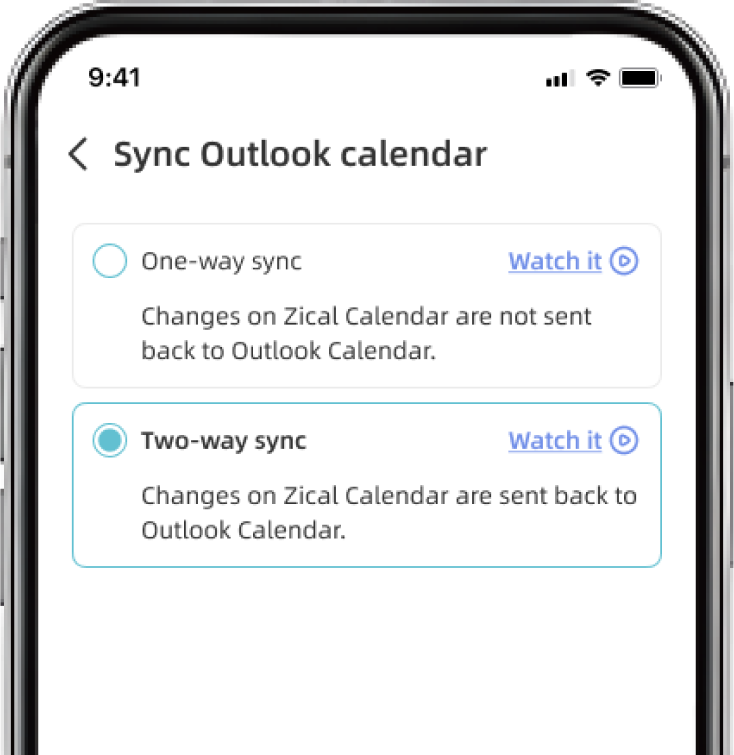
① Choose a sync type:
One-Way Sync: Outlook events appear in Zical, but they can only be added, edited, or deleted in Outlook Calendar.
Two-Way Sync: Supported changes sync between Zical and Outlook Calendar.
② On the Microsoft sign-in page, select or enter the Microsoft account connected to your Outlook calendar, then sign in and follow the on screen instructions.
③ Wait for your Outlook calendars to load.
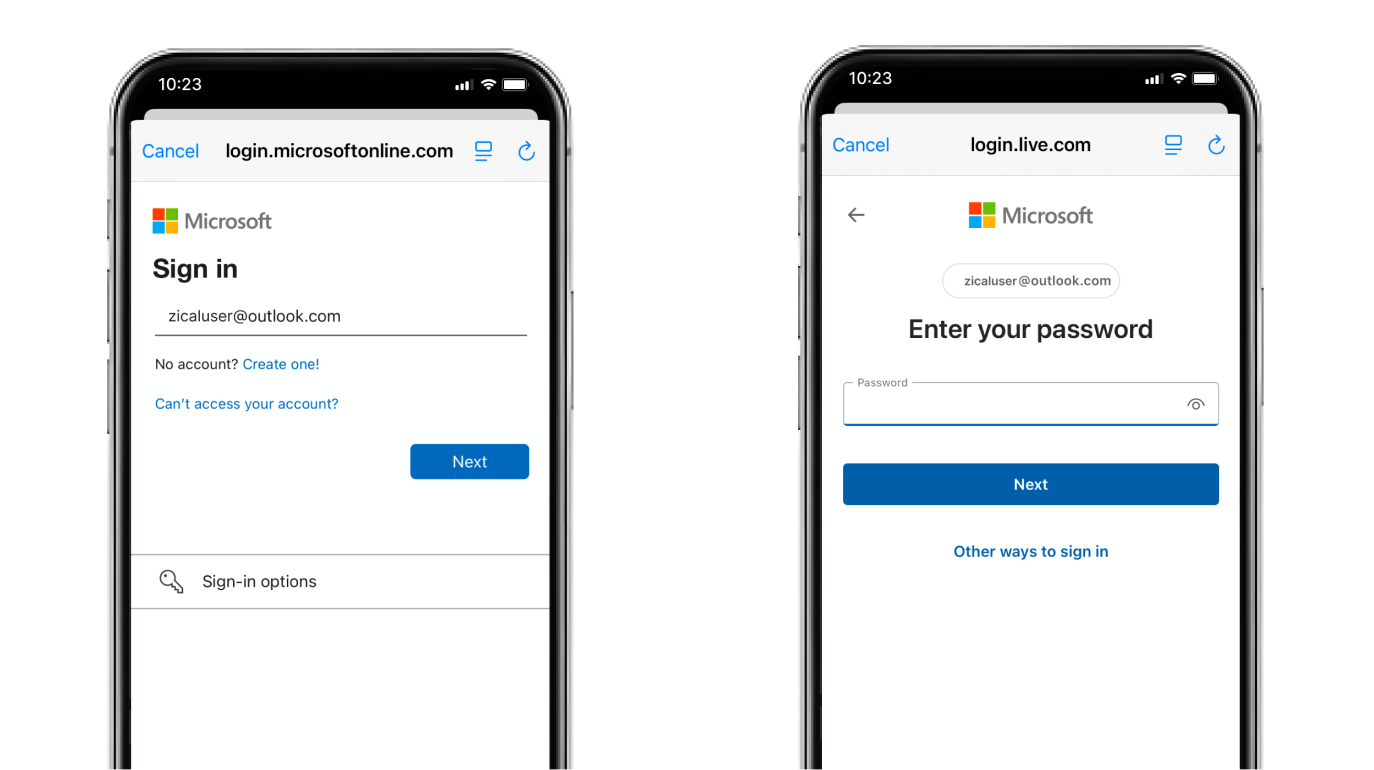
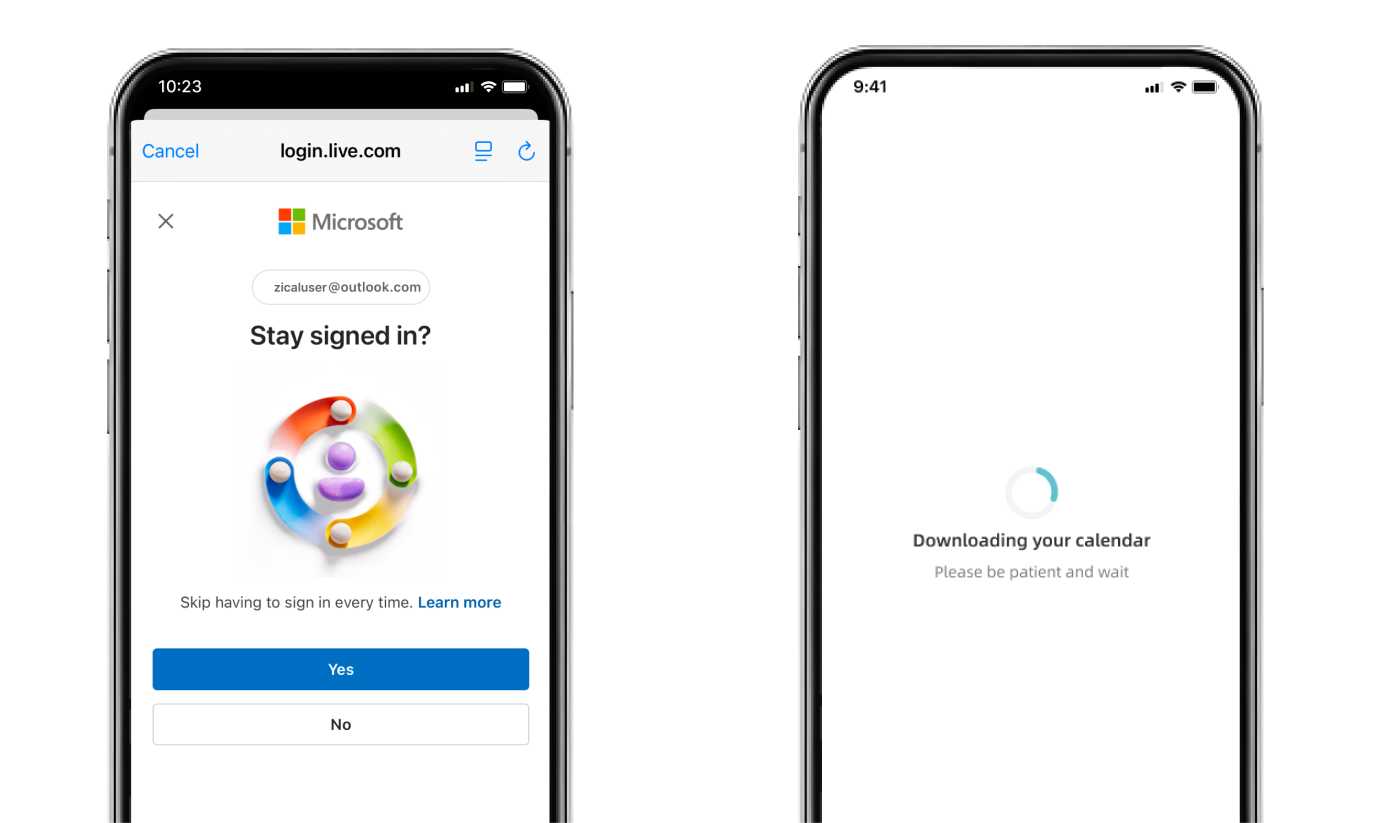
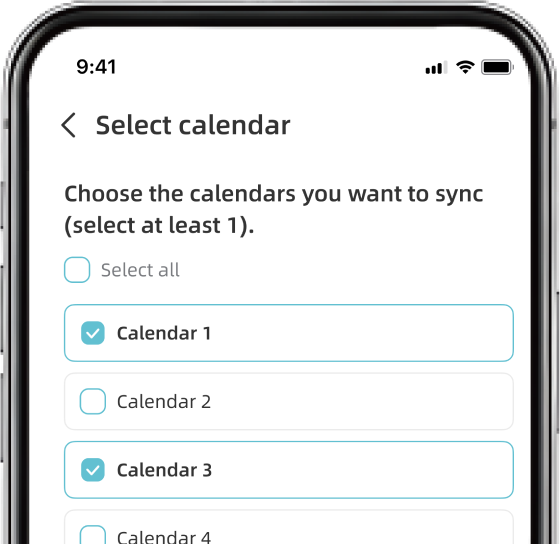
④ Select the calendars you want to sync.
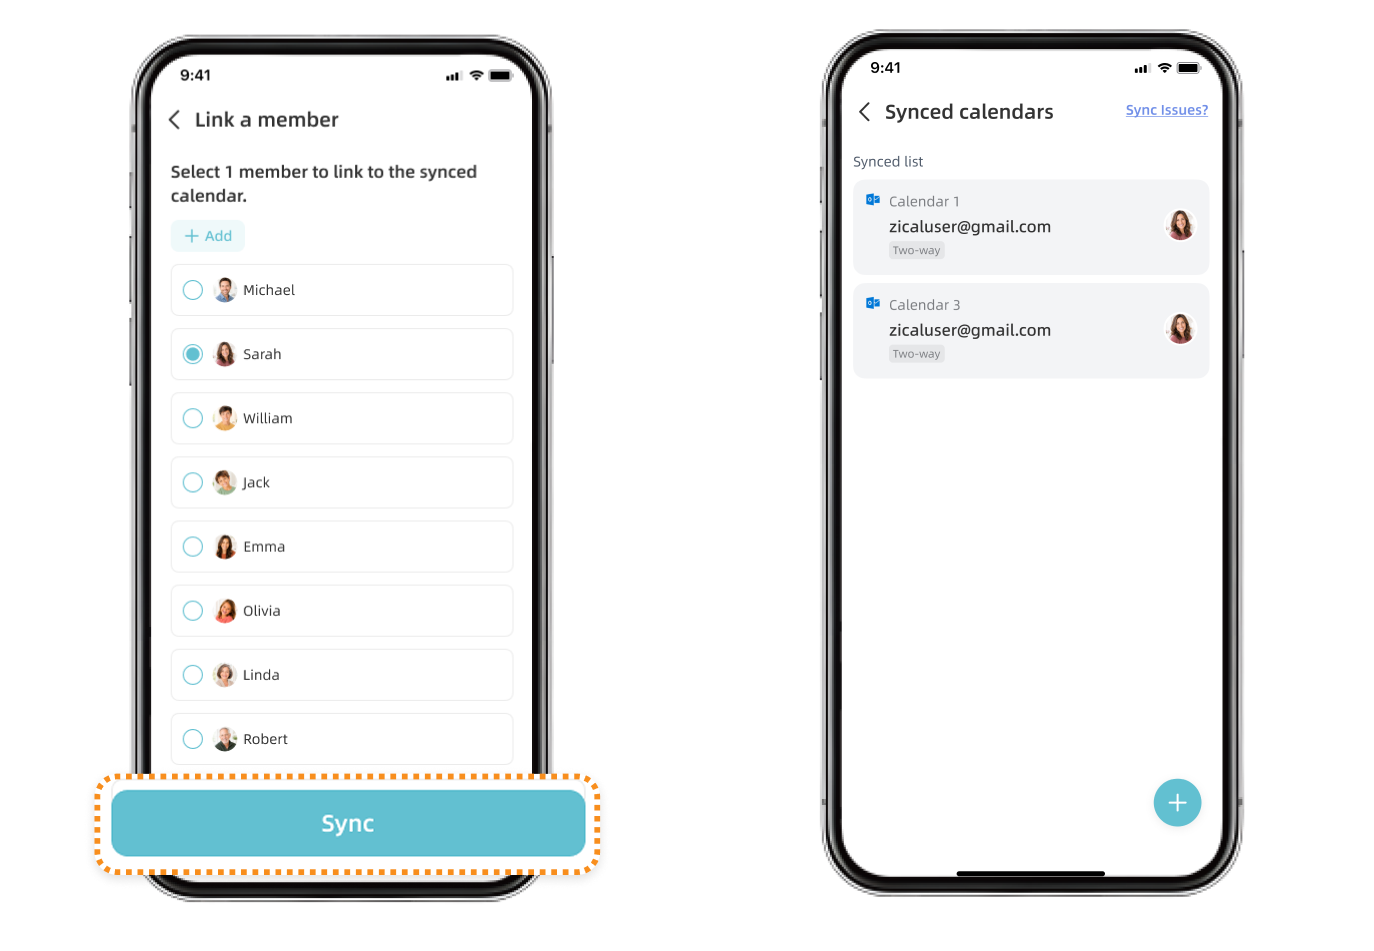
⑤ Assign each selected calendar to a Member, then tap “Sync”. To create an event in a two-way synced Outlook calendar from Zical, turn on “Synced Calendar” when creating the event, then select the Outlook calendar you want to use.
Note: Your organization may restrict access to work or school accounts. If you see “Need admin approval,” contact your IT administrator for access. If an ICS link is available for the calendar, you can use it for one-way sync instead.
6.5 Sync Cozi, TeamSnap, or Other Calendars
Cozi, TeamSnap, and many other calendars can be connected to Zical using a calendar subscription link, also called an ICS link.
In the Zical App, open the side navigation and tap “Sync”, Tap “+” to sync a new calendar, then select your calendar service or “Calendar URL / ICS”.
① Follow the on-screen instructions to find and copy the ICS subscription link from your calendar service. The steps vary by service.
② Paste the ICS link into the Zical App when prompted.
③ Assign the calendar to a Member, then tap “Sync”.
Notes: ICS calendars use one-way sync and are view-only in Zical. Add, edit, or delete their events in the original calendar service. Updates may take about 30 minutes to appear in Zical. Each ICS link connects only one calendar. Repeat these steps for every calendar you want to add. ICS imports include events from the previous 90 days and future events, up to a total of 5,000 events.
6.6 Add a Holiday Calendar
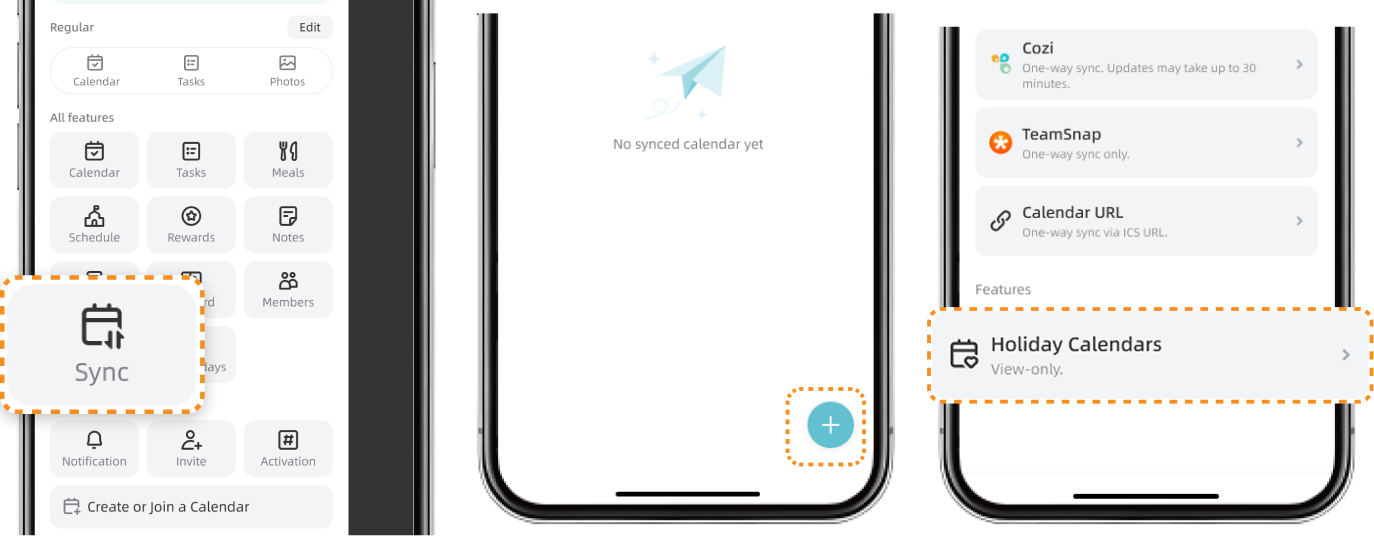
In the Zical App, open the side navigation and tap “Sync”. Tap “+” to sync a new calendar, then select “Holiday Calendars”.
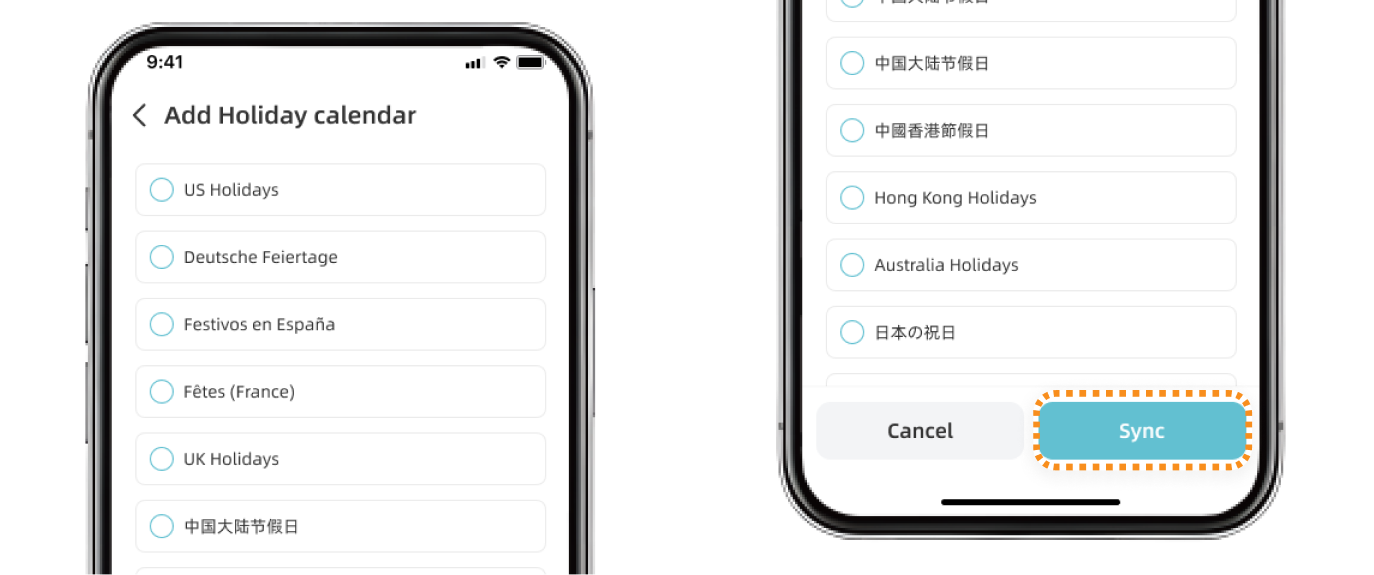
① Select the holiday calendar you want to add.
② Tap “Sync”.
Note: When you add a holiday calendar, Zical automatically creates a corresponding Member profile. The Member's color is used to identify events from that holiday calendar.
6.7 Remove a Synced Calendar
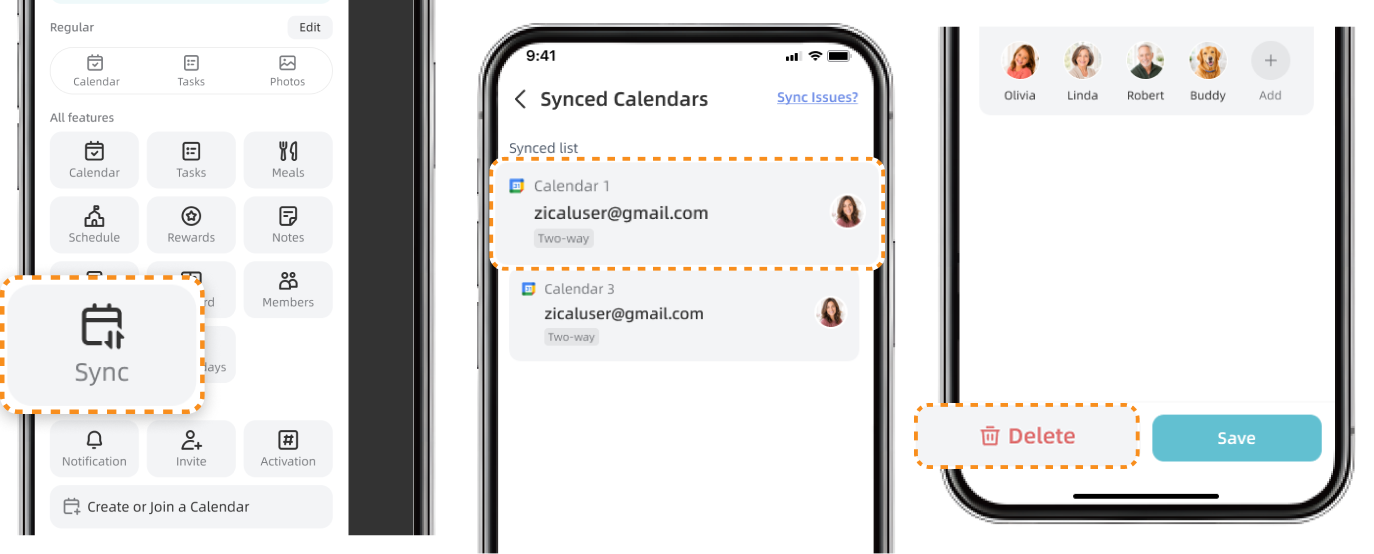
In the Zical App, open the side navigation and tap “Sync”.
① Select the connected calendar you want to remove.
② Tap “Delete”.
Note: Removing the connection stops the calendar and its events from appearing in Zical. It does not delete the original calendar or its events from the calendar service.
6.8 Troubleshoot Calendar Sync
A calendar is empty or missing events
Make sure you connected the correct calendar account and selected every calendar you want to show. Some accounts contain several separate calendars. For iCloud ICS sync, each calendar requires its own share link.
An ICS link cannot be added
Make sure the address is a valid ICS subscription link and that the original calendar has been shared correctly.
Events are not appearing in Zical
Check the selected calendar, Member filters, calendar filters, and network connection. Refresh the affected screen and allow time for the events to sync.
The calendar connection has expired
Reconnect the calendar account, complete the authorization process again, and reselect the calendars you want to sync. If the issue continues, contact Zicalstar Support. Include the calendar service, sync direction, affected calendar, and an example event that did not sync.
7. Core Features
Keep your family organized and connected with Zical's everyday features.
7.1 Home (Display Only)
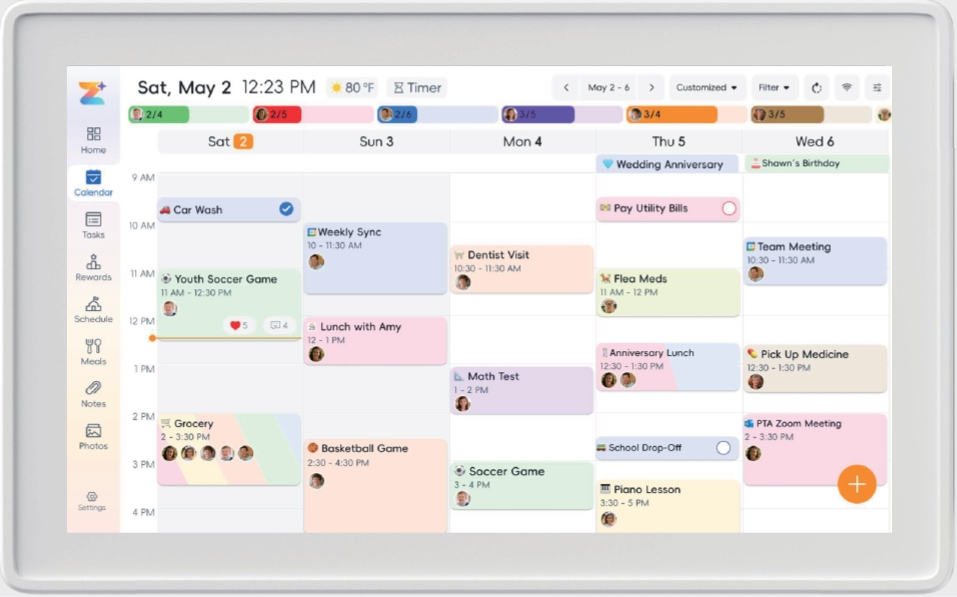
See your family's events, tasks, meals, notes, rewards, photos, weather, special days, and more together on the Home screen. Use it for a quick look at the day ahead.
7.1.1 Customize Home Widgets
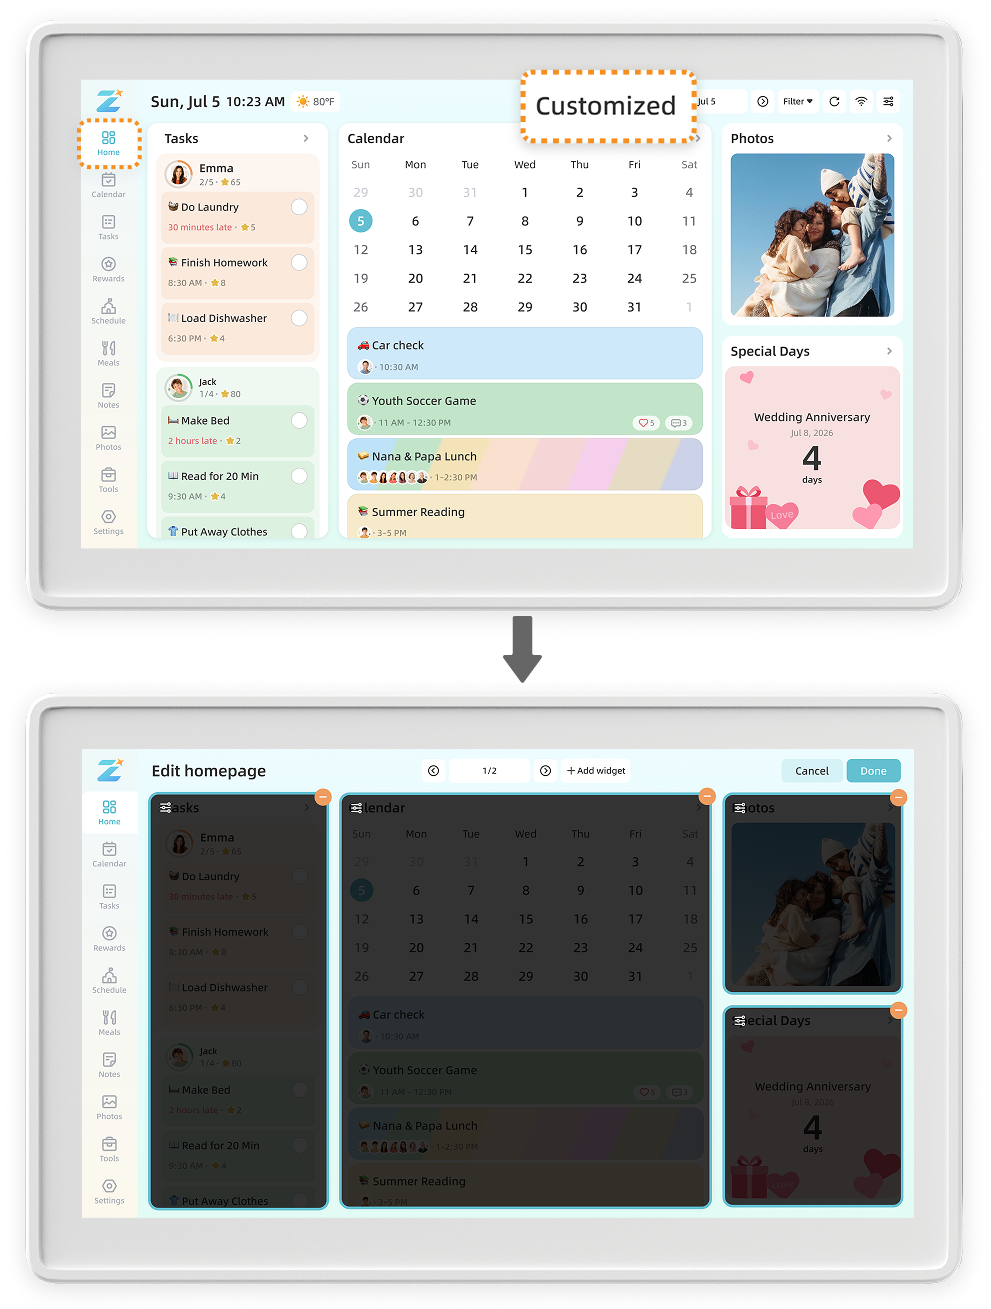
Customize the Home screen
Tap Customize on the Home screen to enter edit mode. Changes are not saved until you finish editing and confirm the new layout.
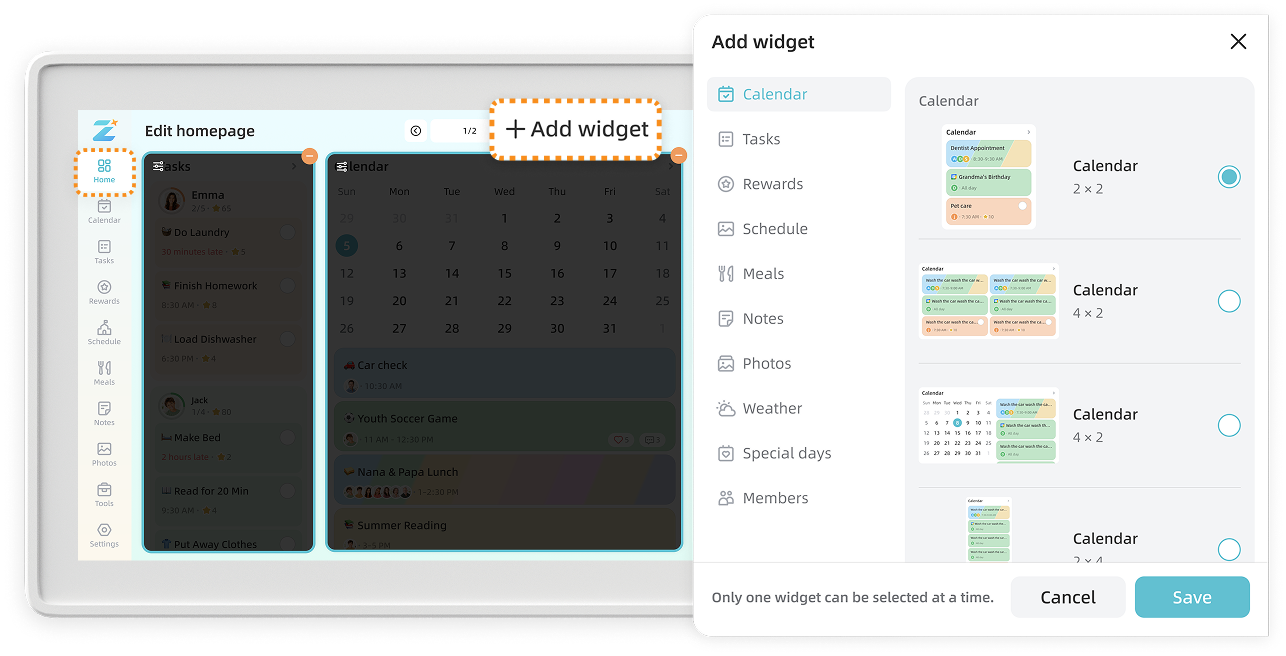
Add a widget
Tap Add Widget, choose a widget type and style, then place it in an available space on the Home screen.
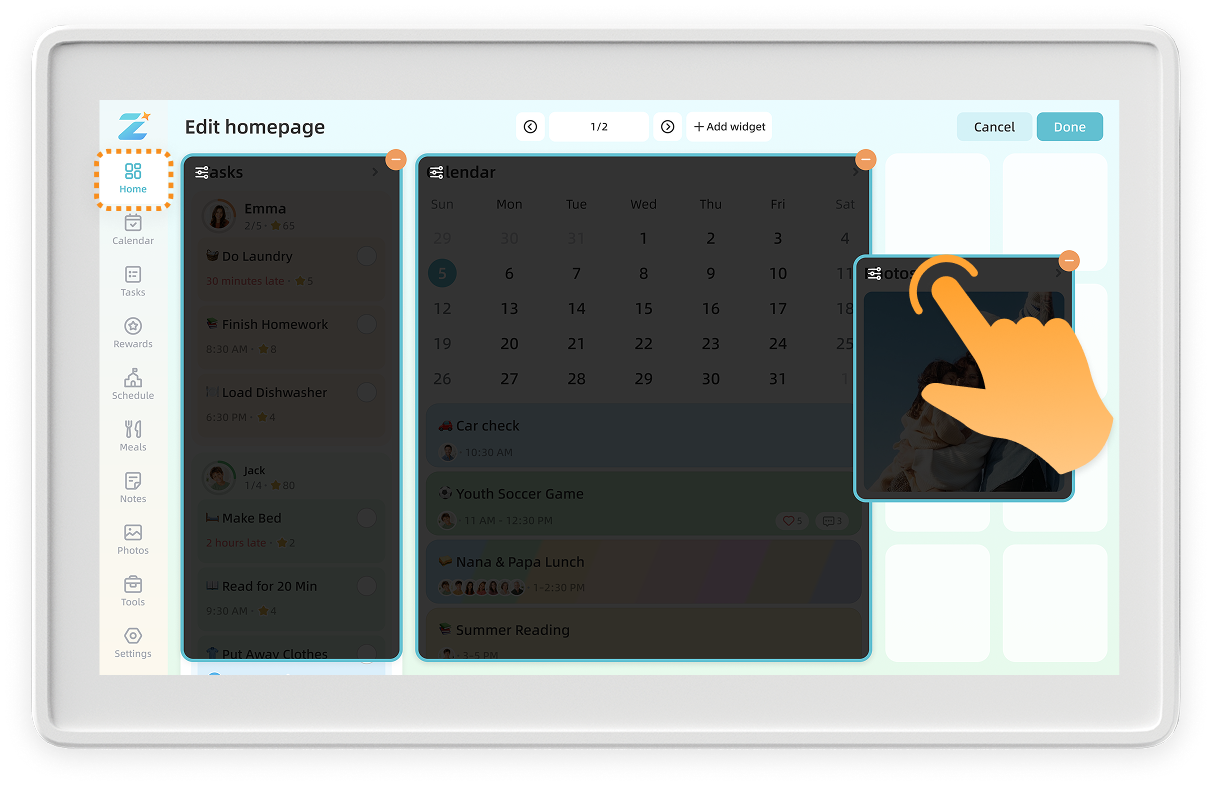
Move or customize a widget
Drag a widget to a new position. Select the widget to change its available style settings.
Note: Widget content cannot be opened while the Home screen is in edit mode.
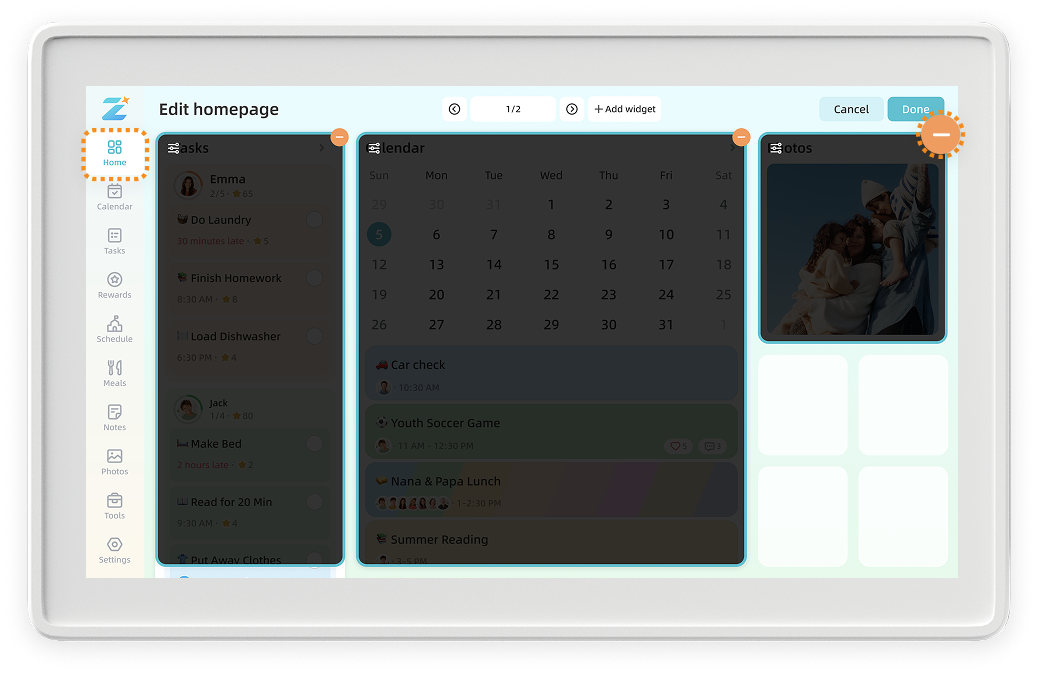
Remove a widget
Select the widget you want to remove and tap Remove. Confirm the Home layout to save your changes.
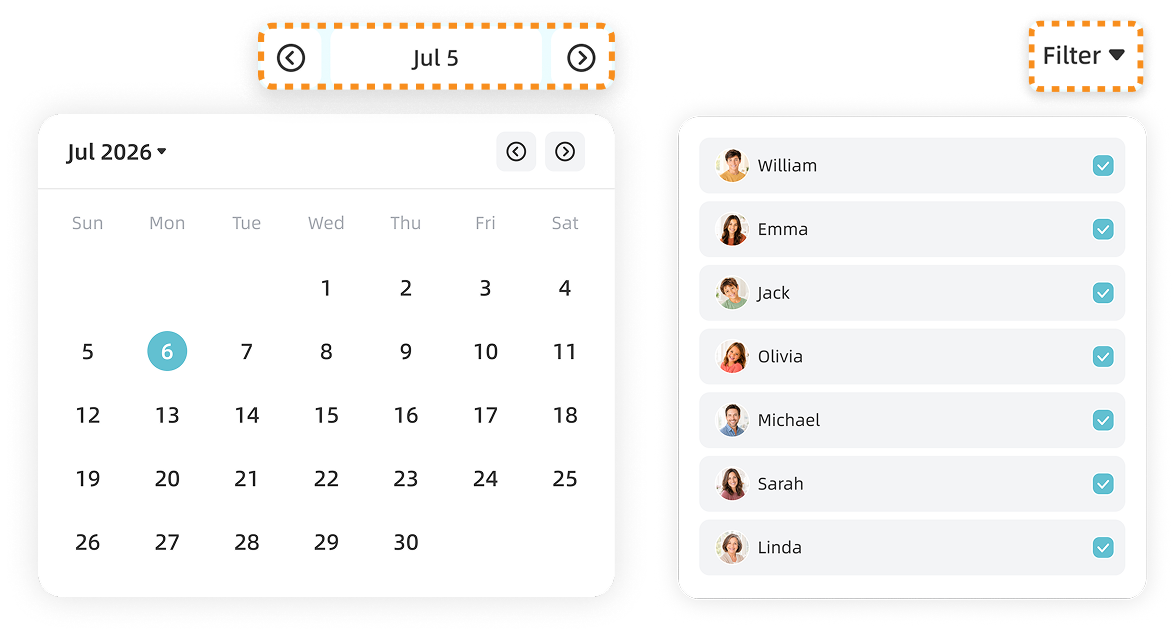
7.1.2 View Home by Date or Member
Select a date to view the Home content for that day, or select a Member to show only content assigned to that person.
This changes only what appears on the Home screen. It does not modify any events, tasks, or other content.
7.2 Calendar
Keep your family on track with one clear, shared calendar.
7.2.1 Create, Edit, Delete, or Copy Events
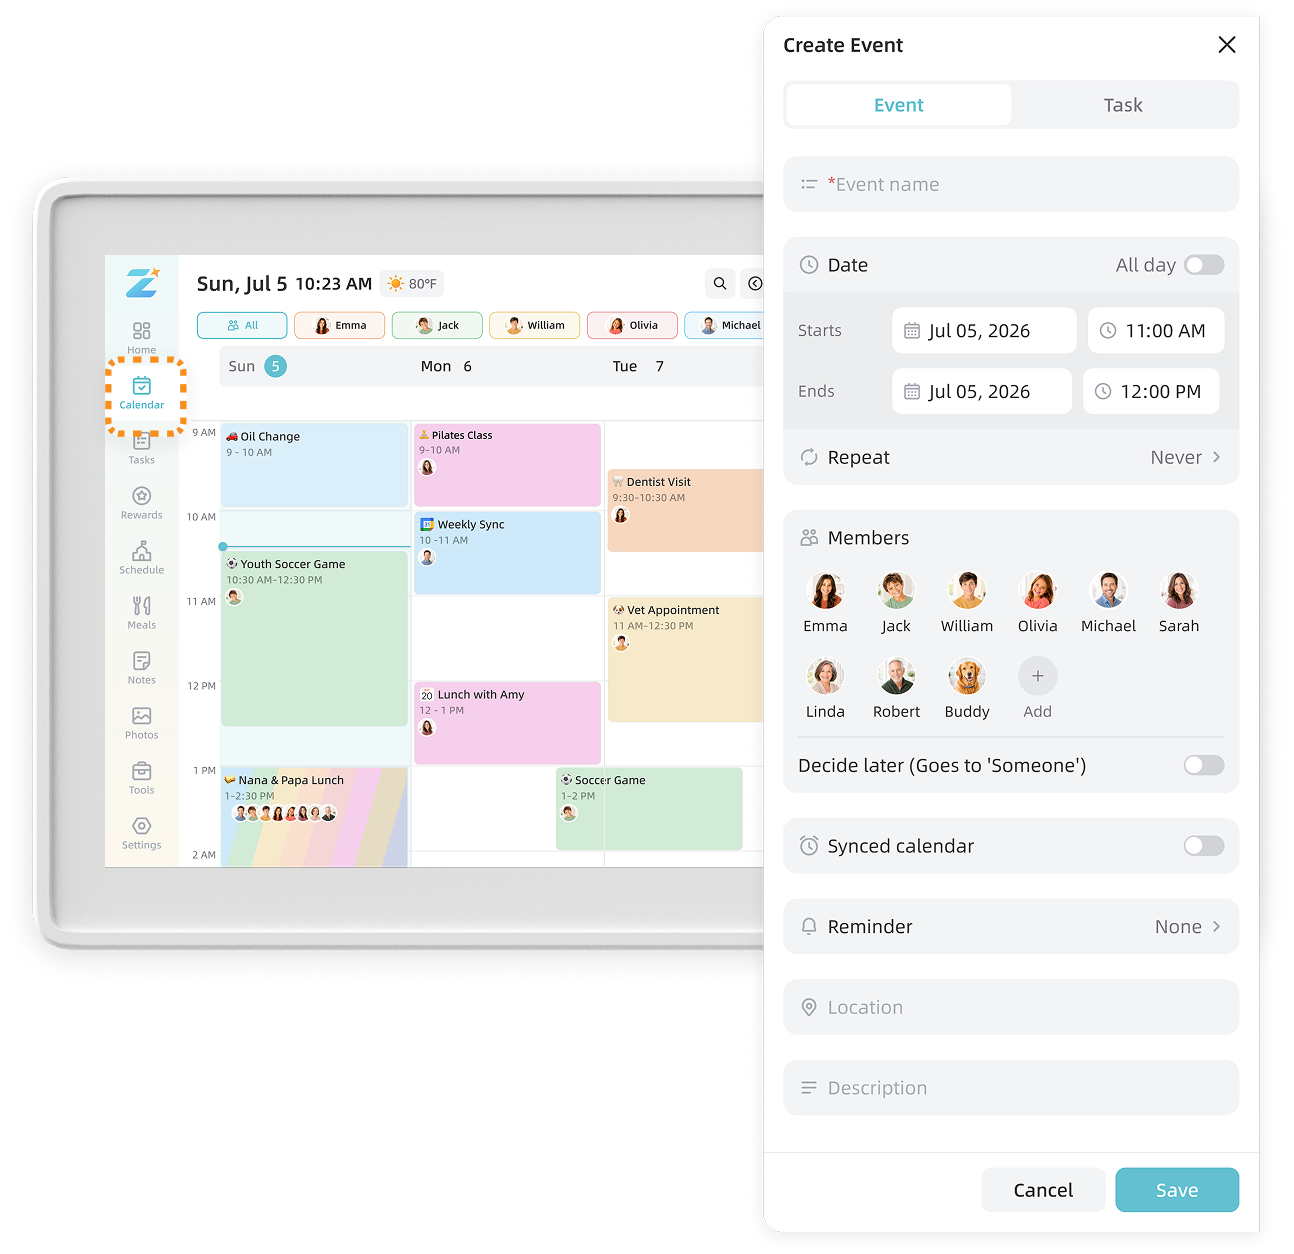
Create an event
Enter the event title, date, time, Members, repeat settings, reminders, and any other details, then save the event.
Note: To create an event that syncs to a two-way connected calendar, turn on Synced Calendar and select the calendar you want to use before saving. If no synced calendar is selected, the event will be saved only in Zical.
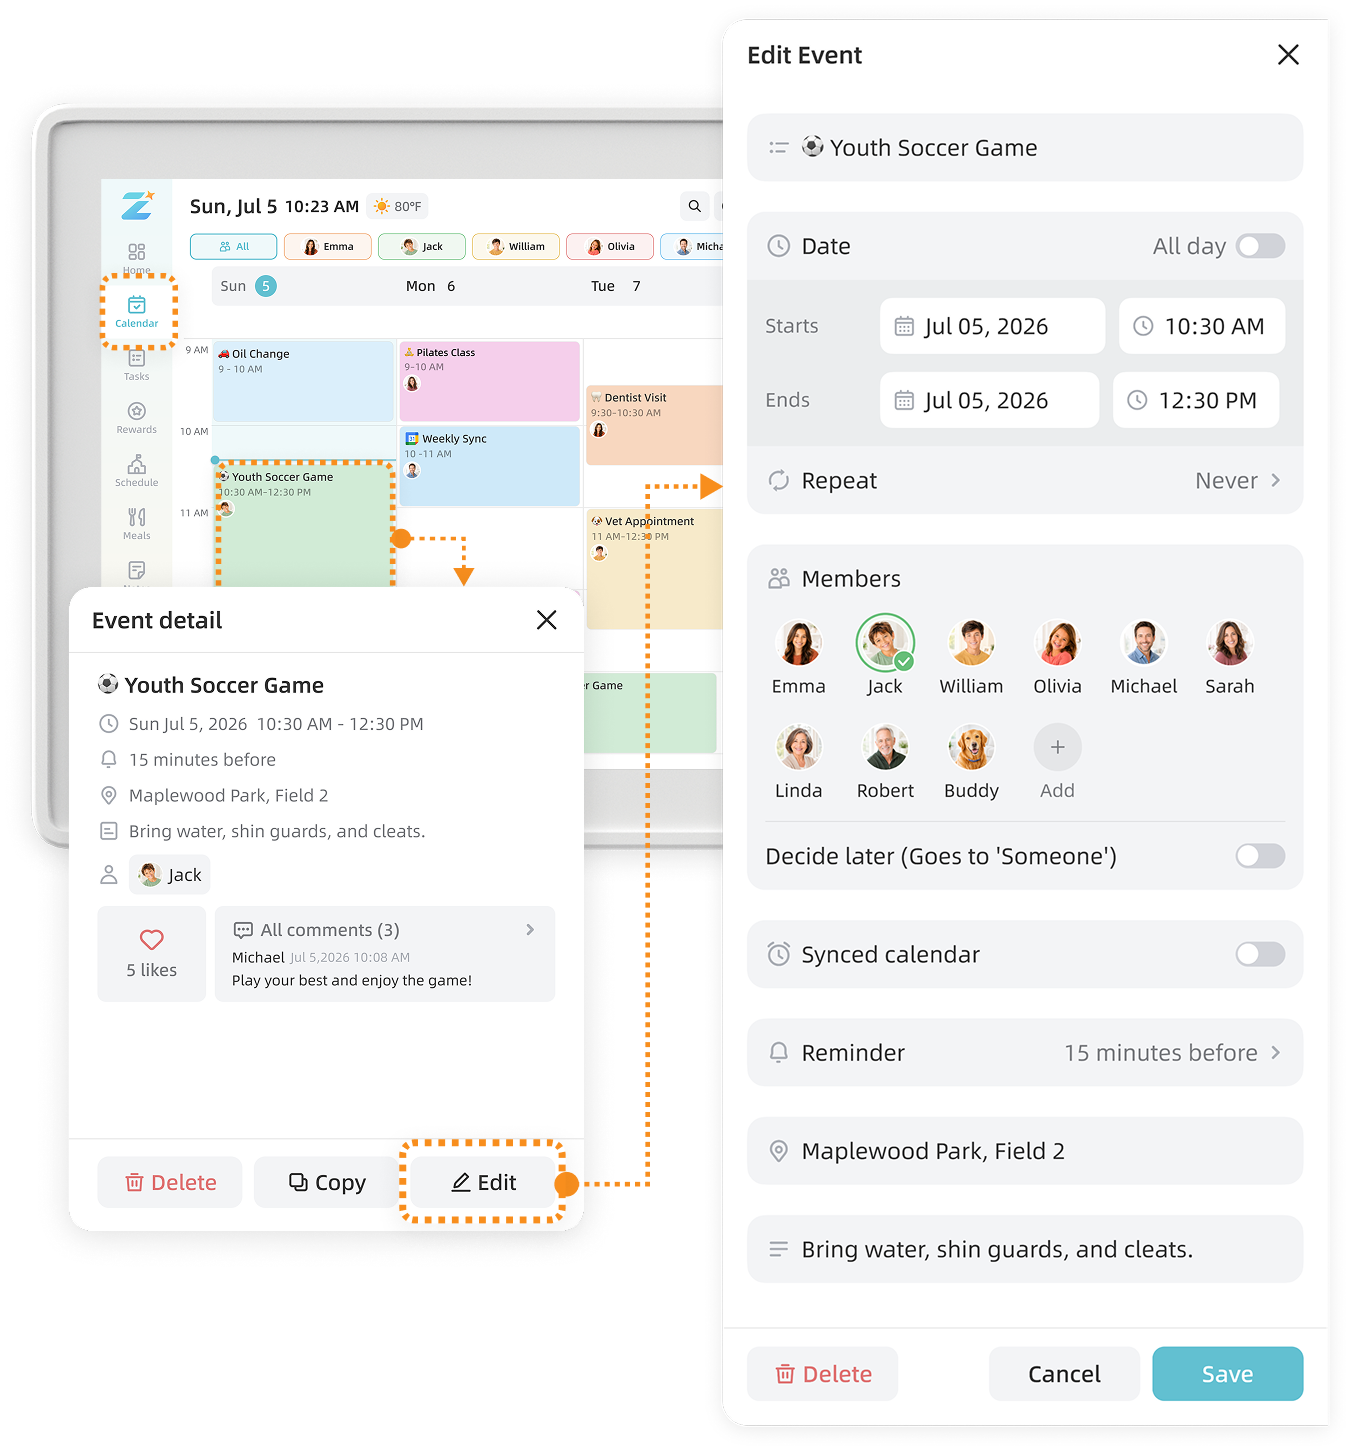
Edit an event
Open the event, update the details, then save your changes. For a recurring event, choose which occurrences you want to update.
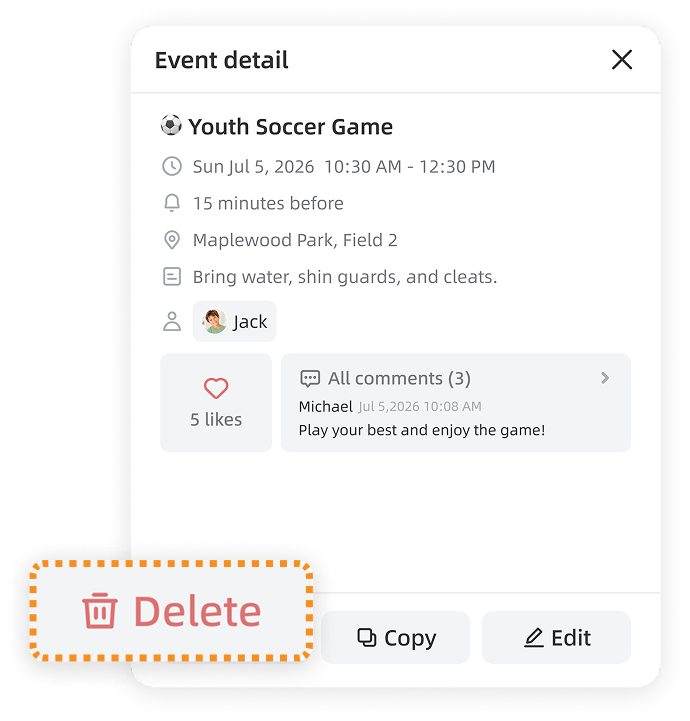
Delete an event
Open the event and tap Delete. For a recurring event, choose which occurrences you want to delete.
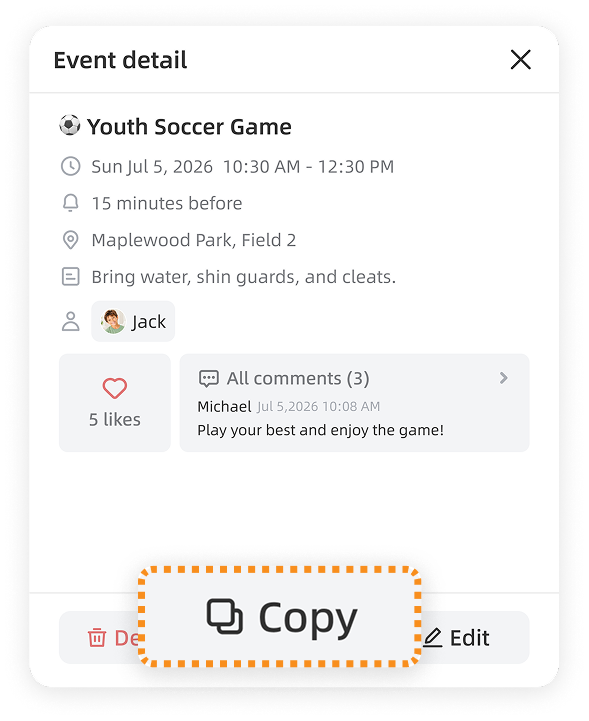
Copy an event
Open an existing event and tap Copy. Update the date or other details, then save it as a separate event. The original event will not be changed.
Note: If a recently edited or synced event is not visible, tap Refresh in the upper-right corner of the screen.
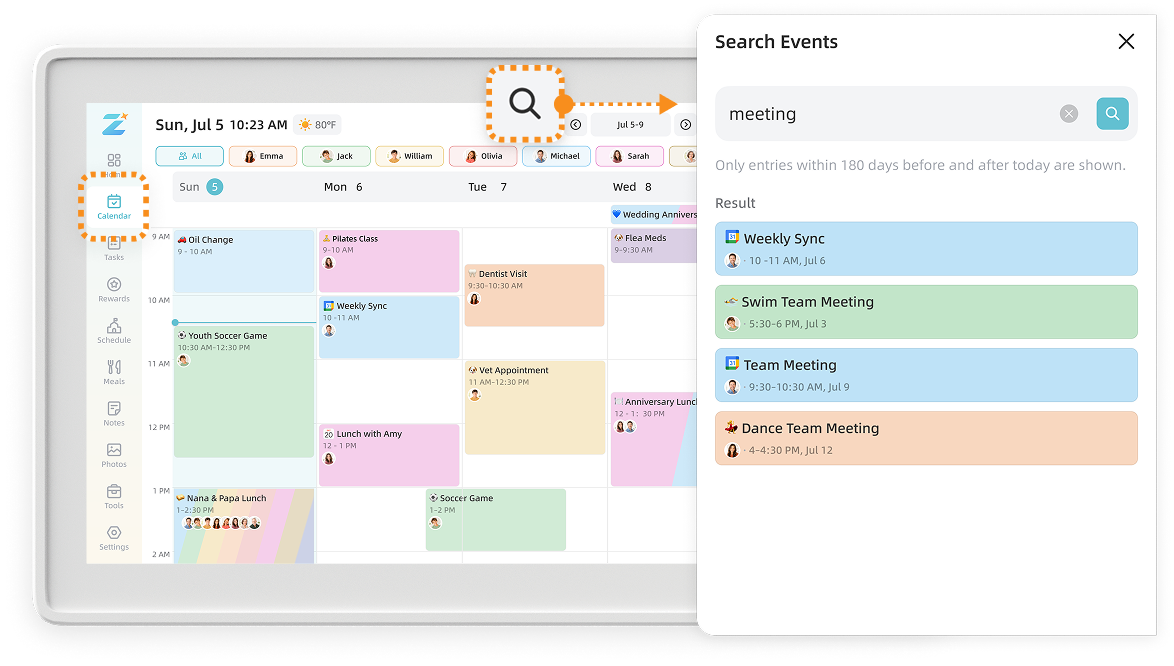
7.2.2 Search for Events
Enter an event title or keywords to search the calendar. Select a search result to view or manage the event.
Note: Event search covers a limited date range around the current date.
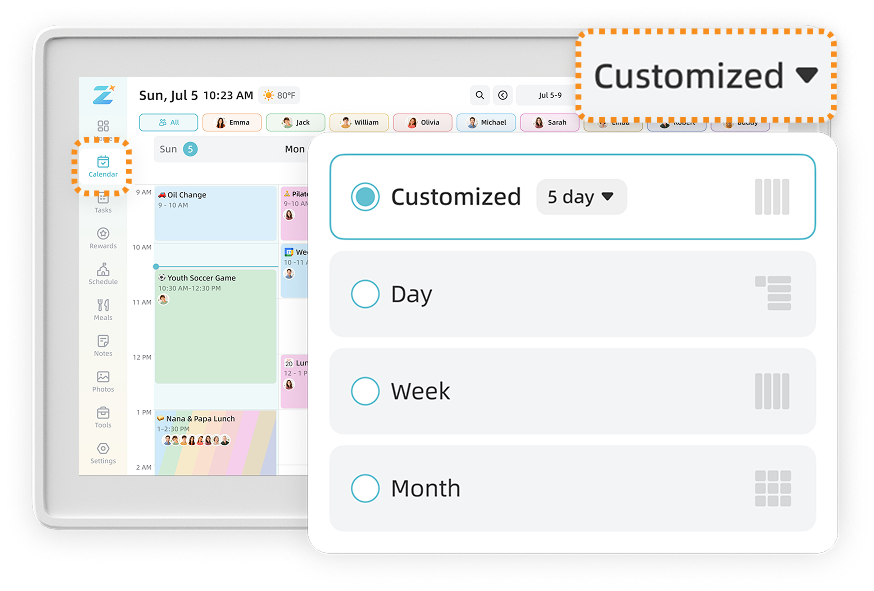
7.2.3 Switch Calendar Views
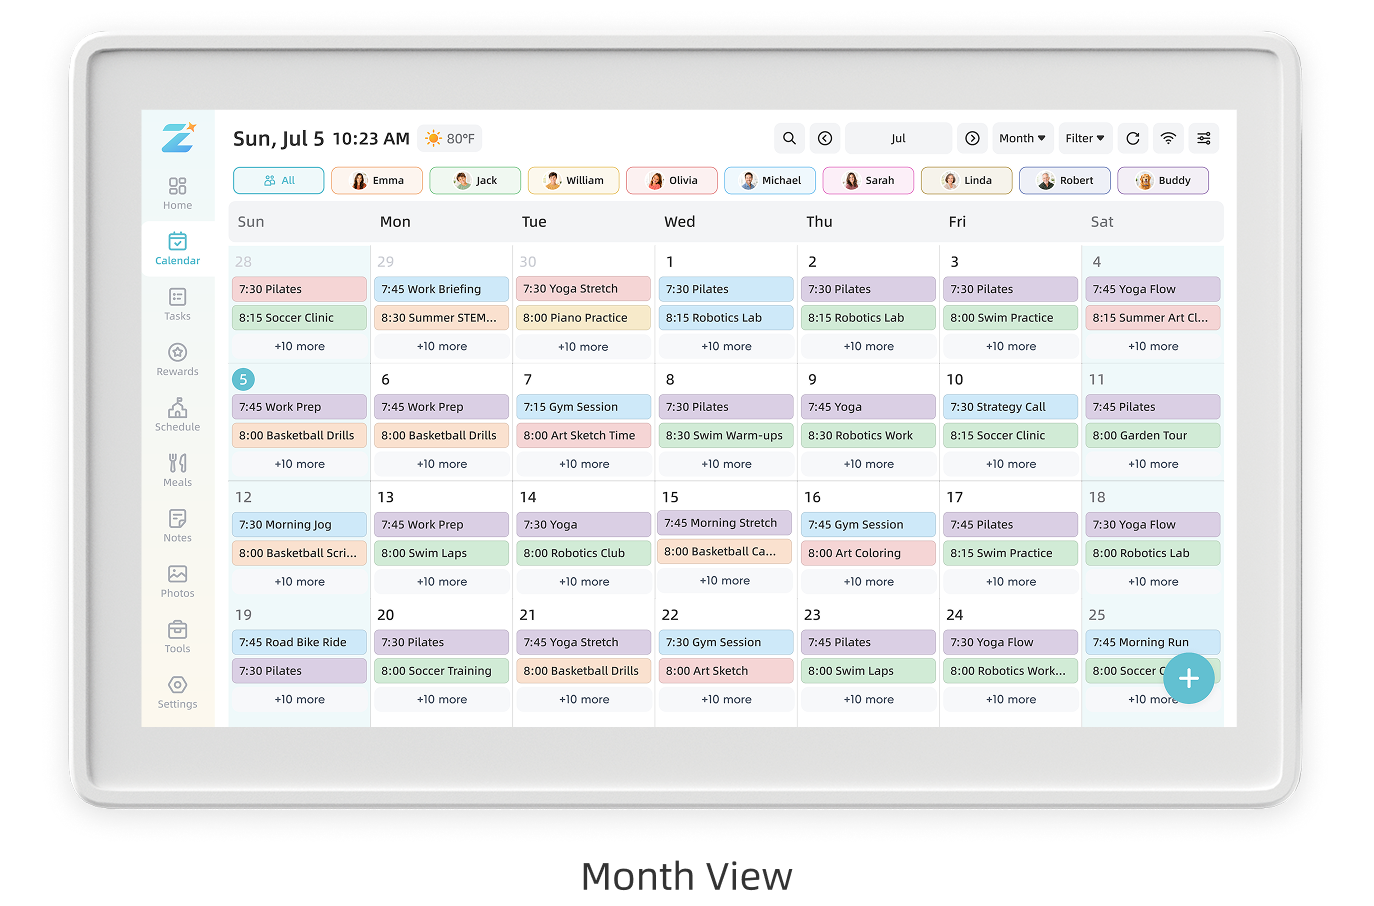
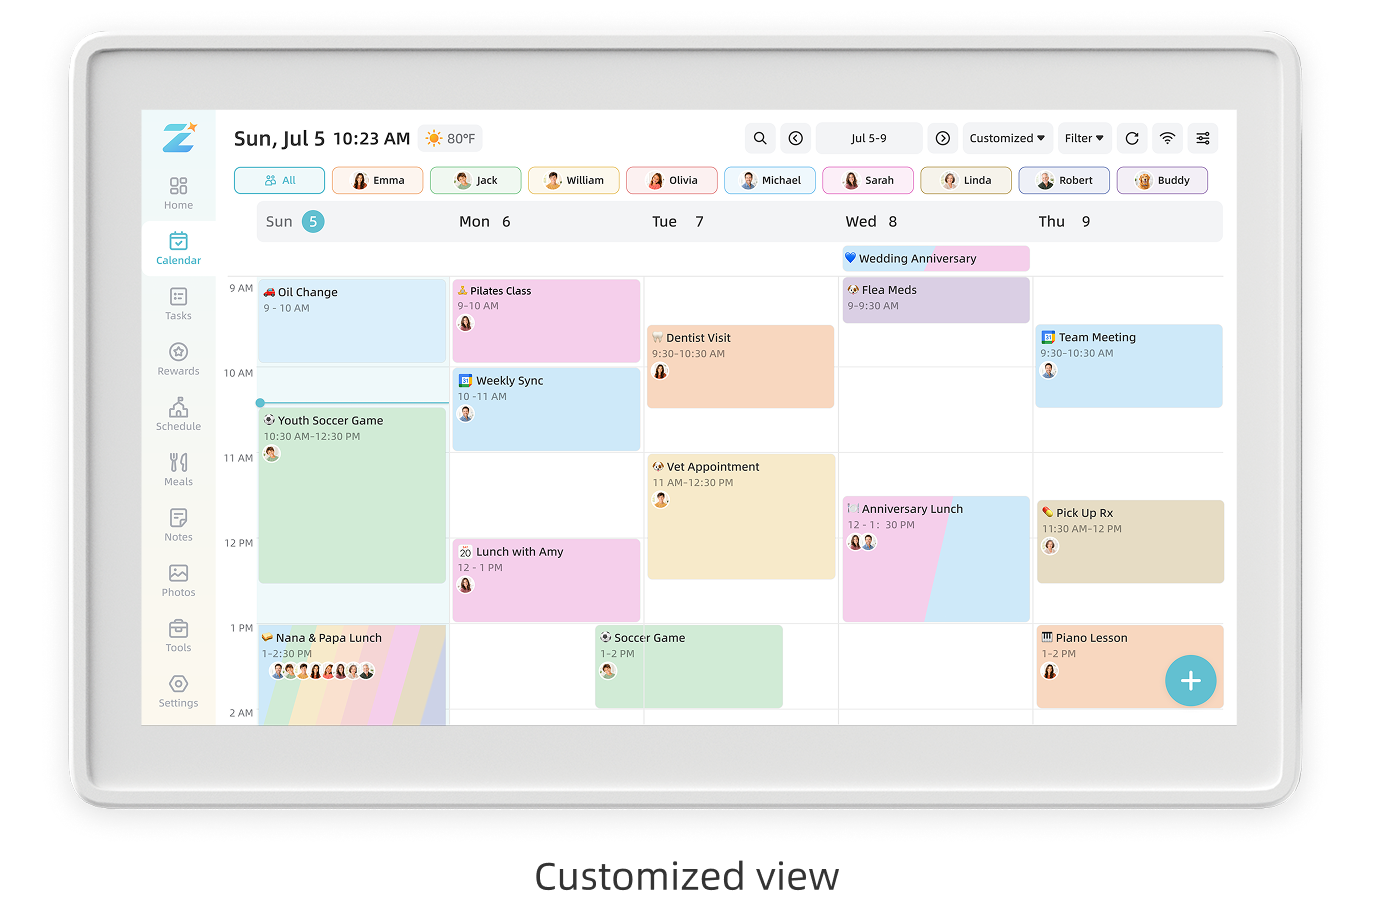
Switch between Day, Week, Month, and Customized views. Week view displays events on a timeline, while Customized view lets you choose how many consecutive days to show.
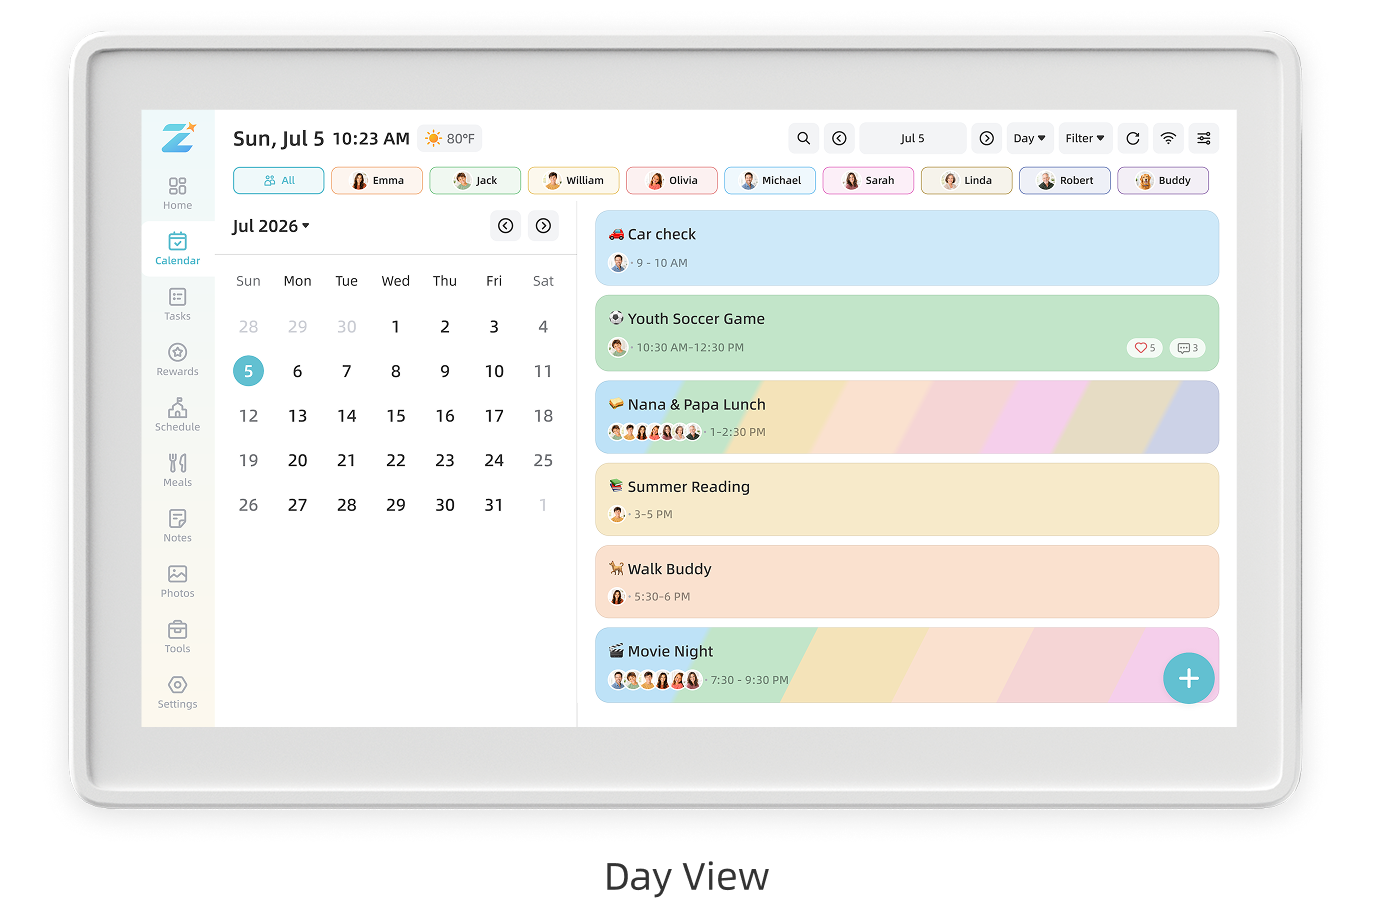
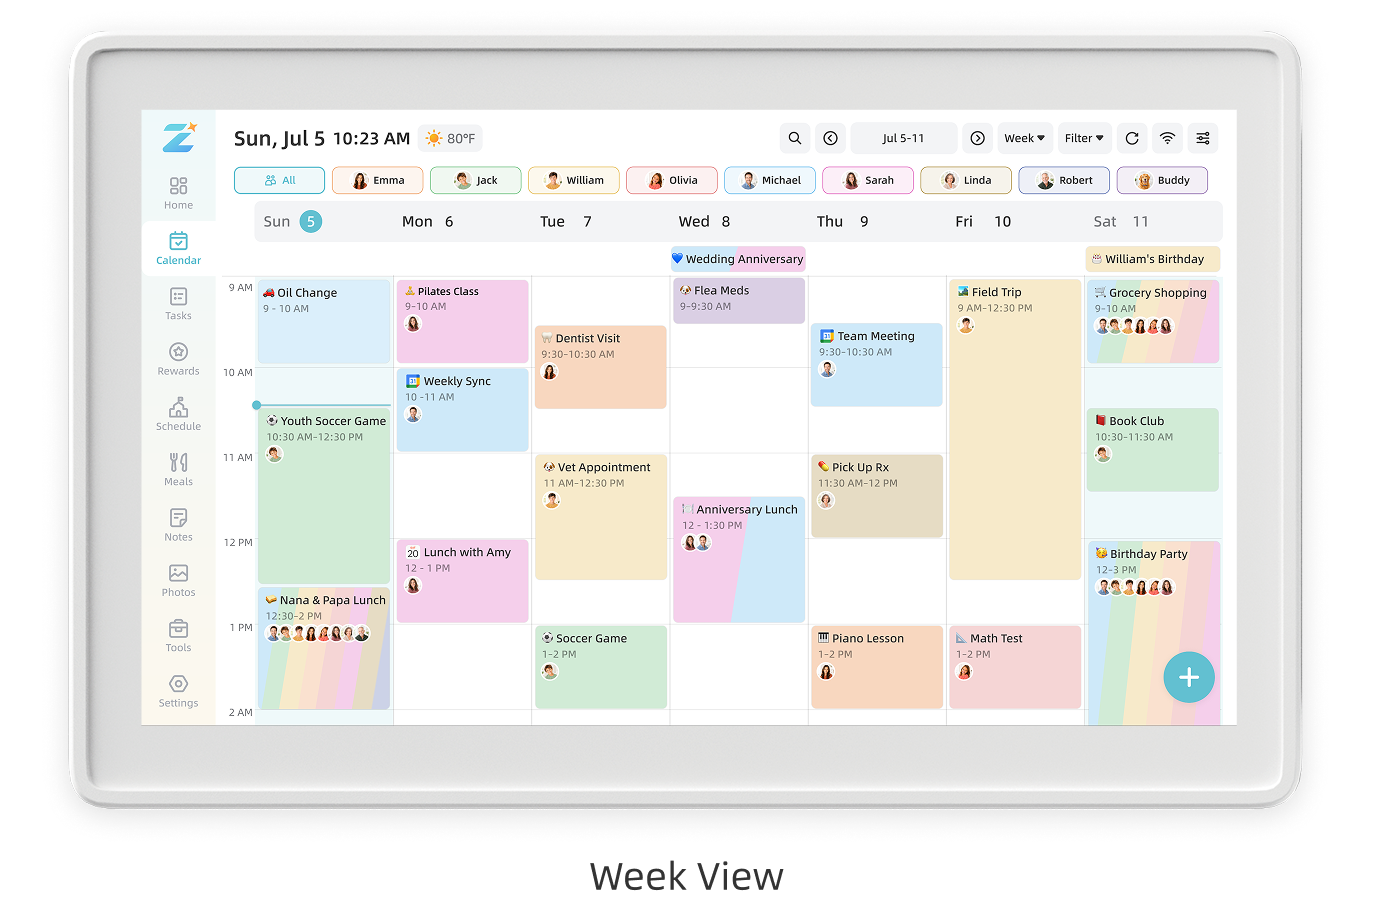
7.2.4 Filter Calendar Content
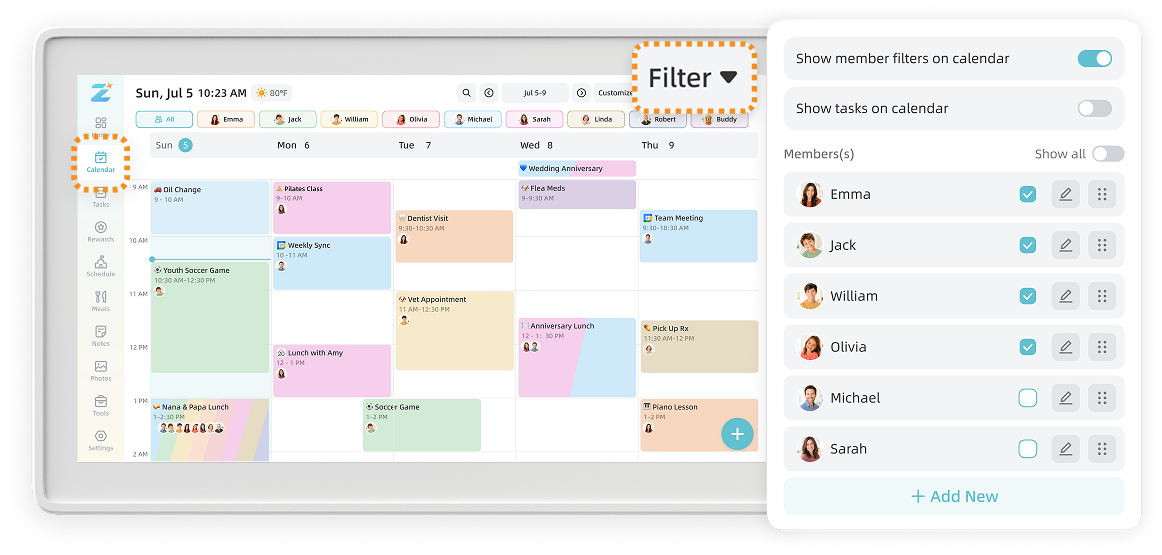
Use Member filters to show events and tasks for selected family members. You can also choose whether tasks appear on the calendar.
7.3 Tasks
Assign individual, shared, or claimable tasks and reward family members with stars when they finish.
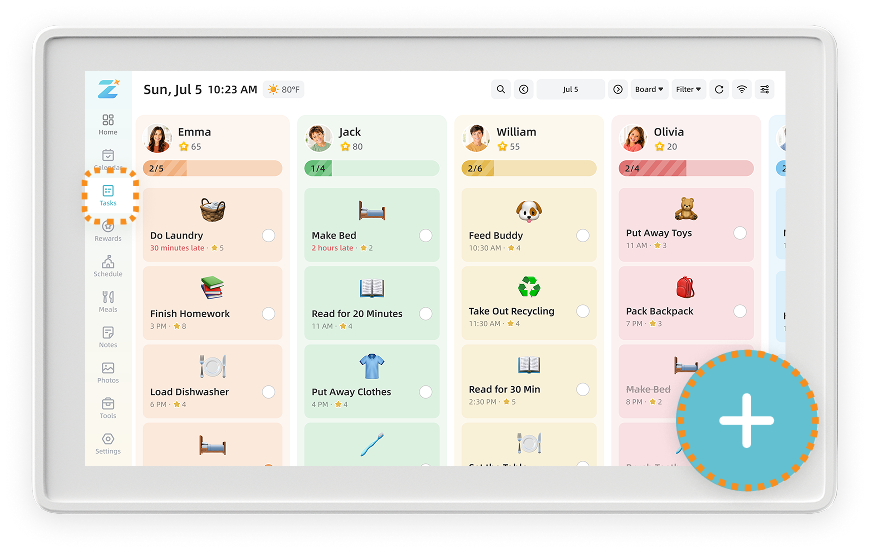
7.3.1 Create and Manage Tasks
Create, edit, or delete a task
Enter the task details and assign it to the appropriate family Members. Open an existing task to update or delete it.
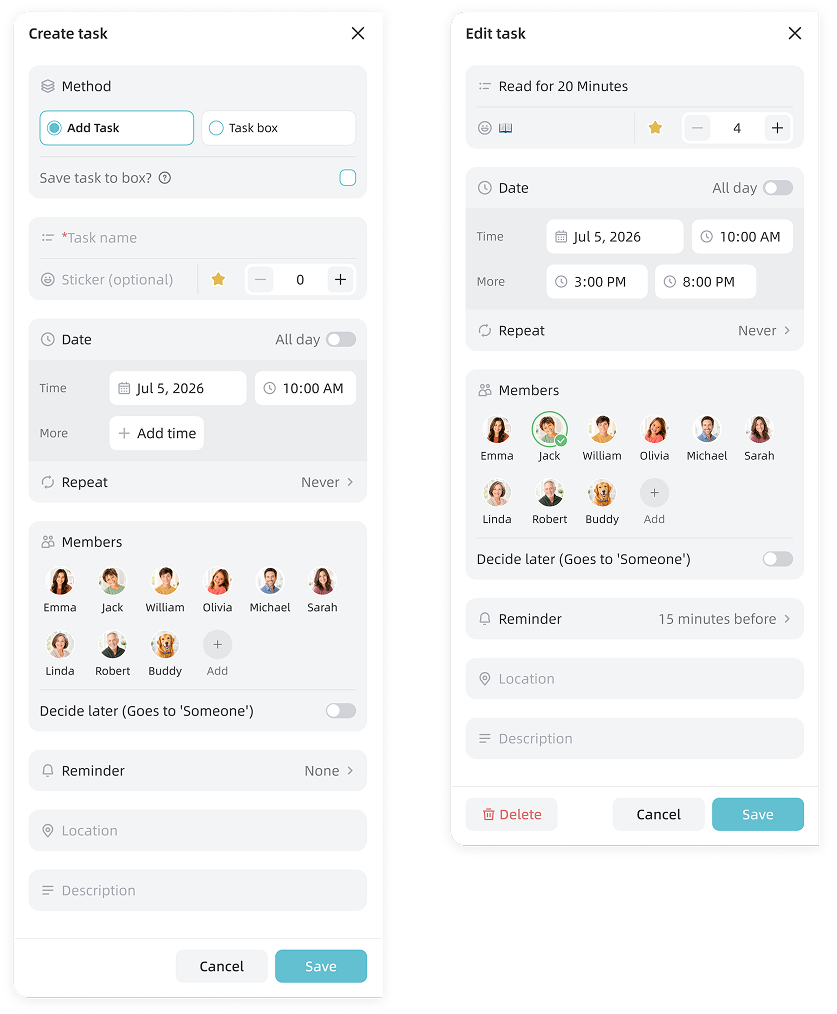
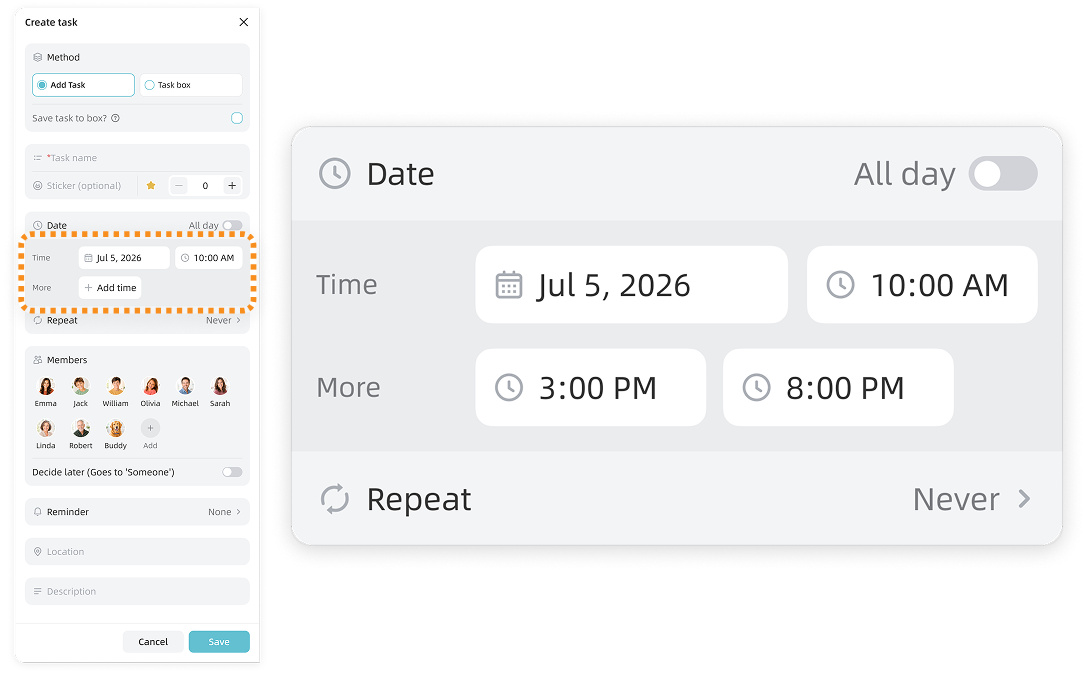
Add multiple completion times
Add more than one time if the same task needs to be completed multiple times in one day.
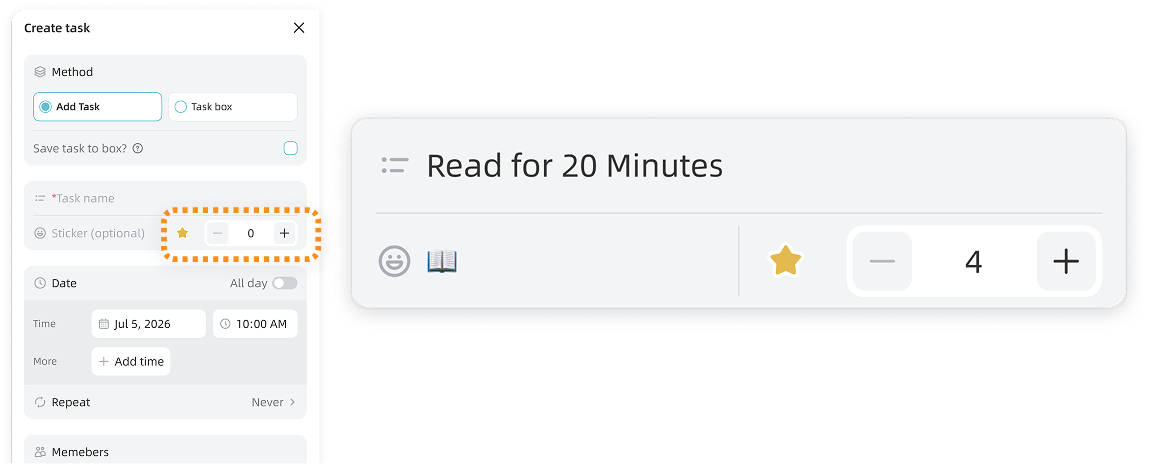
Set a star reward
Choose how many stars Members earn when they complete the task. Earned stars can be used to redeem Rewards.
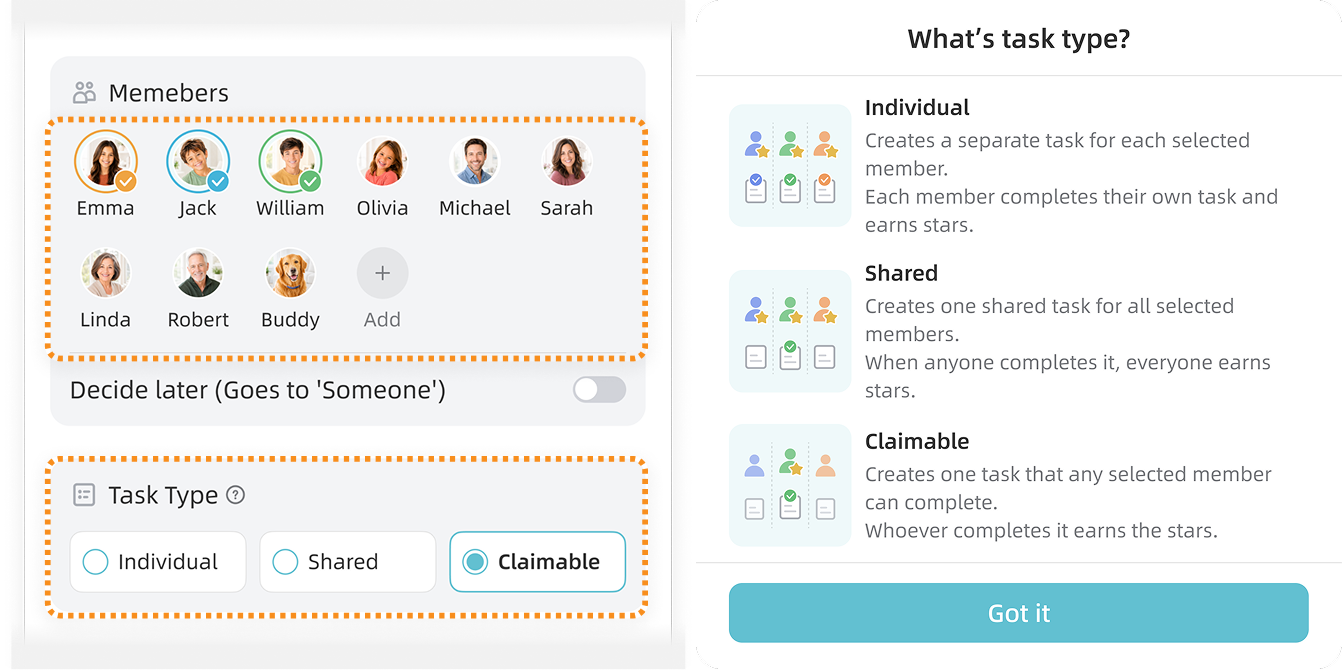
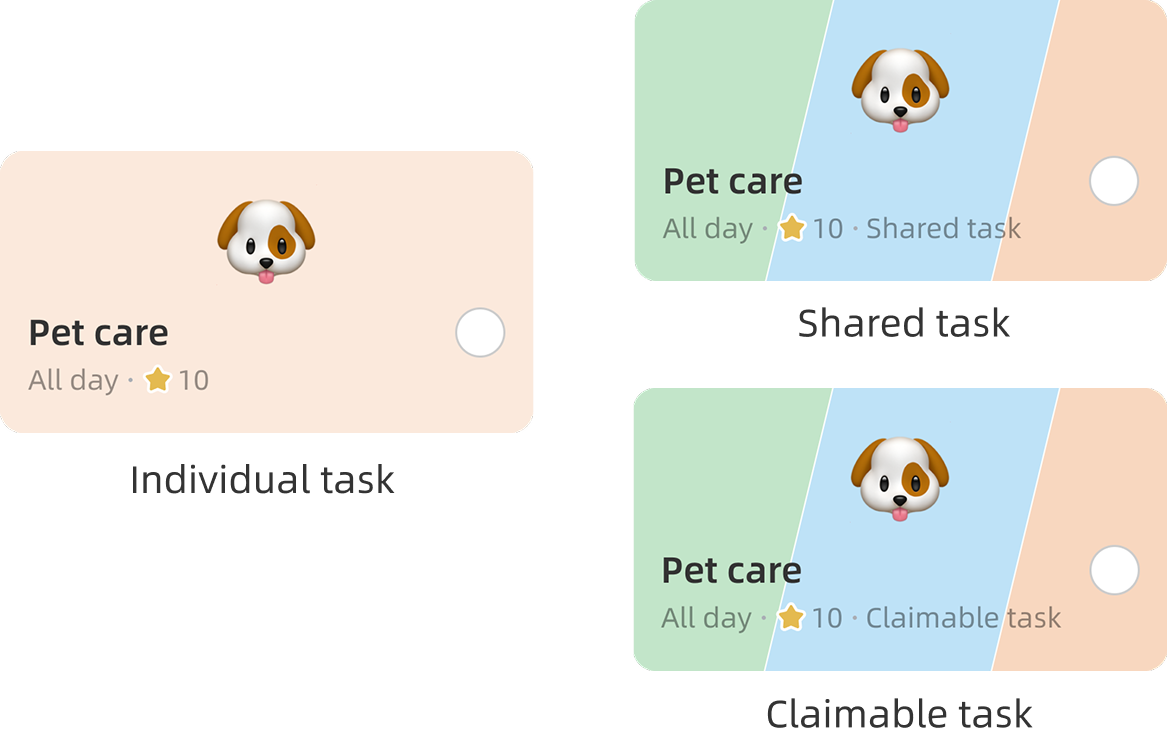
Choose a task type
Individual: Each assigned Member completes the task separately and earns the set number of stars individually.
Shared: All assigned Members complete the task together. When the task is completed, each assigned Member receives the stars set for the task.
Claimable: The first assigned Member to complete the task earns the stars.
Note: The Shared and Claimable options appear only when two or more Members are assigned to the task.
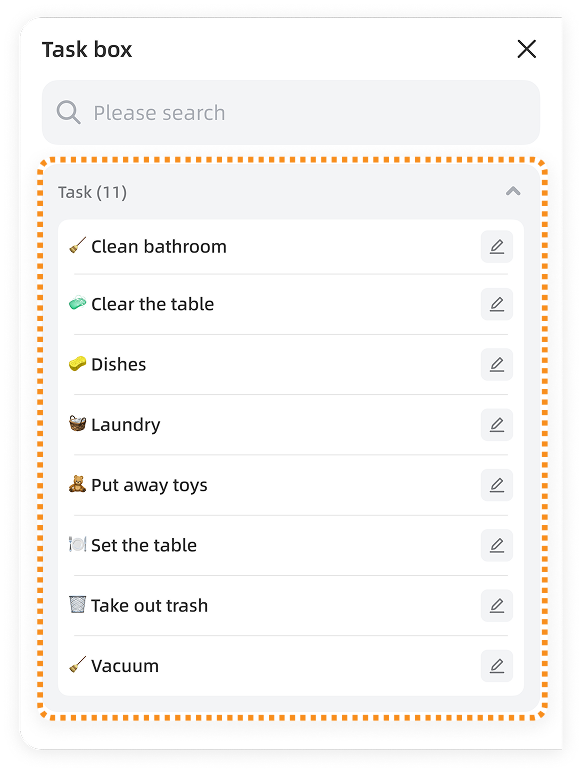
7.3.2 Use the Task Box
The Task Box stores reusable templates so you can create common tasks more quickly.
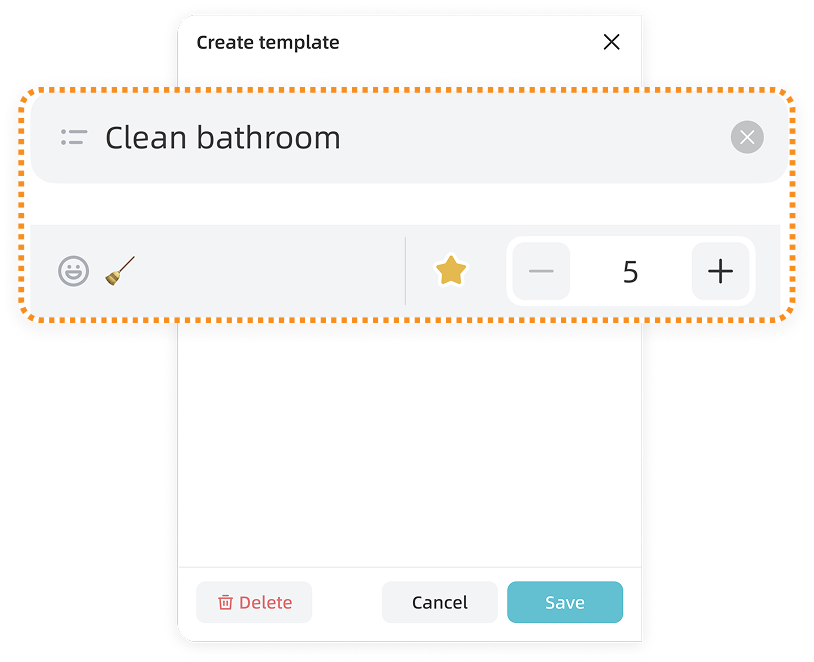
Create a template
Enter a task name, choose a sticker, set the number of stars awarded for completion, then save the template.
Use a template
Select a template, then add it to the current calendar.
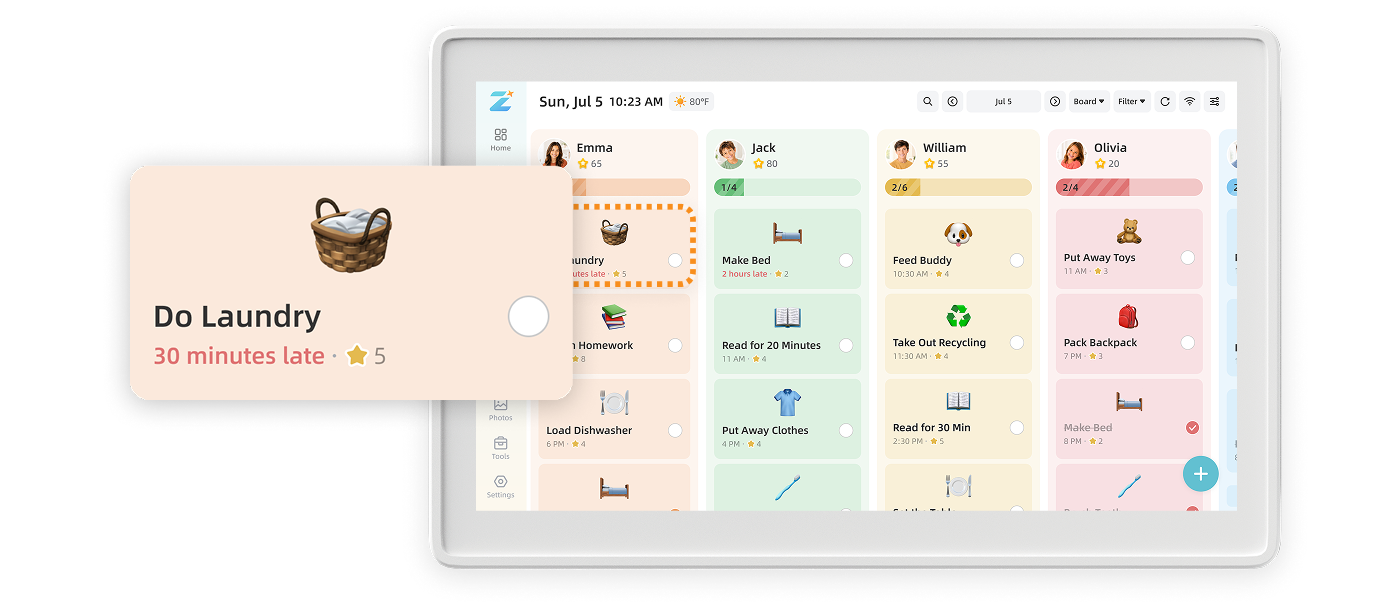
7.3.3 View Overdue and Rolled-Over Tasks
When Show overdue tasks is turned on, overdue tasks are displayed.
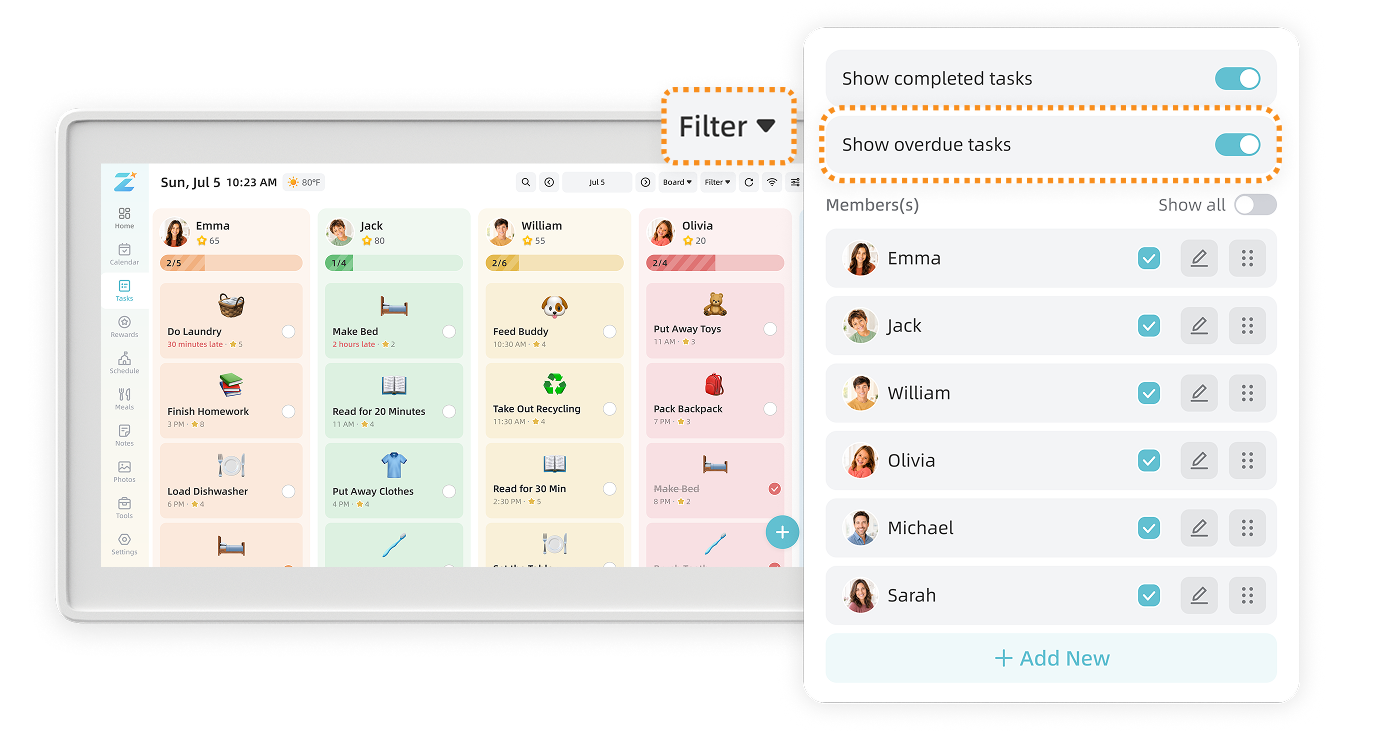
Tasks that become overdue today show how long they have been overdue. Unfinished tasks from previous days automatically roll over to the current day and also show their overdue duration, helping your family review unfinished tasks without missing them.
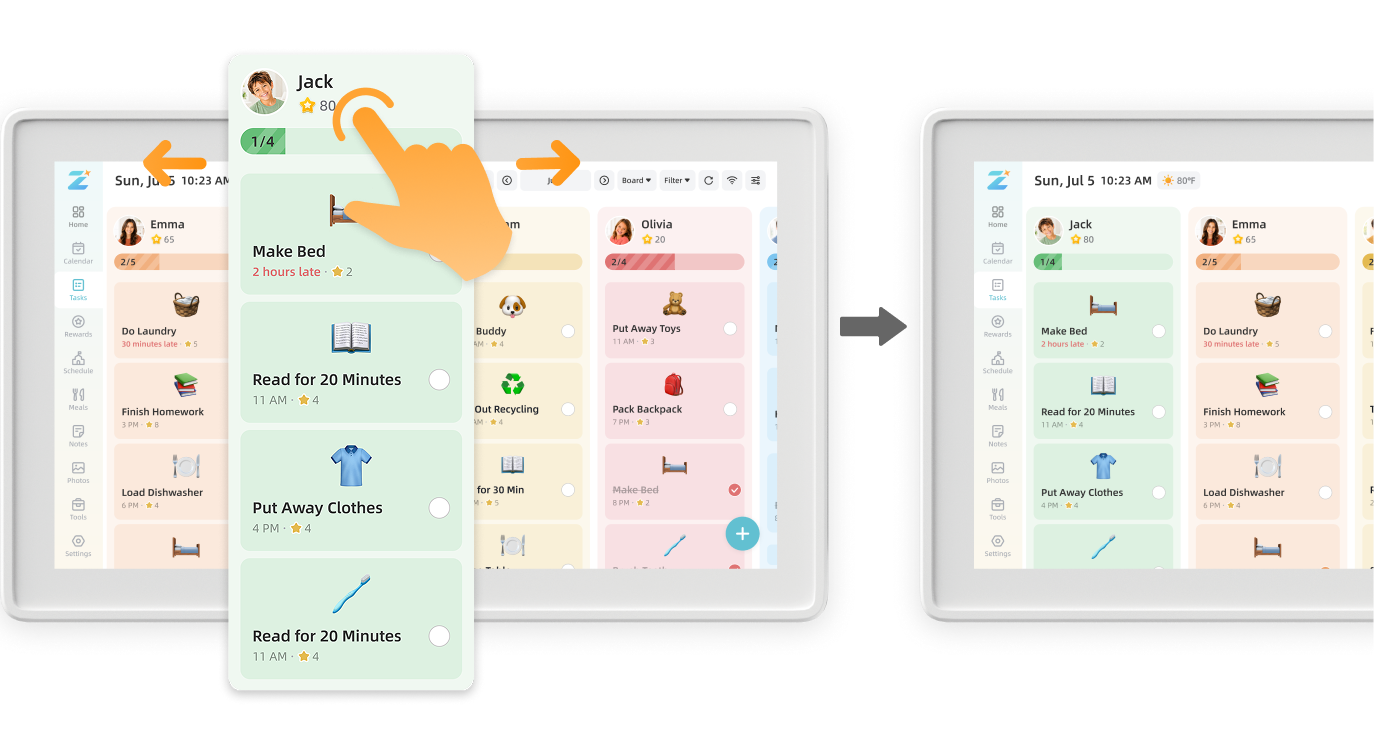
7.3.4 Reorder Members on the Task Board
On the home display, open the Task Board. Press and hold a Member profile, then drag it to the preferred position.
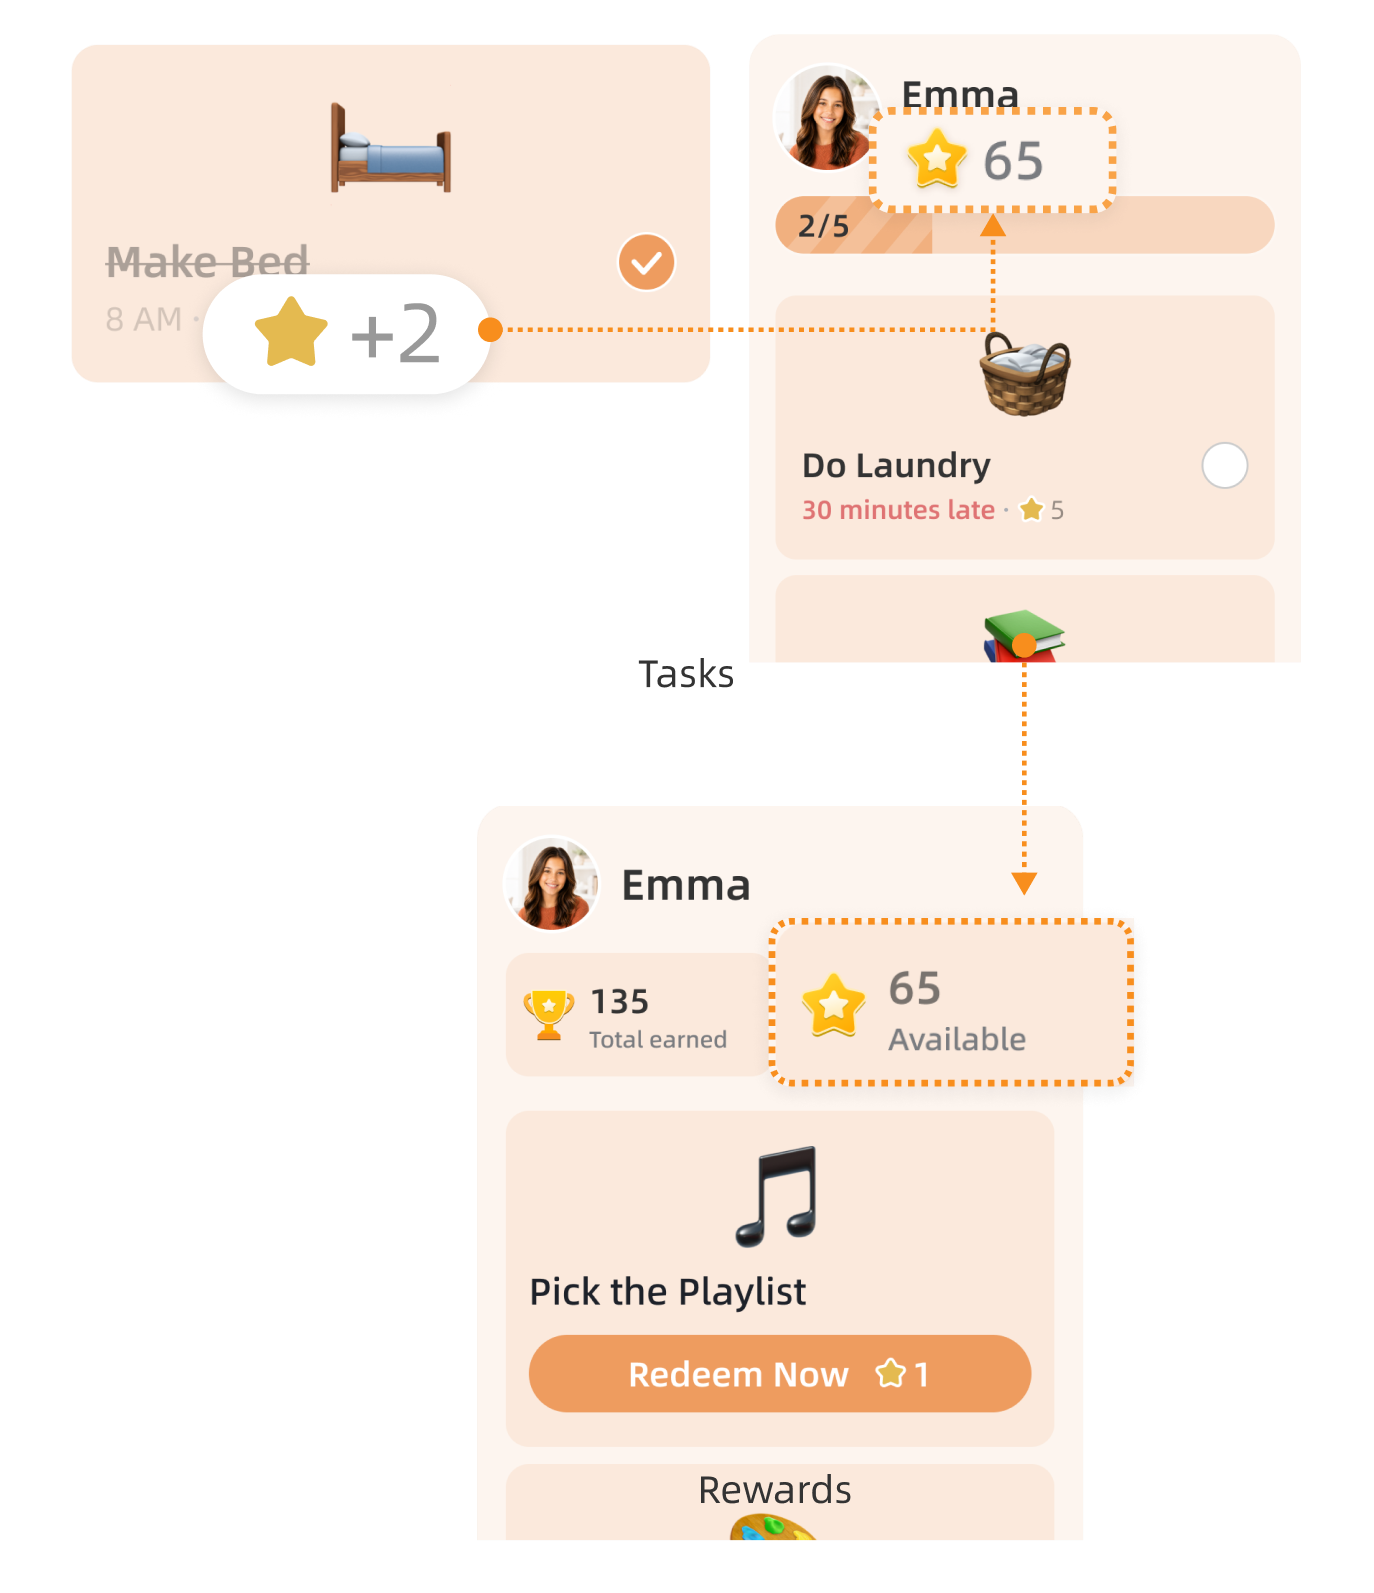
7.3.5 How Tasks and Rewards Work Together
When a task is completed, stars are awarded to the eligible Members based on the task type and settings. Members can use their earned stars to redeem Rewards.
7.4 Rewards
Motivate your family with meaningful Rewards that Members can redeem using the stars they earn from tasks.
7.4.1 Create, Track, and Redeem Rewards
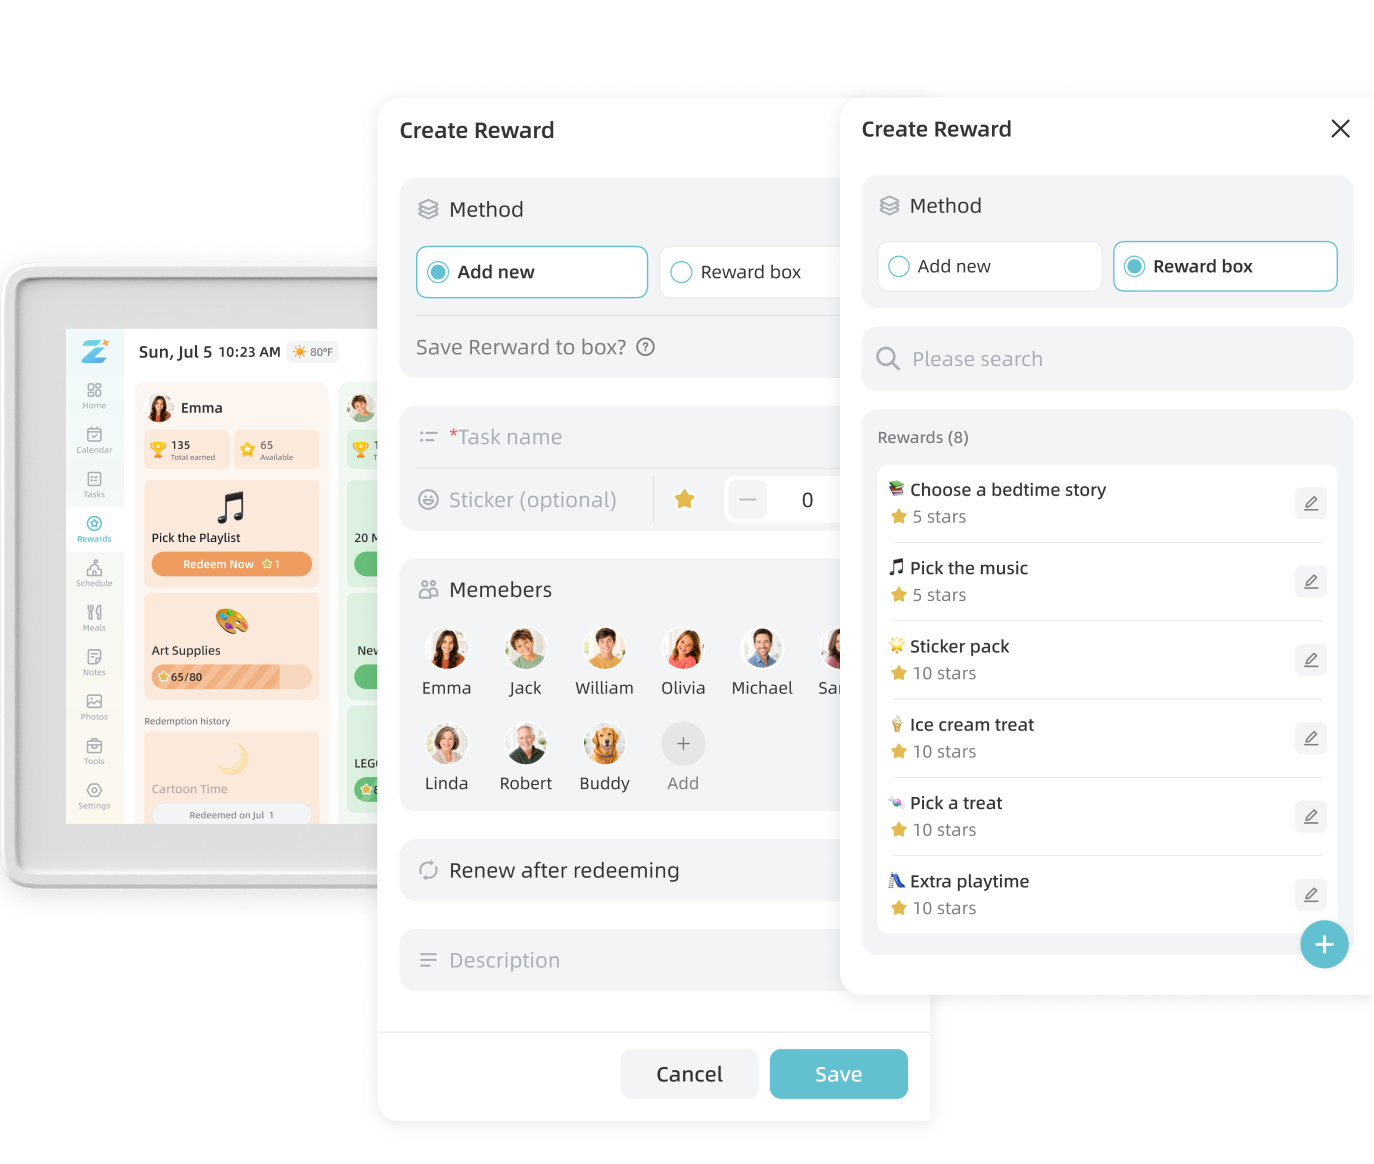
Create a Reward
Create or select a Reward, set the number of stars required, and choose which Members can redeem it.
Track progress
View how many stars a Member has earned and how many more are needed to redeem the Reward.
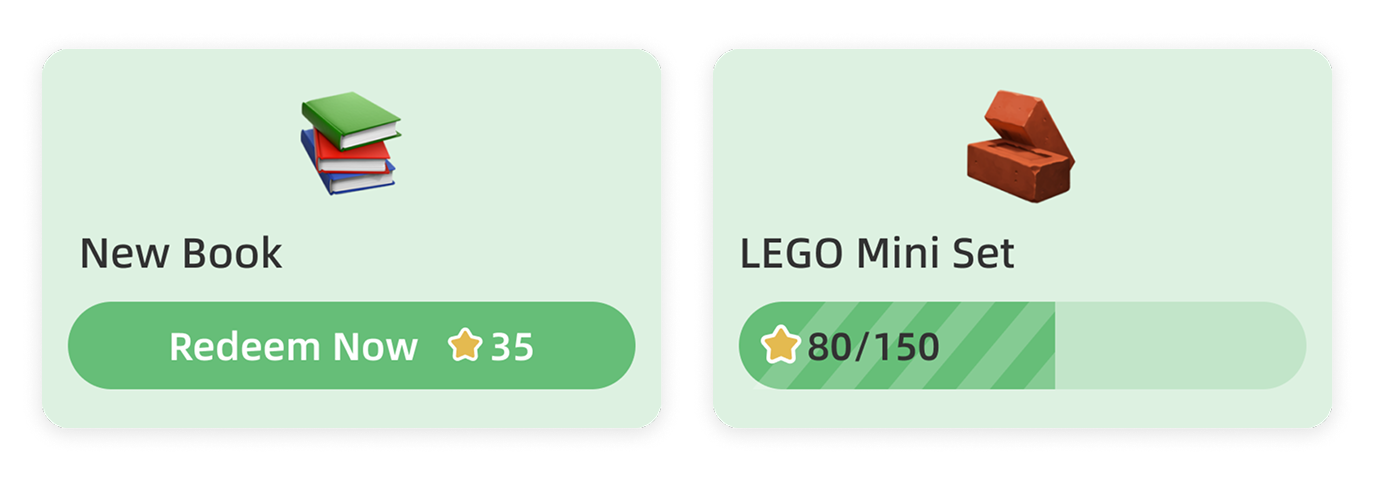
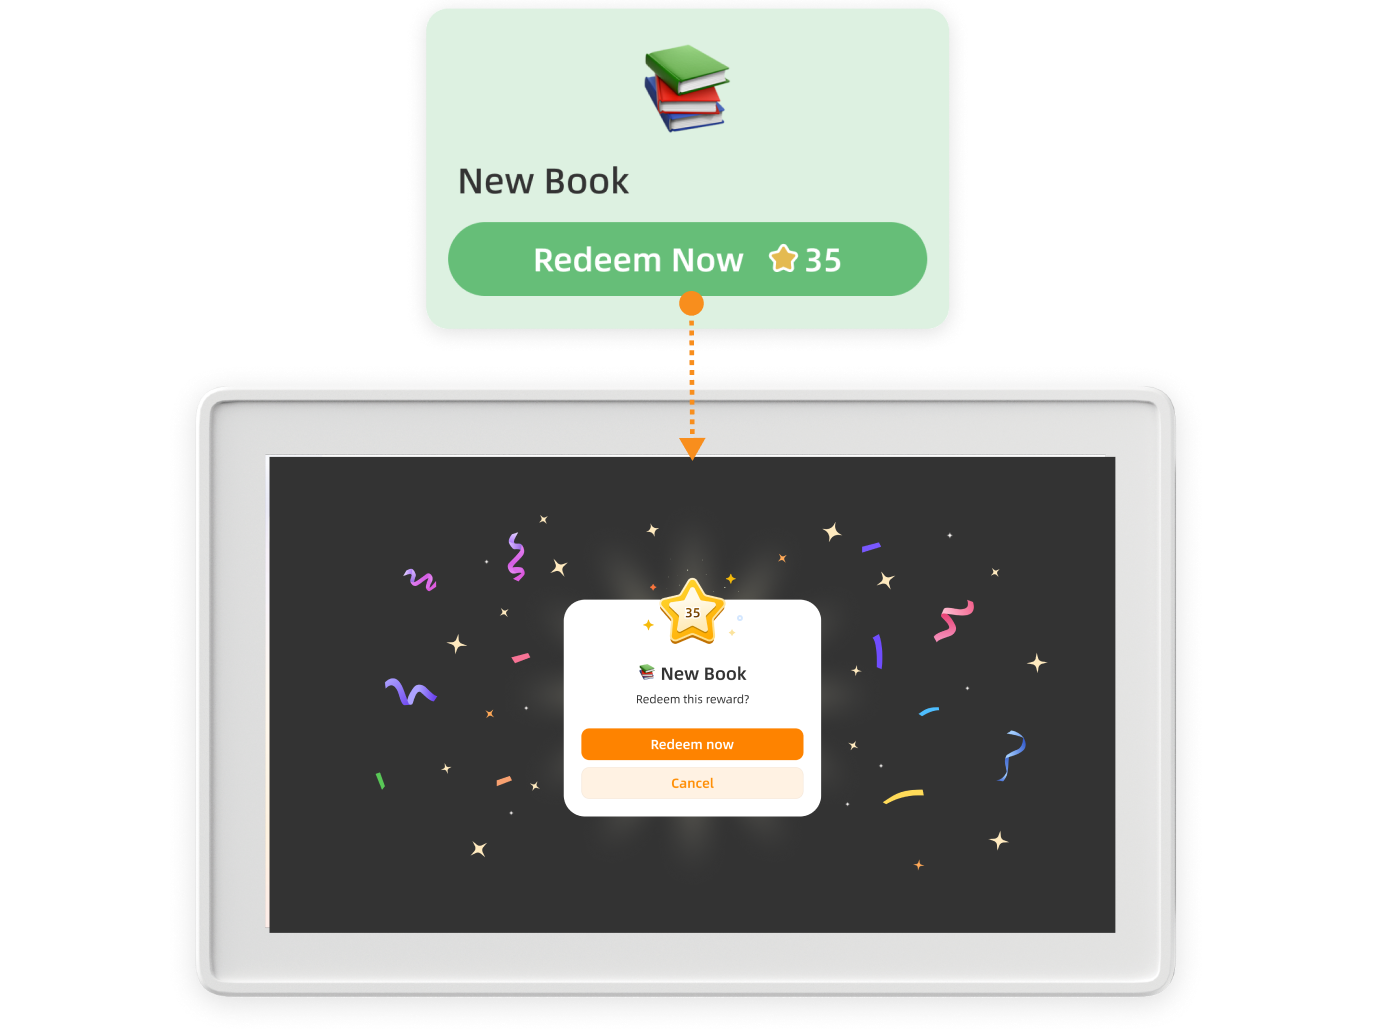
Redeem a Reward
When an eligible Member has enough stars, select the Reward and confirm the redemption.
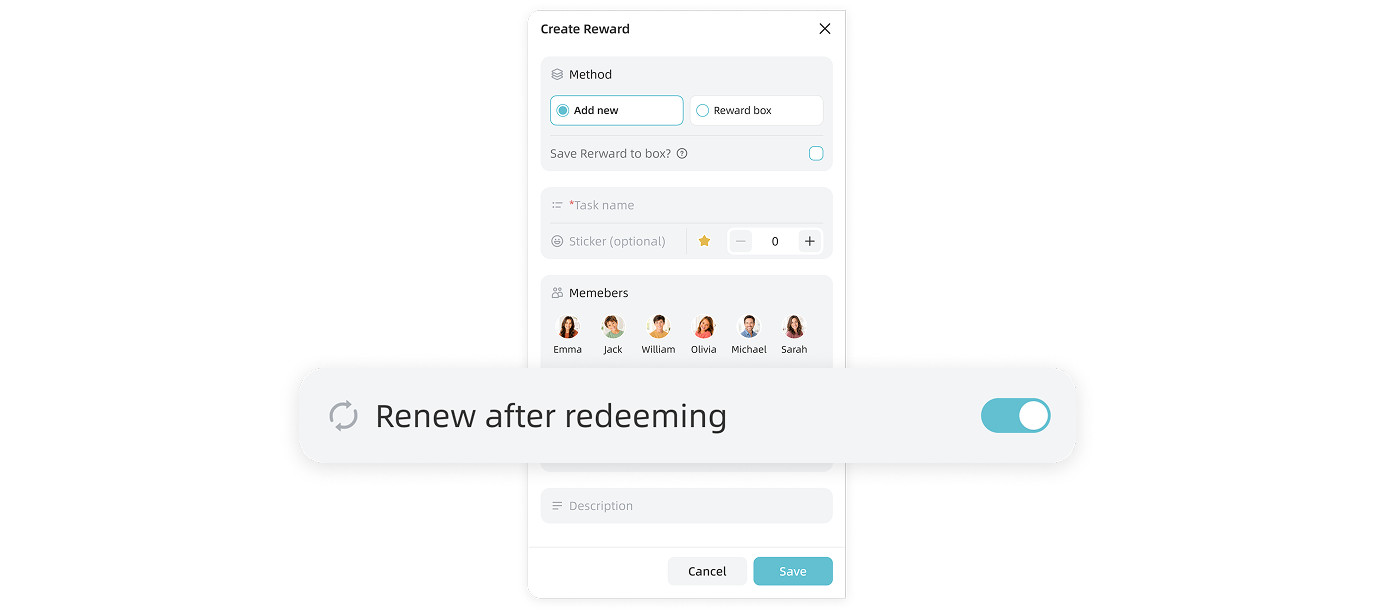
Renew a Reward
Turn on Renew if the Reward can be redeemed more than once. After each redemption, the same Reward becomes available again.
7.4.2 Lucky Wheel (Home Display Only)
Lucky Wheel lets Members spend stars for a chance to win a prize.
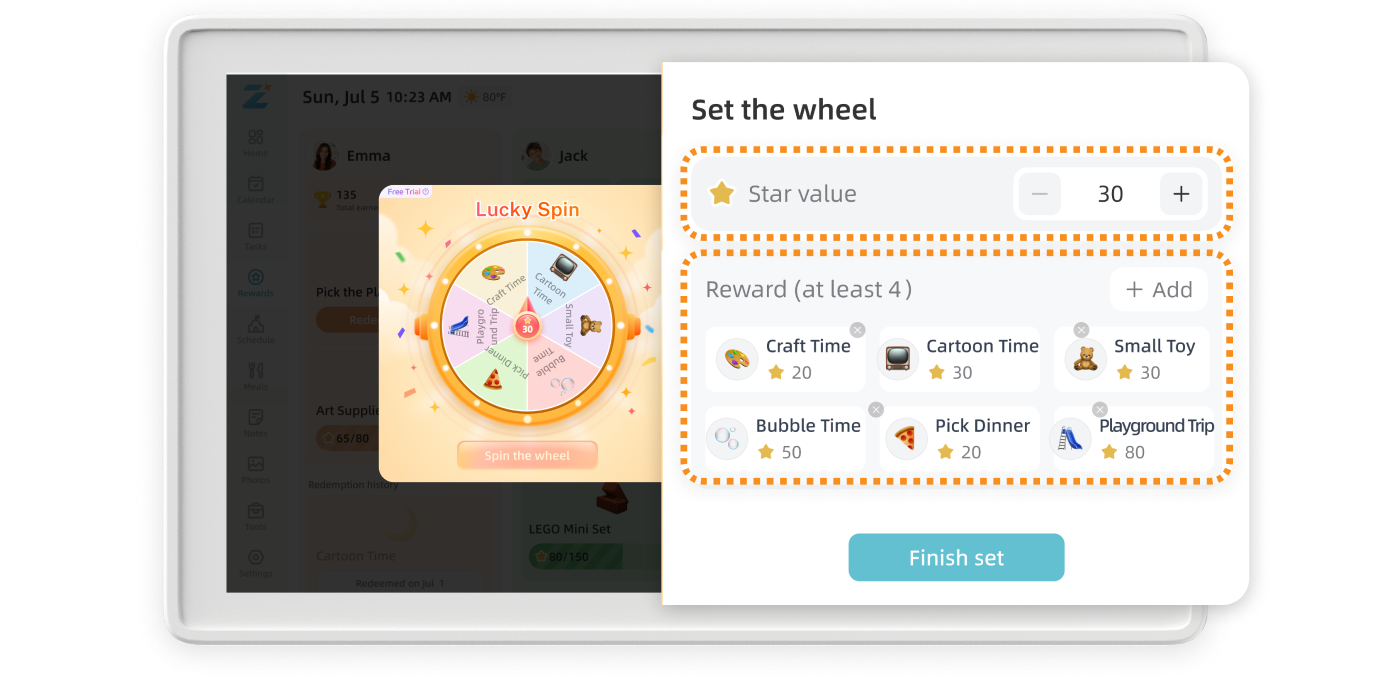
Set up the wheel
① Open Rewards and tap Spin to Win in the upper-right corner.
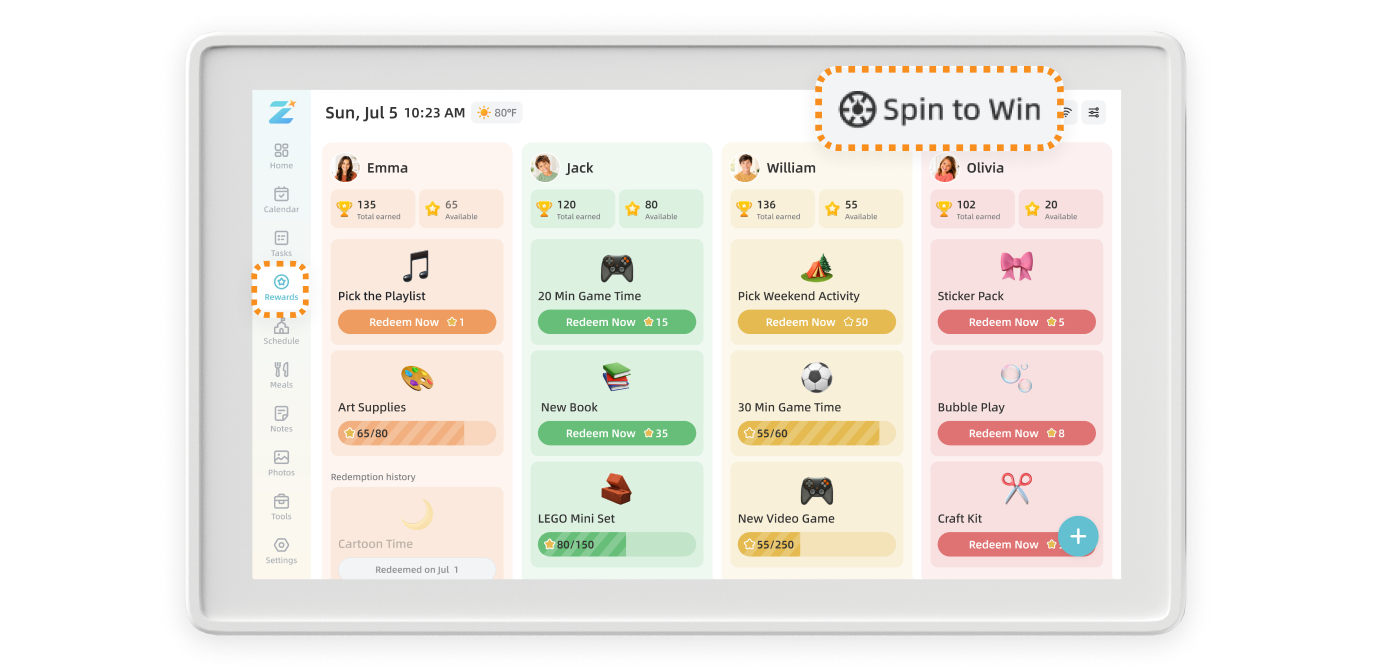
② Tap the Settings icon to configure the wheel.
③ Set the number of stars required for each spin, and add 4 to 8 prize options.
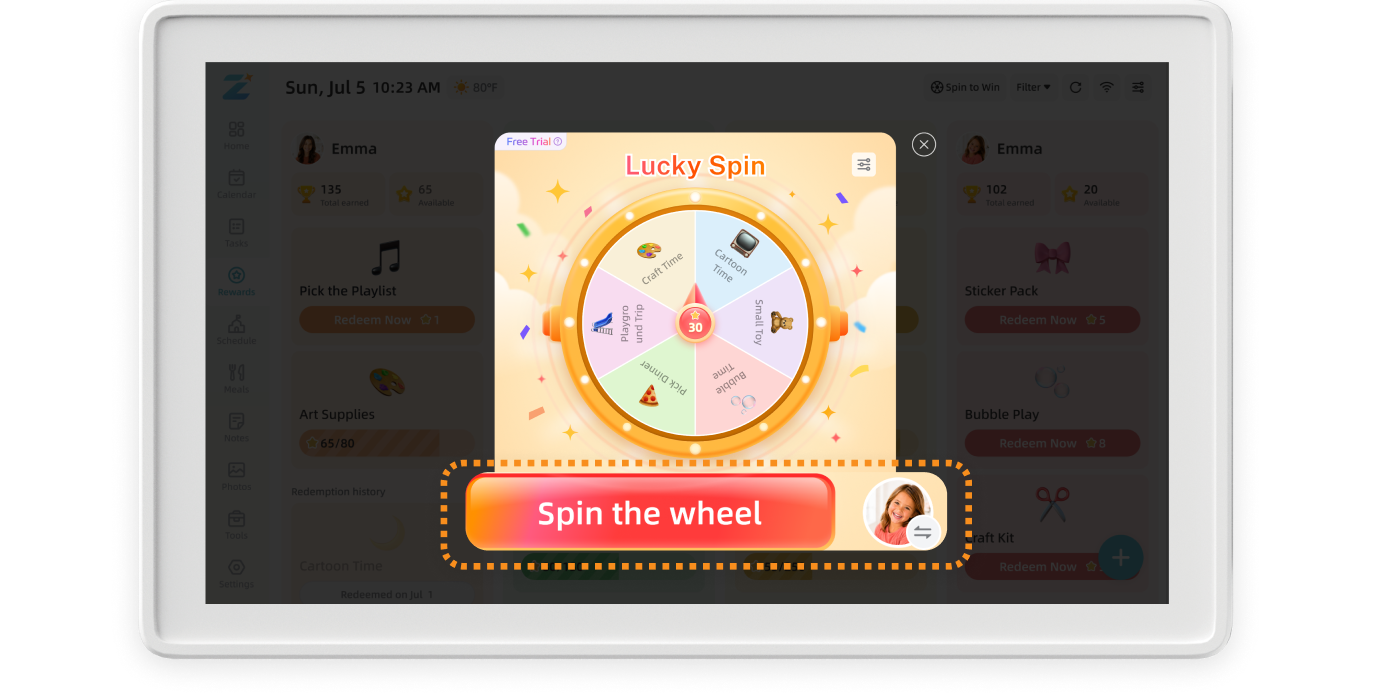
Spin the wheel
① Select the Member who will play. Members without enough available stars cannot be selected.
② Tap Spin the Wheel.
③ The wheel stops on the prize the Member receives.
7.4.3 Add or Subtract Stars Manually
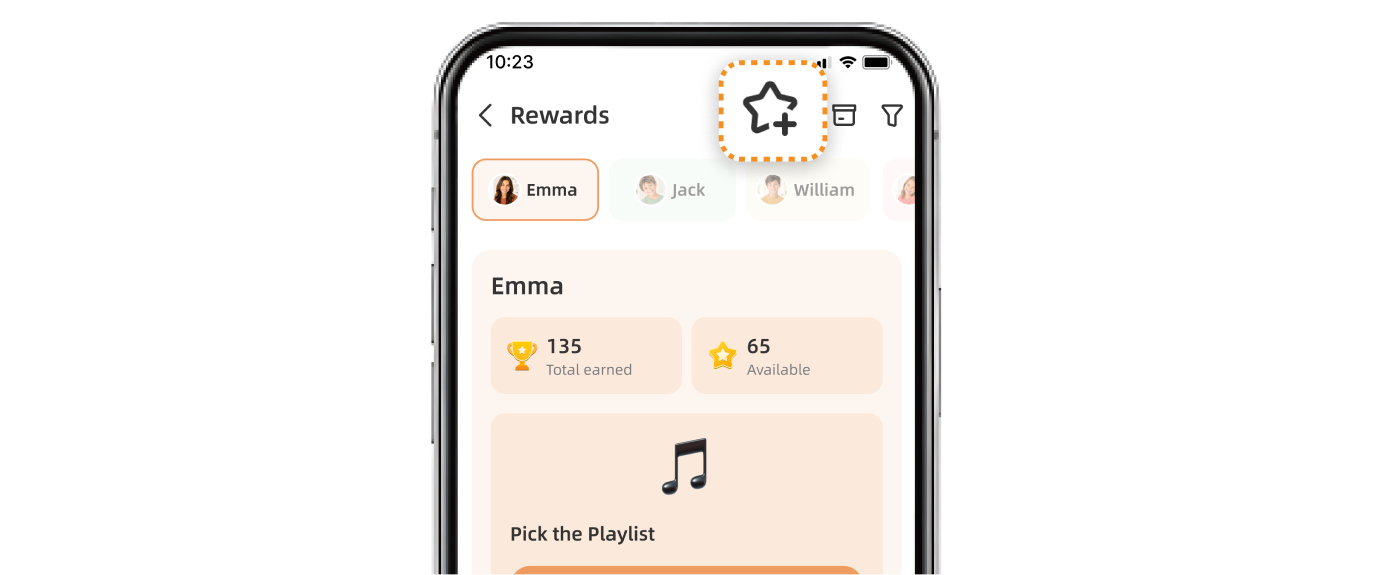
Use the Zical App to manually adjust Members' star balances.
① Open Rewards and tap the Add or Deduct Stars icon in the upper-right corner.
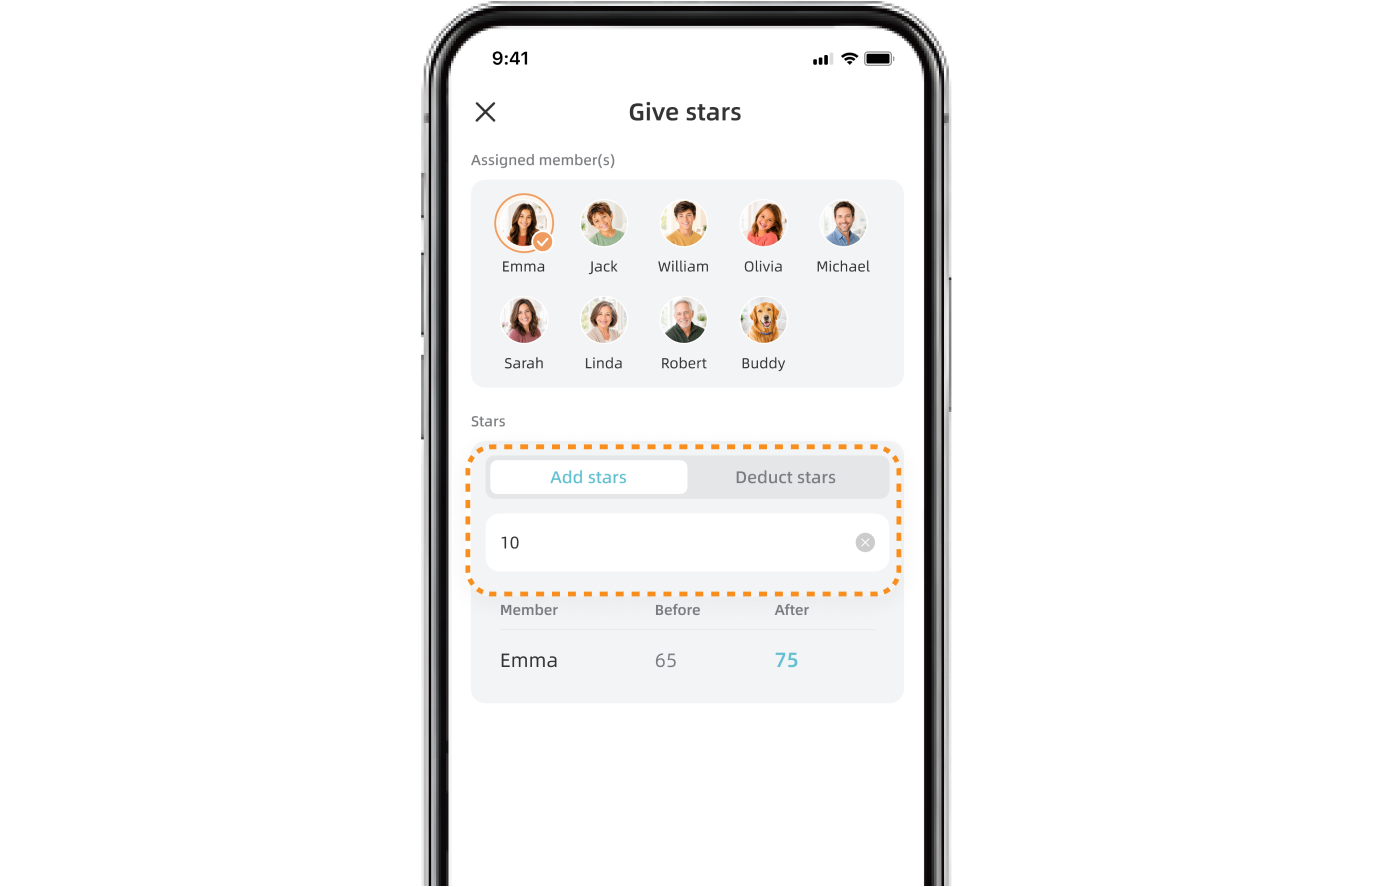
② Select one or more Members.
③ Select Add stars or Deduct stars, then enter the number of stars.
④ Tap Save.
7.5 Meals
Plan family meals with less stress and more consistency.
7.5.1 Create a Meal
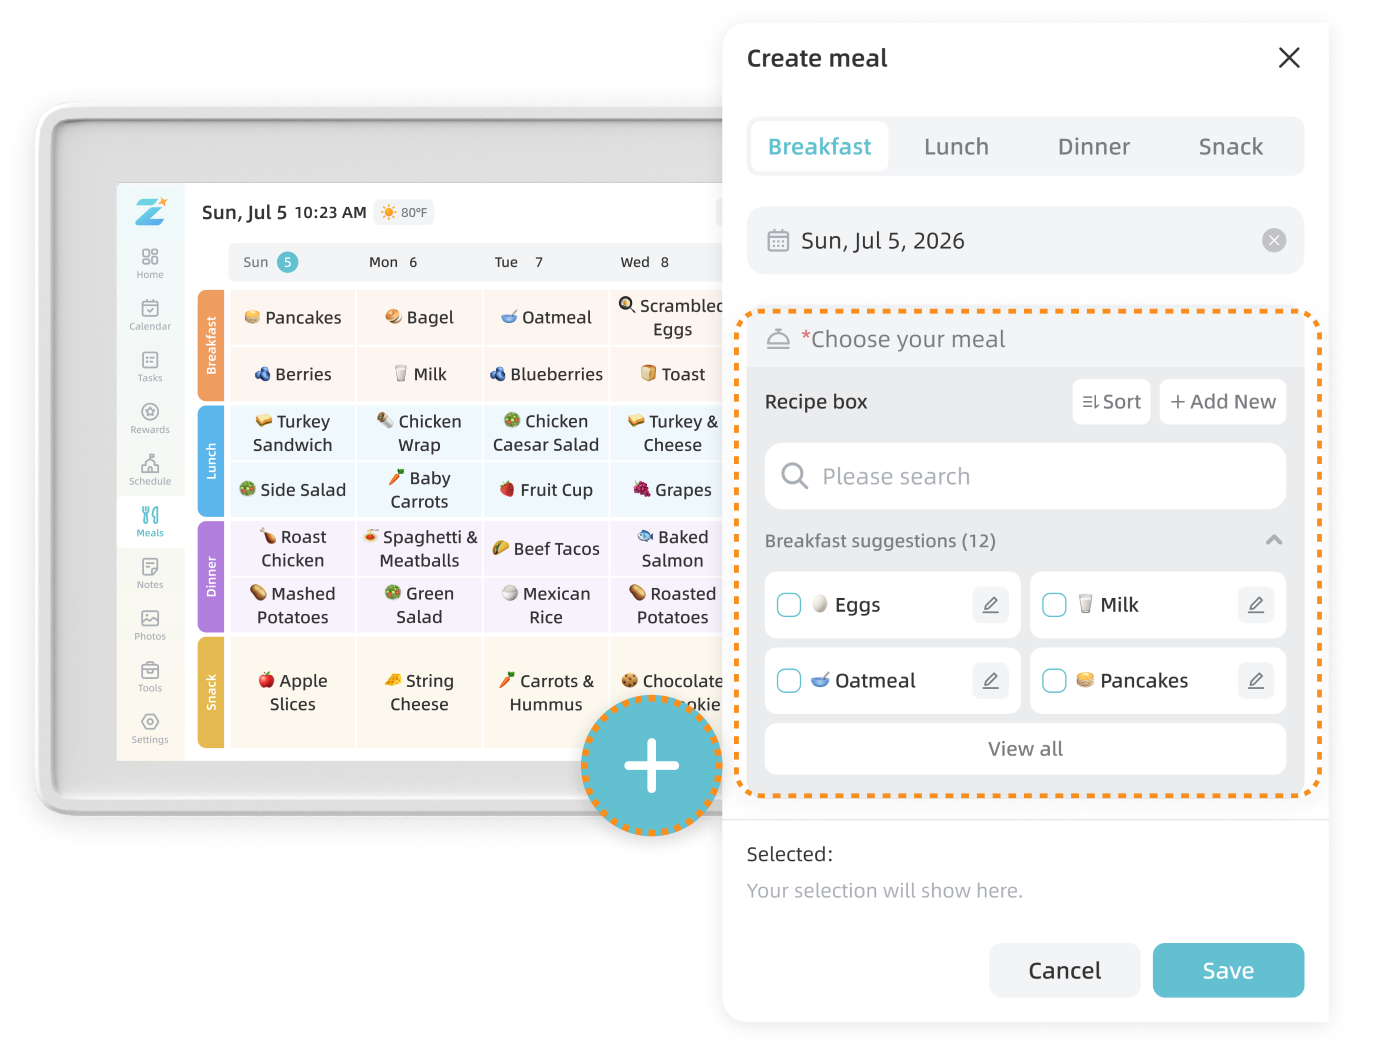
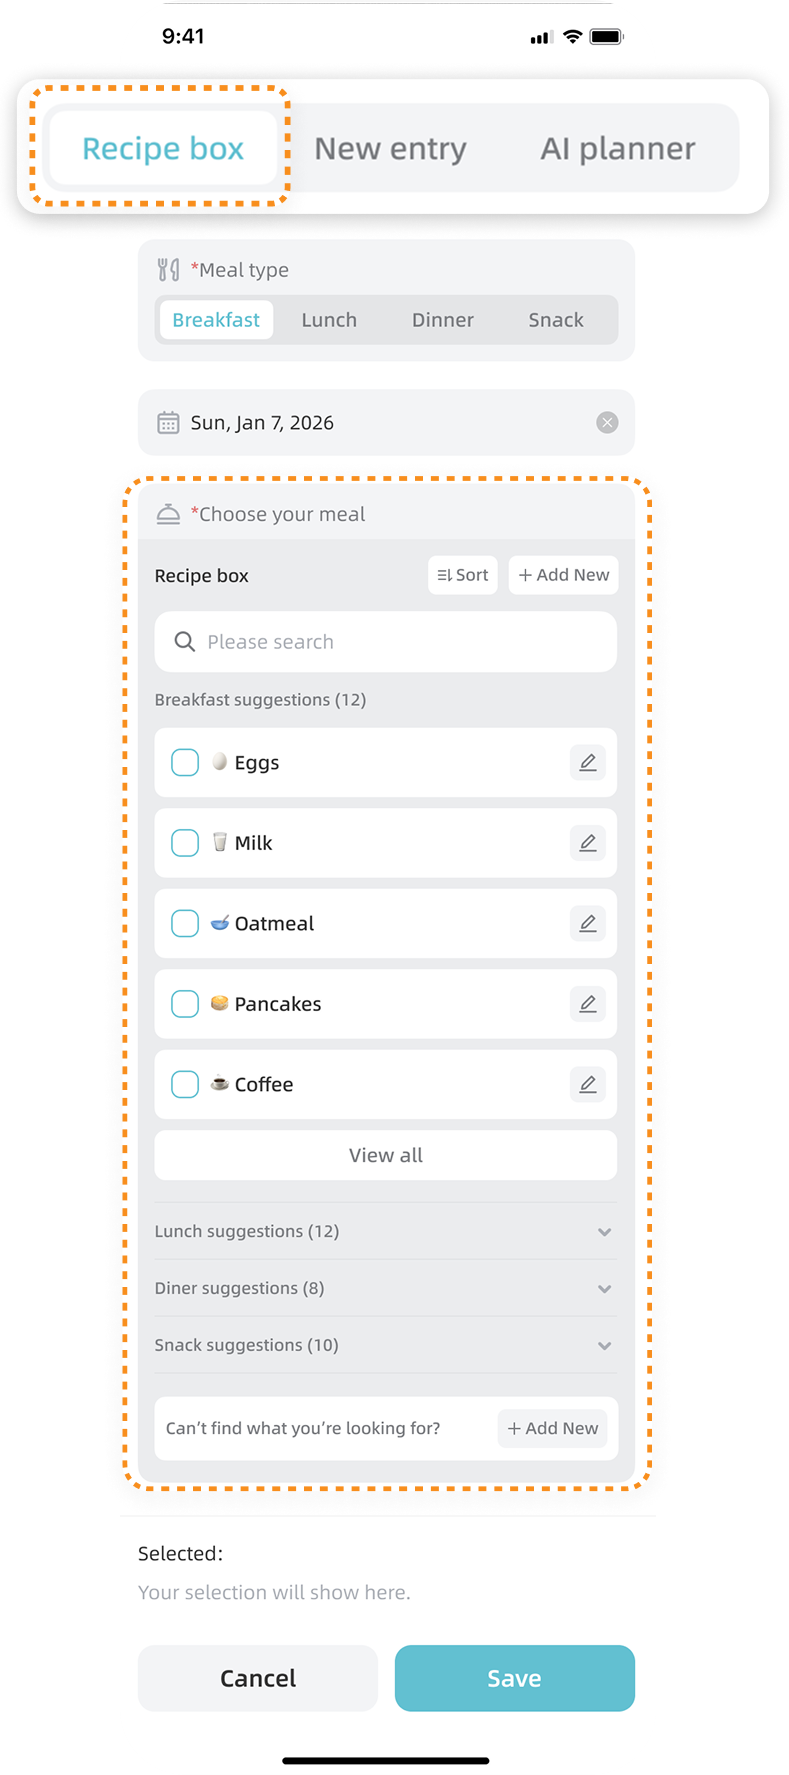
Choose a date and meal time, then create the meal in one of three ways: enter it manually with New Entry, select a saved recipe from Recipe Box, or use AI Planner.
Create a Meal from Recipe Box
Choose a date and meal time, then select a saved recipe from Recipe Box. The recipe name, ingredients, and preparation steps are added to the meal automatically. Review the details, then save the meal.
Note: Recipe details are view-only in this flow. To change them, edit the saved recipe in Recipe Box.
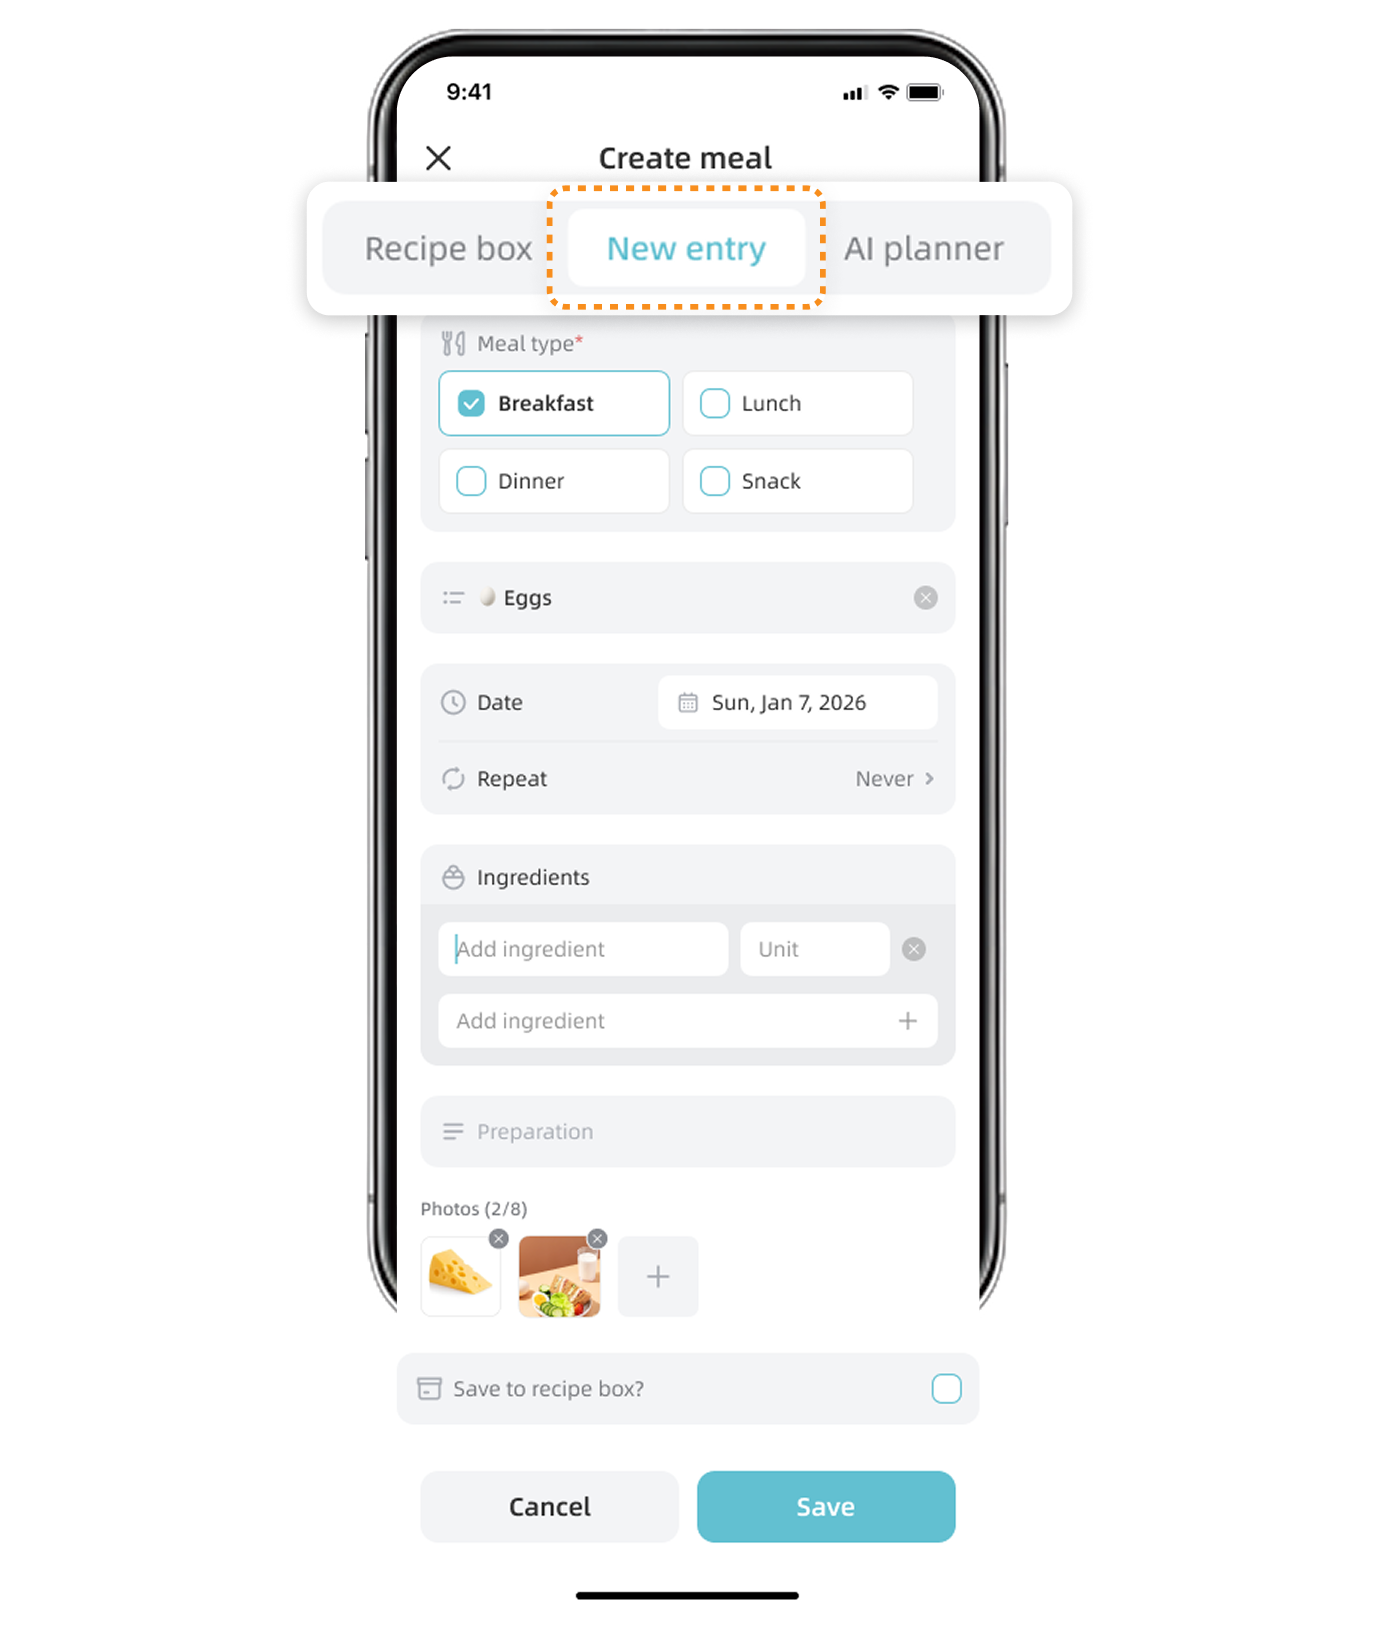
Create a Meal with New Entry
Choose a date and meal time, then select New Entry. Enter the meal name and, if needed, add ingredients and preparation steps.
Save the meal when finished. To reuse the recipe later, you can also save it to Recipe Box.
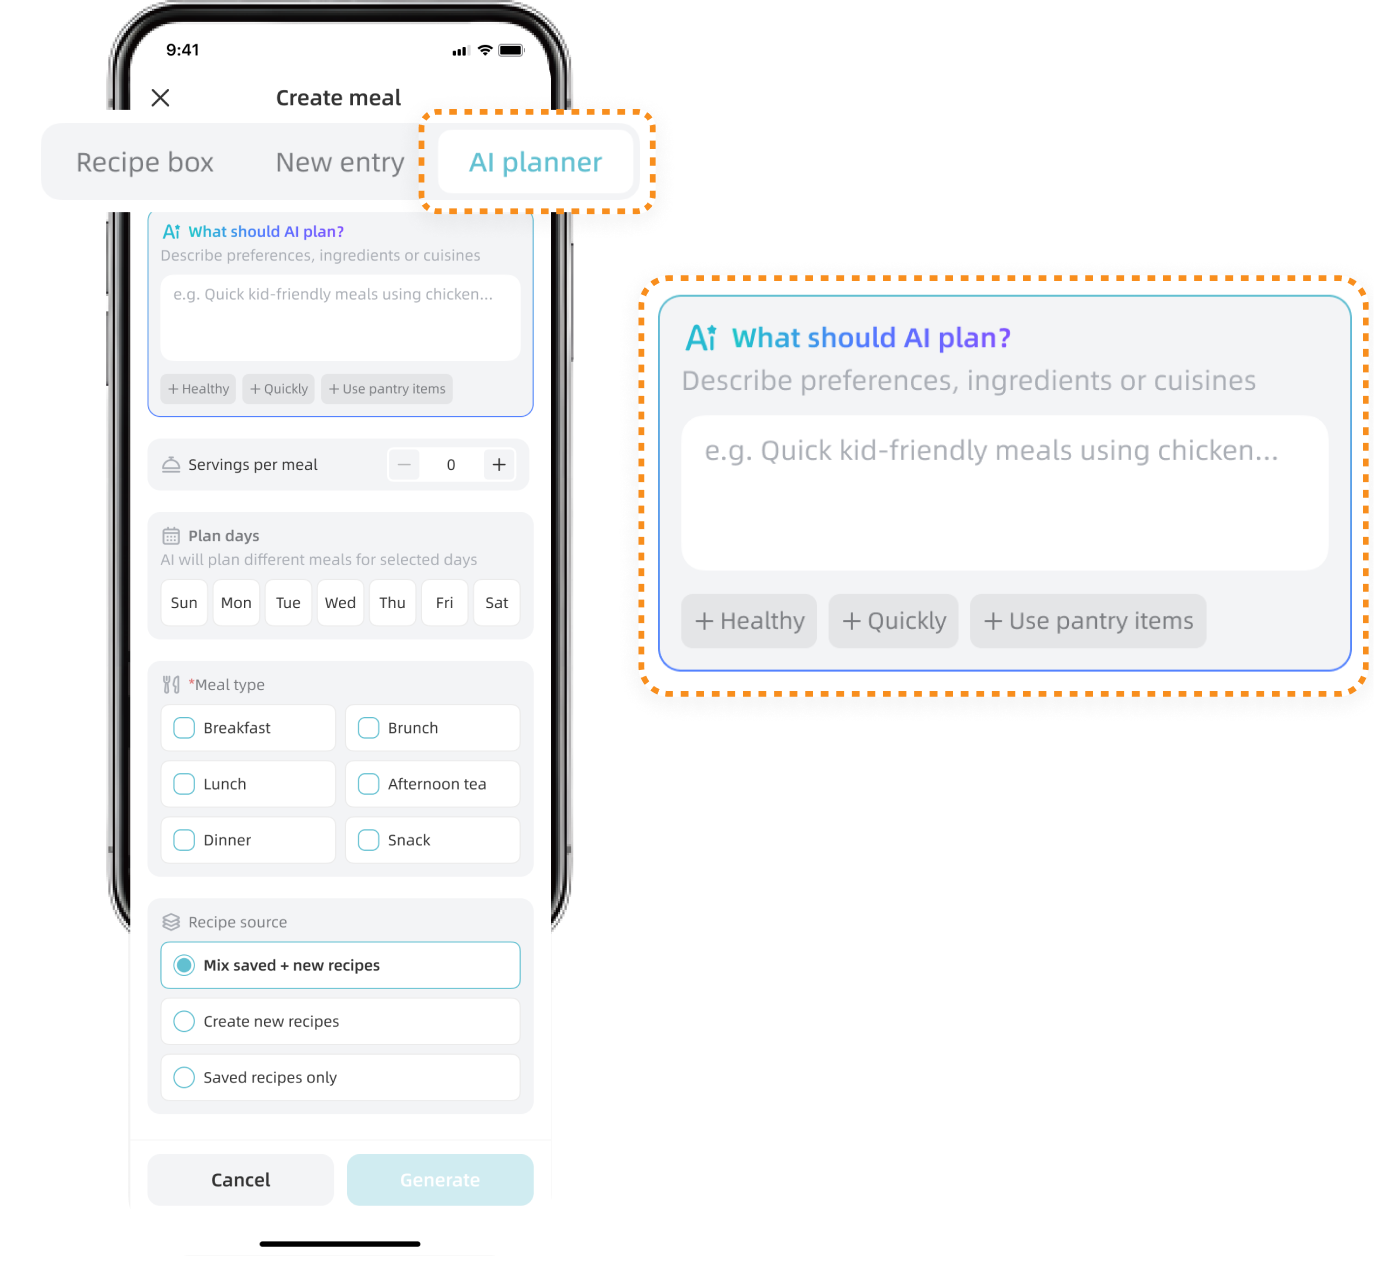
Create Meals with AI Planner
① Enter your family's dietary preferences, restrictions, dates, and other meal-planning needs.
② Submit the request and wait for AI Planner to generate a meal plan. This may take a few minutes.
③ Review each suggested meal. Remove any meal you do not want, or open a meal to edit its recipe details.
④ Confirm and save the plan to add the meals to your calendar. The preview is not saved until you confirm it.
⑤ Select any generated recipes you want to save to Recipe Box for future use.
7.5.2 Manage Recipe Box
On the home display, open Meals, tap Categories in the upper-right corner, then select Recipe Box.
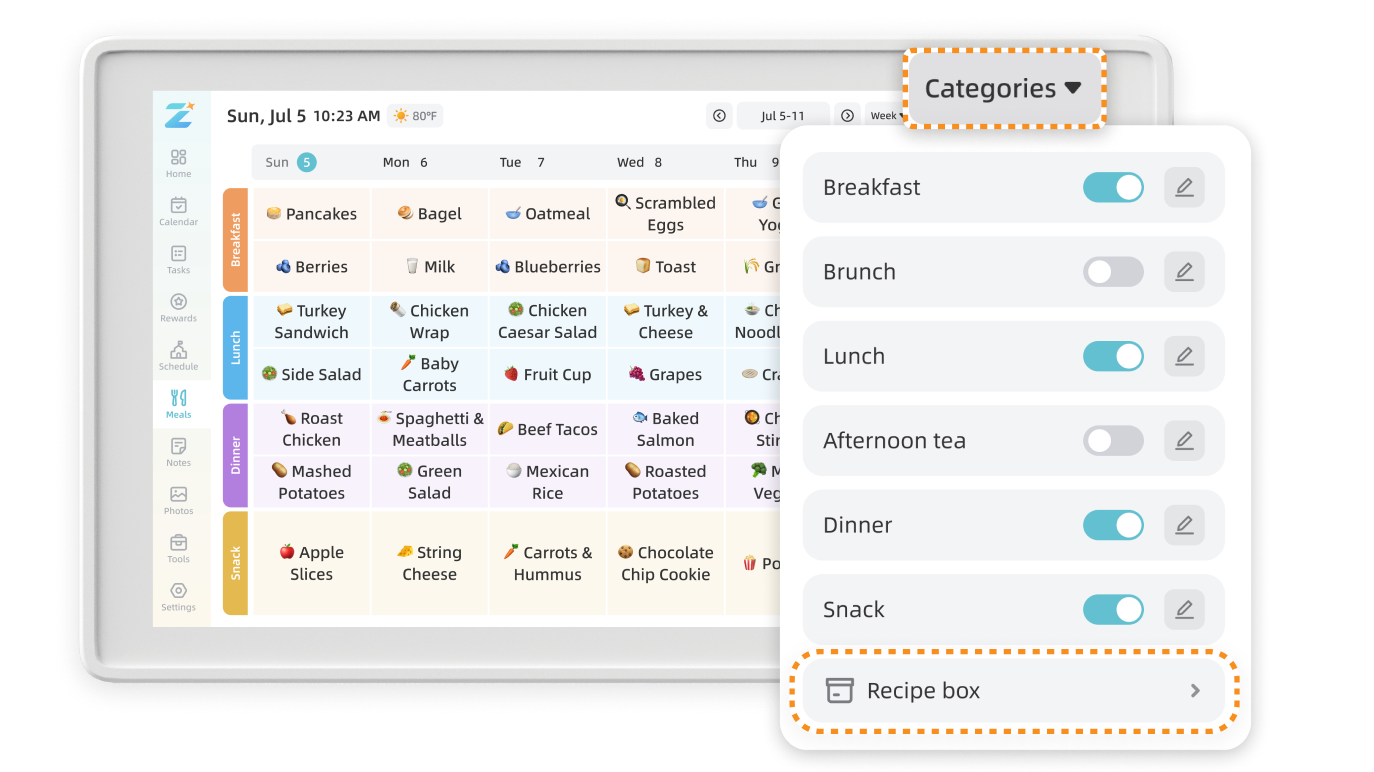
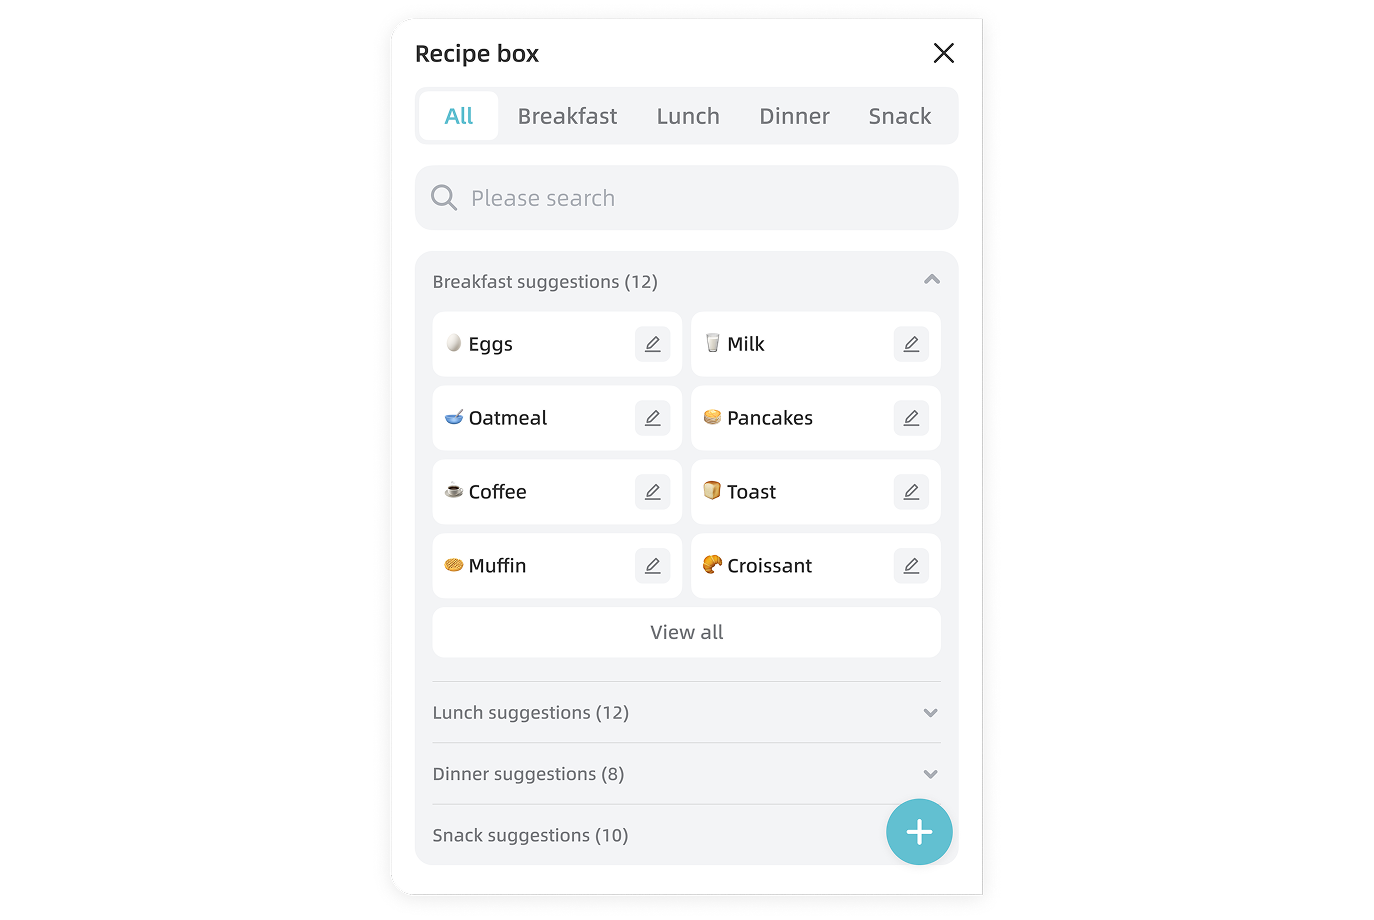
Use Recipe Box to save recipes and meal ideas your family can reuse.
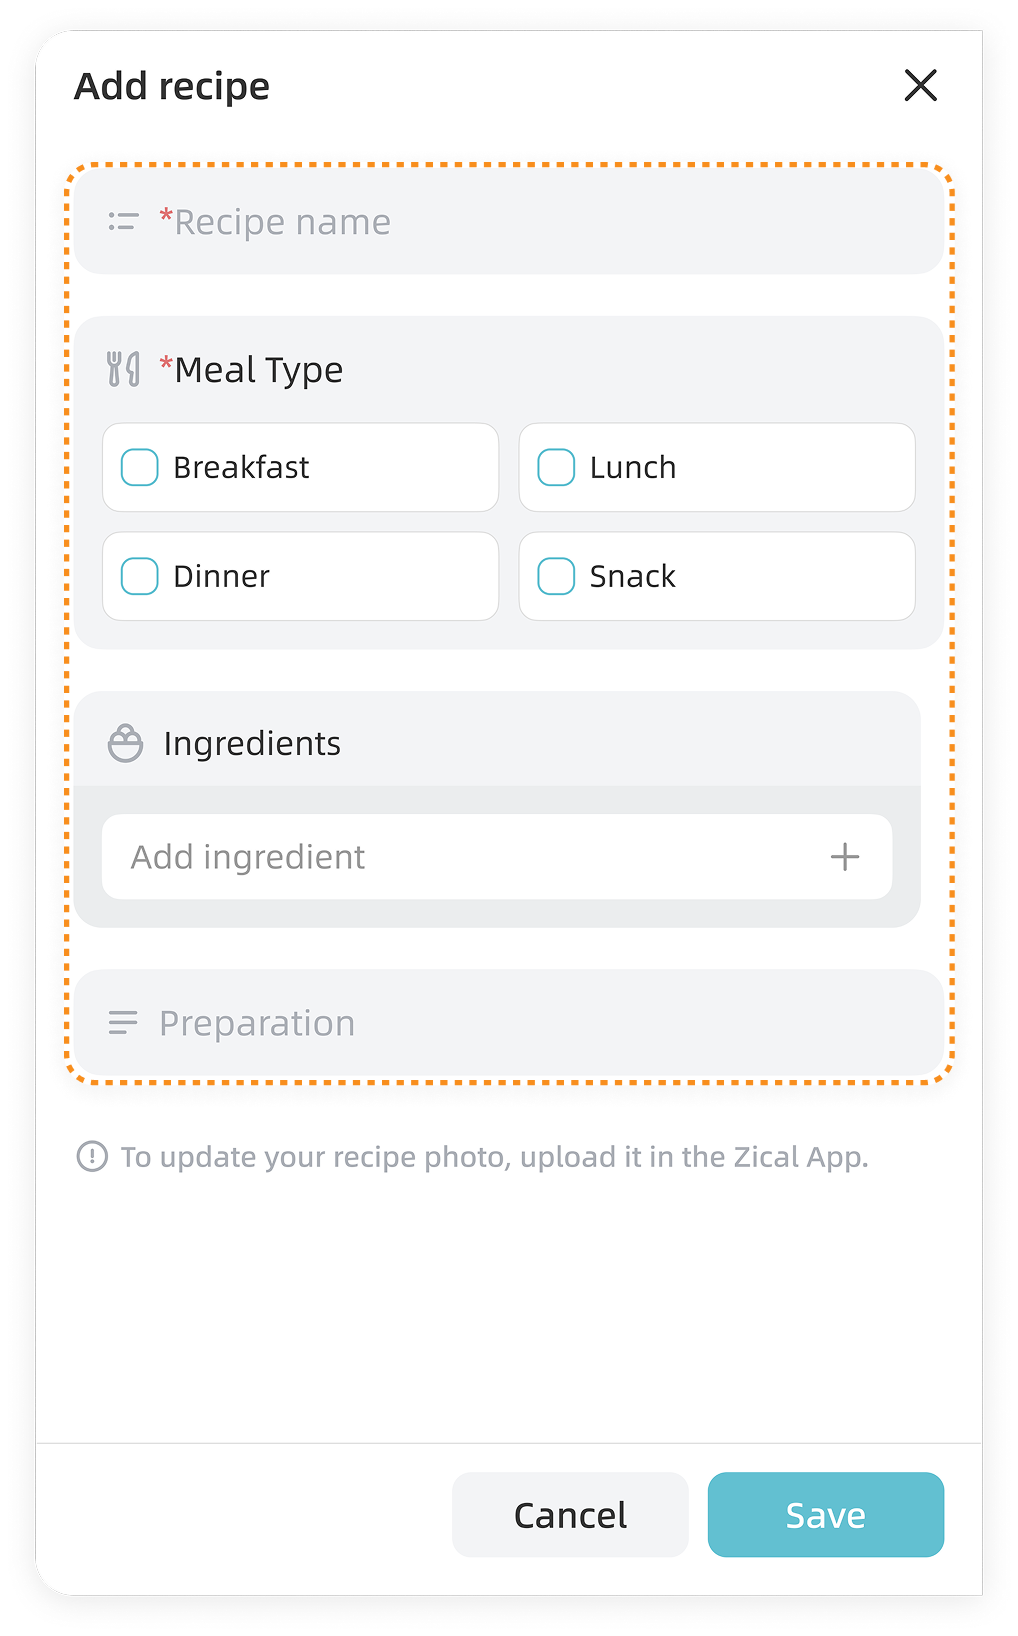
Create a recipe
Enter the recipe name, ingredients, and preparation steps.
Note: You can also add a recipe photo through the Zical App.
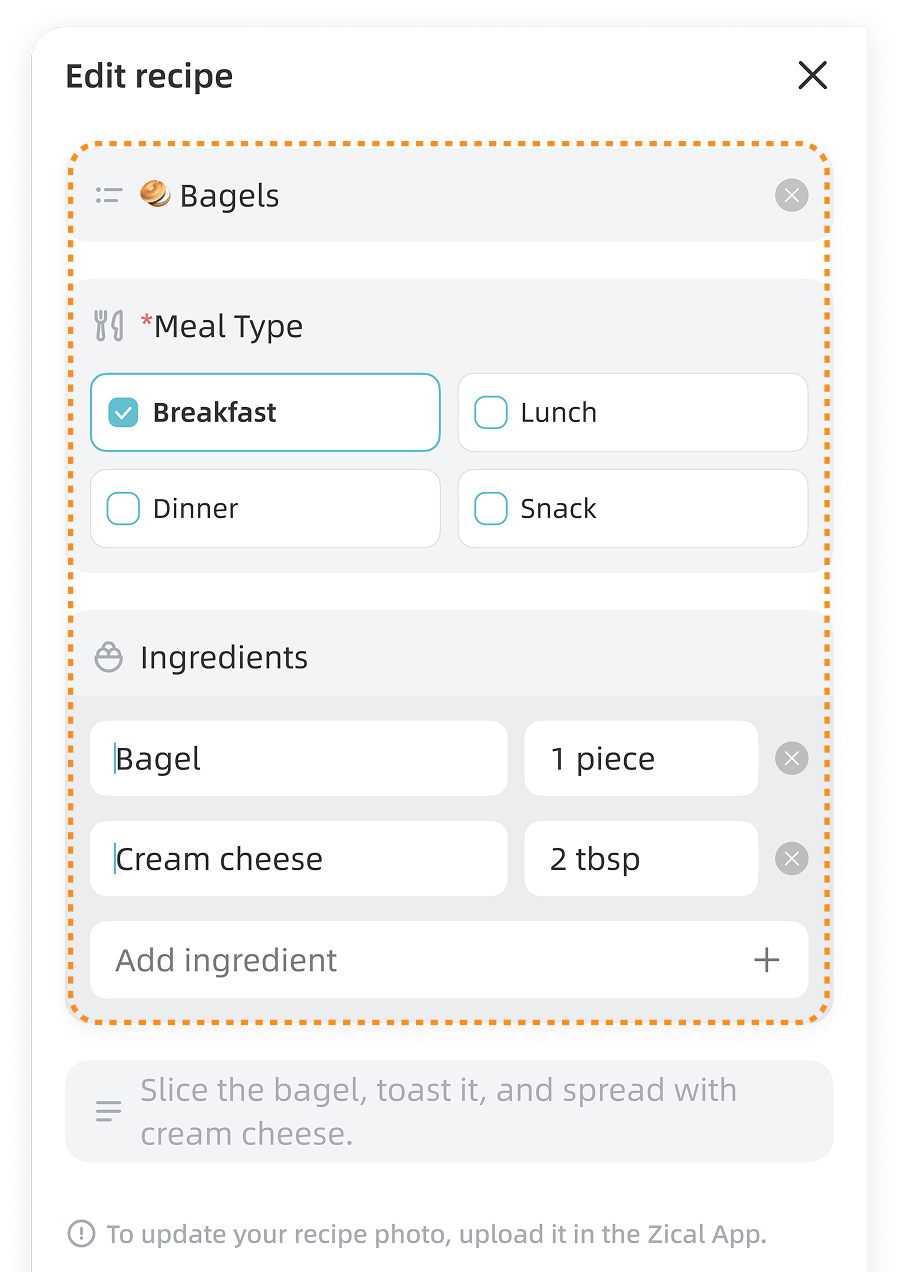
Edit a recipe
Open a saved recipe, update the information, then save your changes.
Delete a recipe
Open the recipe, tap Delete, then confirm.
Note: Editing or deleting a recipe does not change meals that were already created from it.

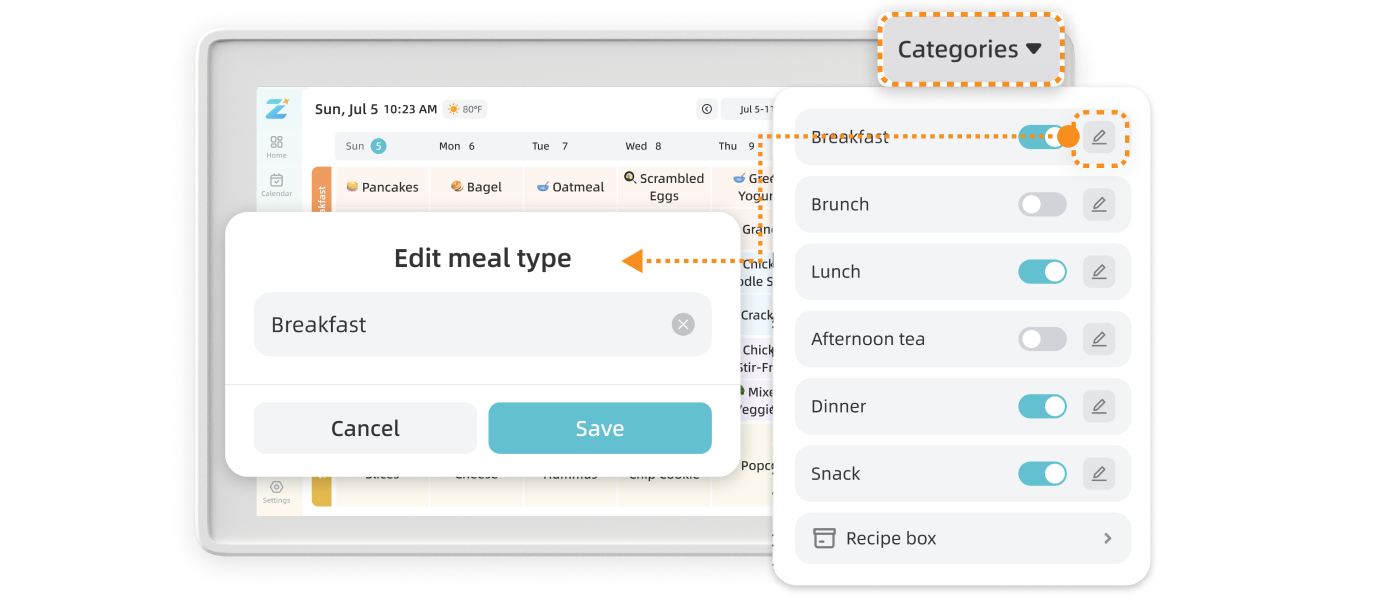
7.5.3 Manage Meal Types
On the home display, open Meals and tap Categories in the upper-right corner.
Turn meal types on or off, and tap the Edit icon to rename them. You can configure up to six meal types.
7.5.4 Add Ingredients to Notes
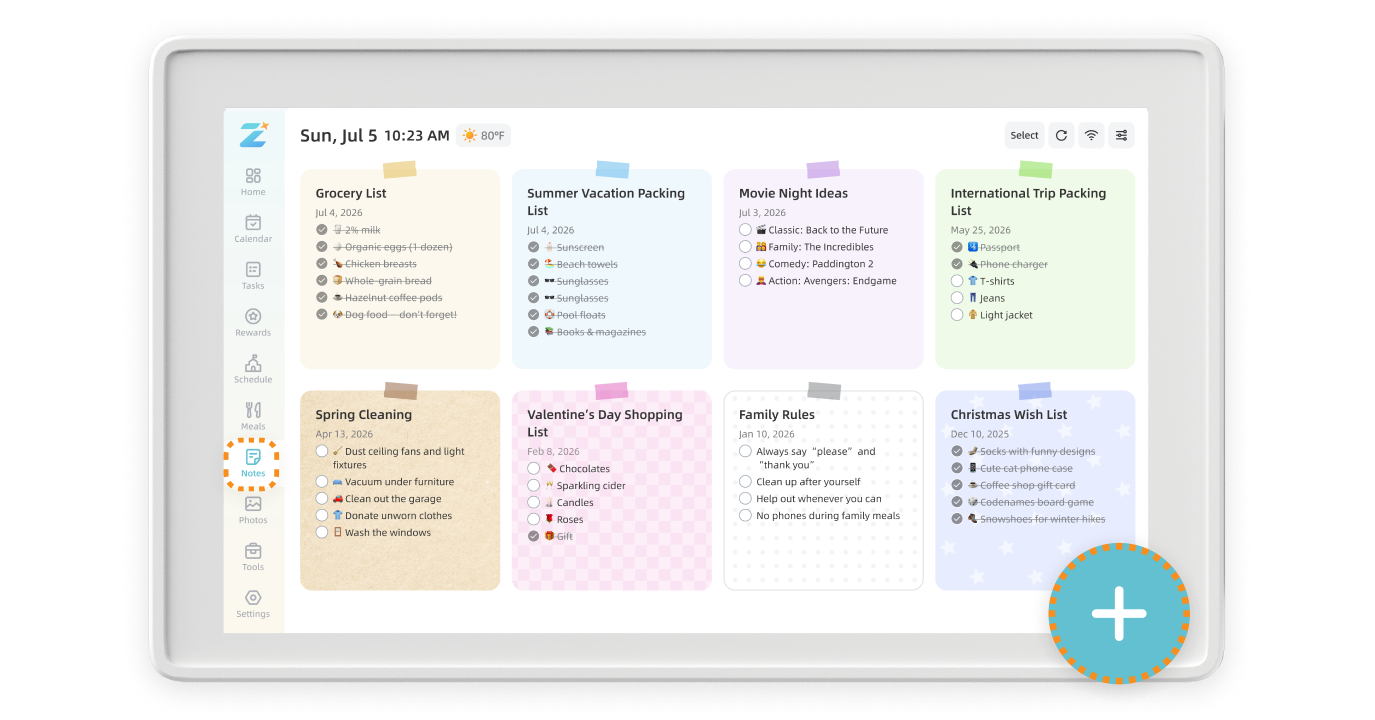
After you create a meal plan, Zical asks whether you want to add the ingredients to Notes. Confirm to create a shopping-list note from the recipes' ingredients. You can view the shopping list in Notes.
Note: If none of the recipes in the meal plan contain any ingredients, Zical will notify you and no note will be created.

7.6 Notes
Share reminders, lists, and quick messages with your family.
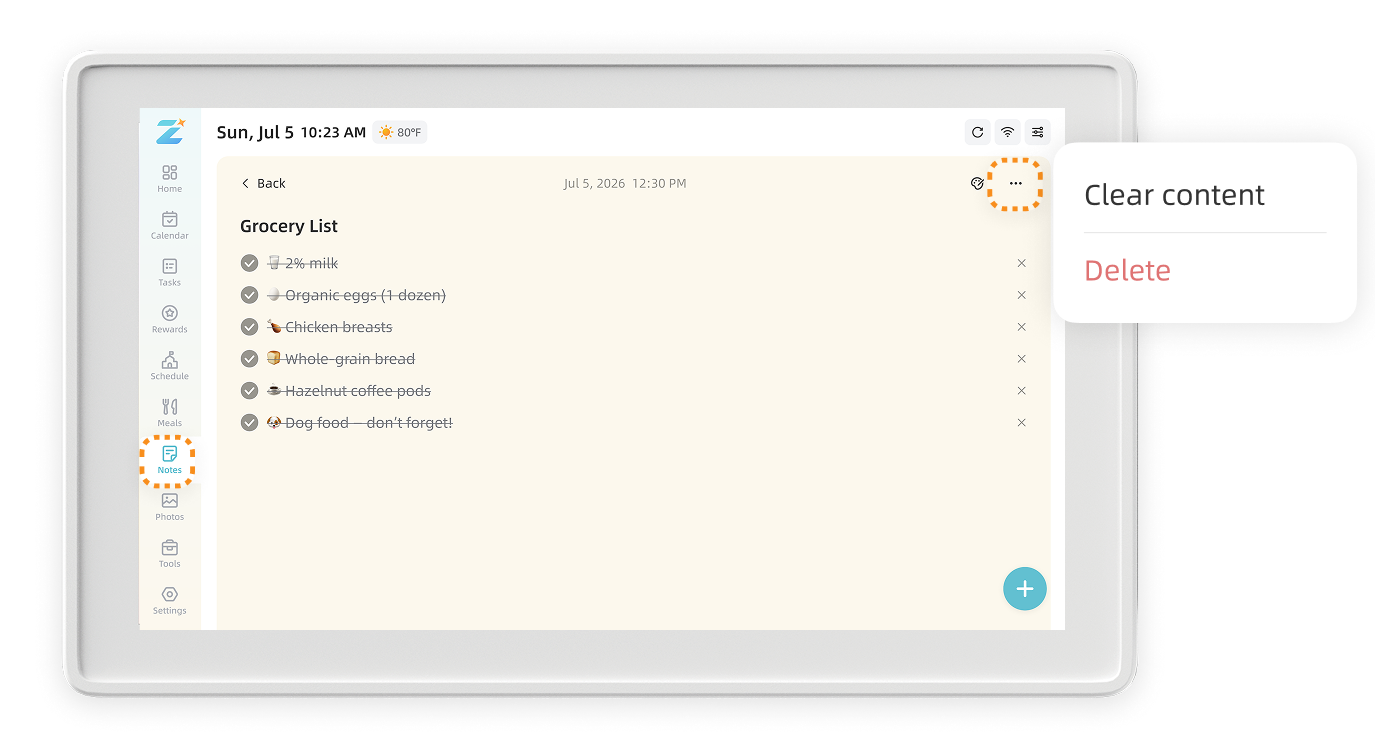
7.6.1 Create, Edit, or Delete Notes
Create, update, or delete notes as needed. New notes appear at the top of the list and sync across supported linked devices.
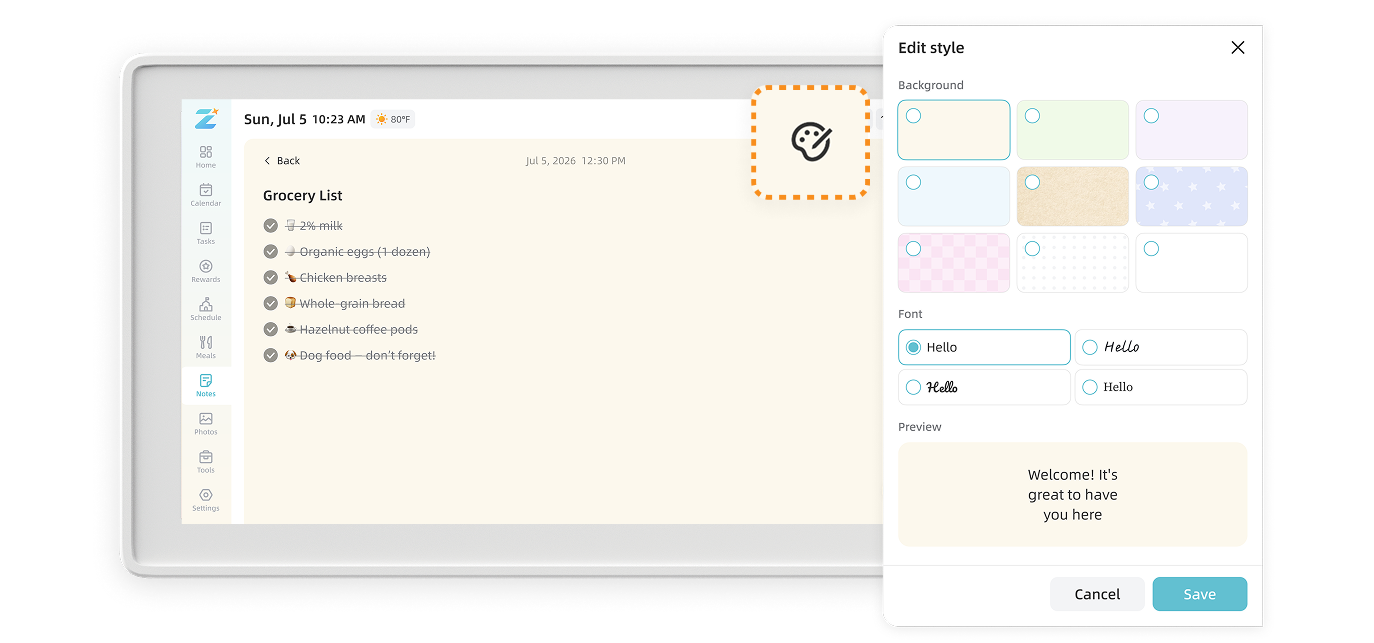
7.6.2 Customize a Note's Style
Open a note's style options to change its background and font style.
7.7 Schedule
Keep classes, lessons, and after-school activities organized in one place.
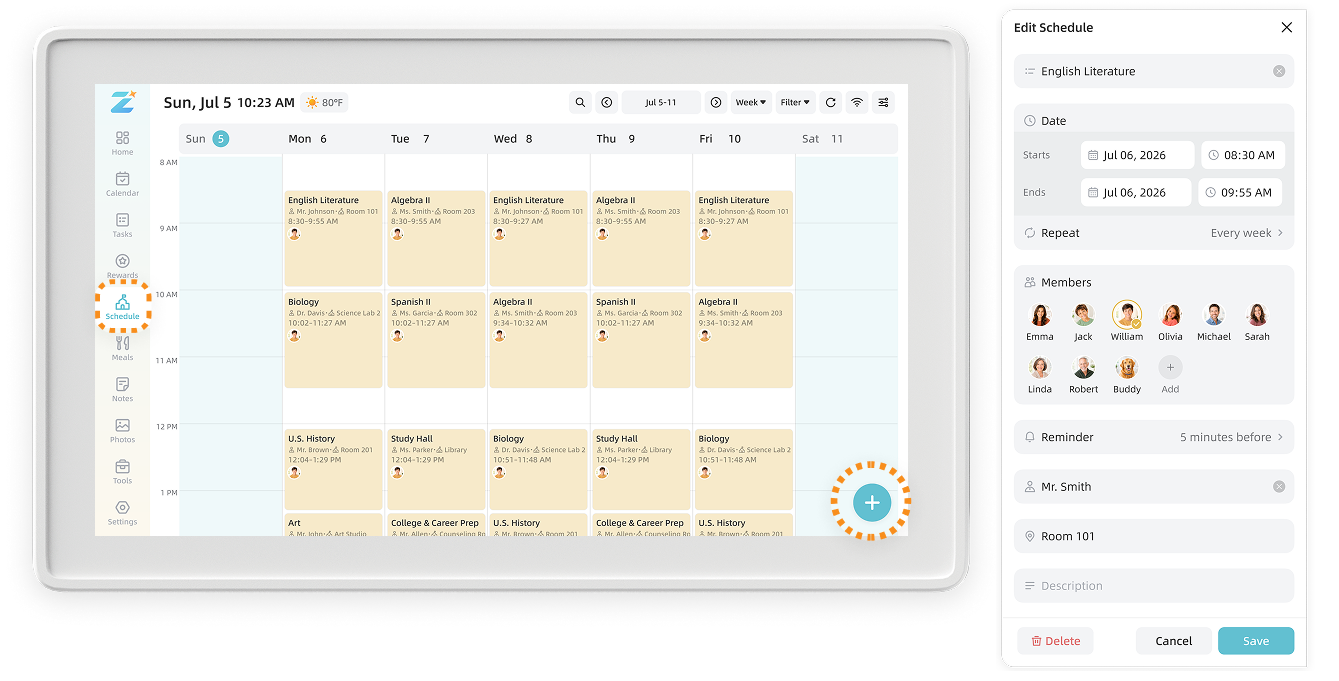
7.7.1 Create and Manage Schedule
Create, edit, or delete courses as needed. For each course, select the Member, day, and time, and add optional details such as the teacher, classroom, location, or pickup information.
7.7.2 Switch Schedule Views
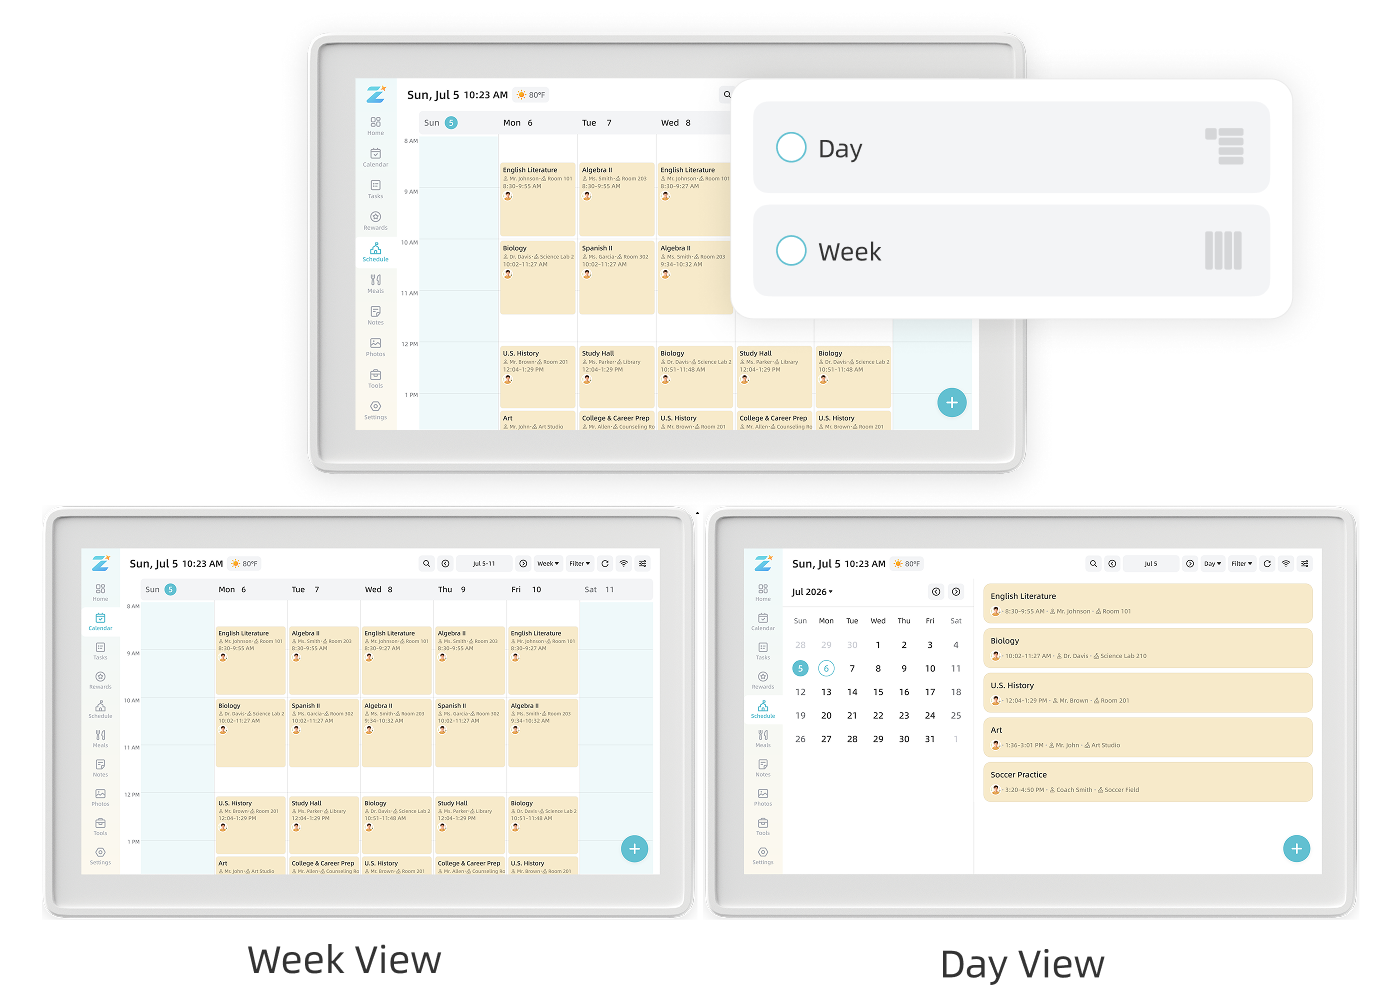
Switch between Day and Week views to review your schedule. Day view shows a list of all classes for the selected day. Week view displays the full schedule on a timeline, helping you spot conflicts between classes or pickup times.
7.8 Photos
Bring your favorite family photos and videos to the home display so everyone can enjoy them together.
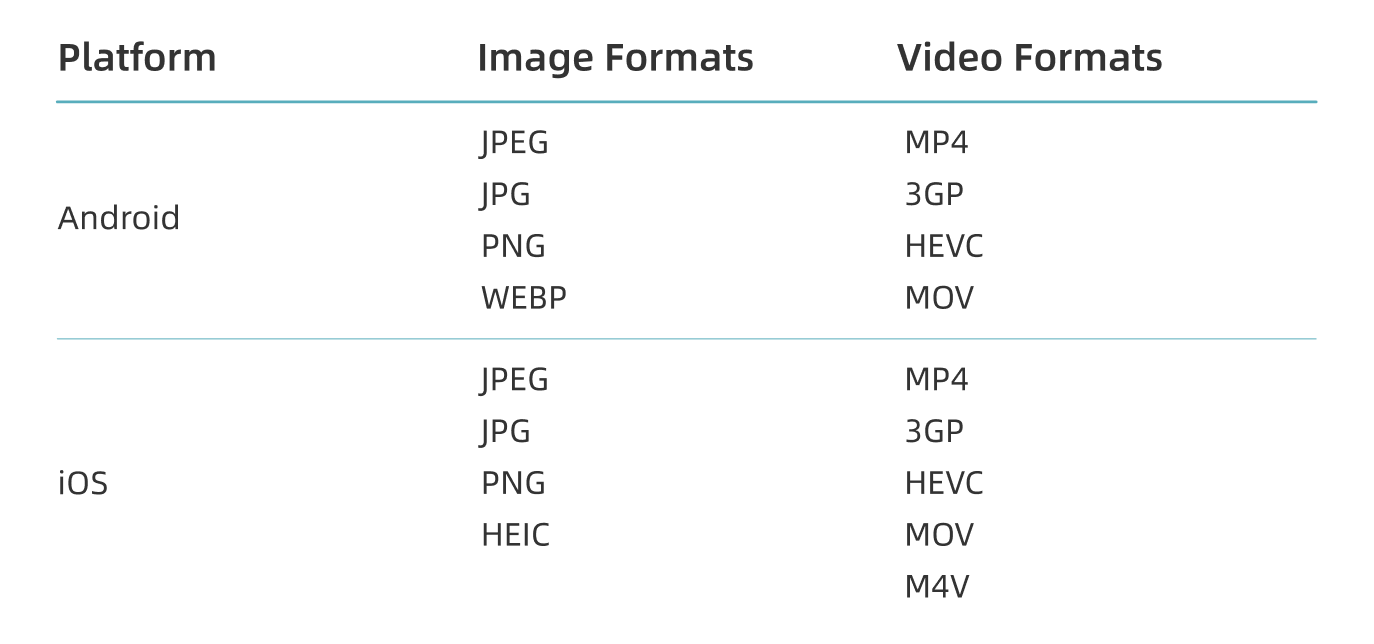
7.8.1 Supported Photo and Video Formats
Upload photos and videos in the formats listed in the Zical App. Encoding support and playback availability may vary by software version and device model.
7.8.2 Upload Photos and Videos in the App
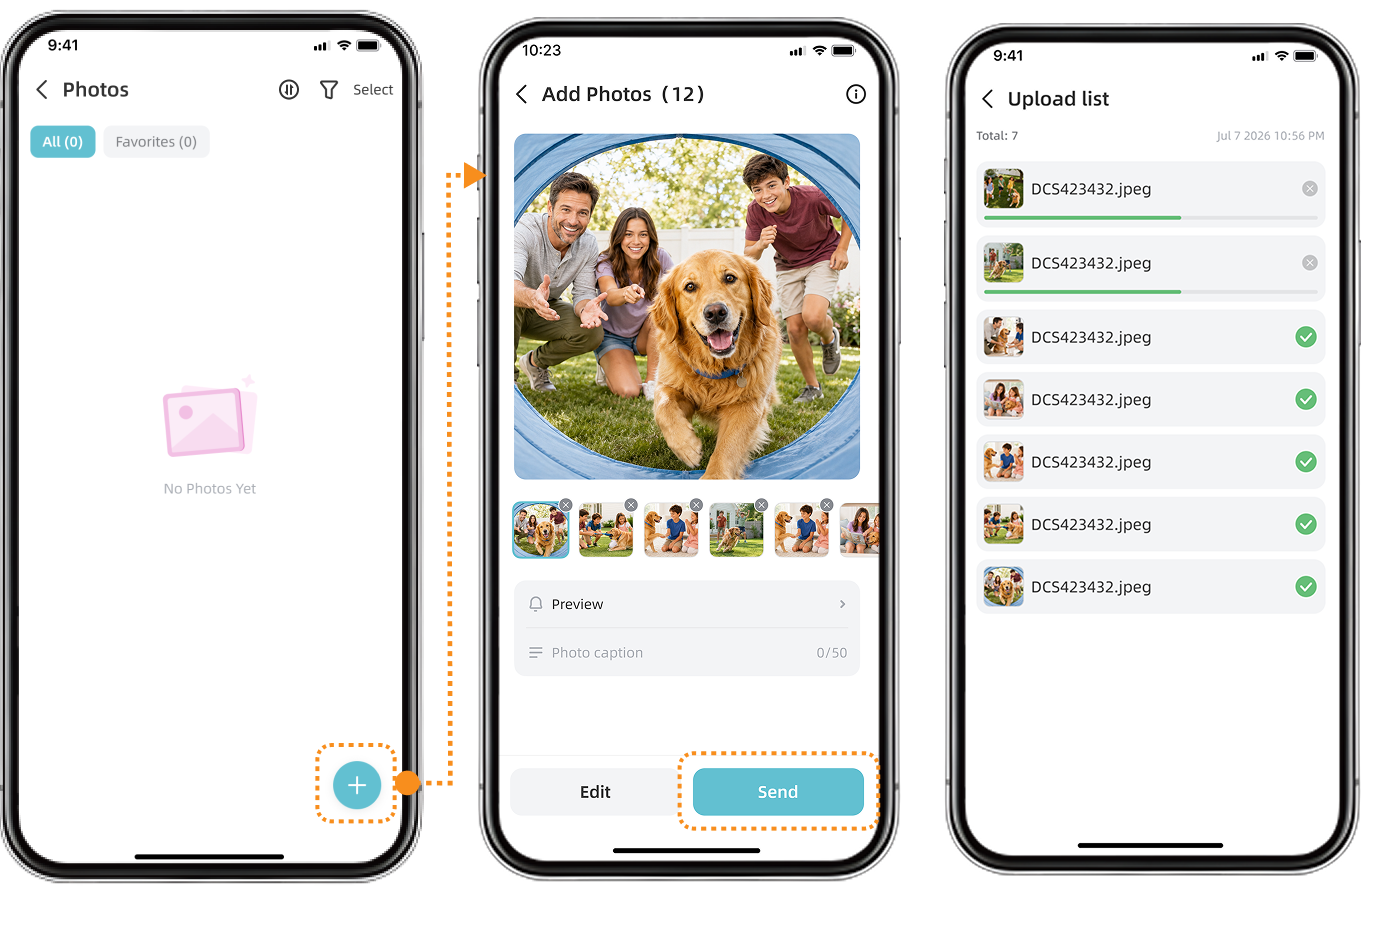
In the Zical App, select the photos or videos you want to upload. You can view the upload queue and progress. For large uploads, keep the App open and maintain a stable internet connection until the upload is complete.
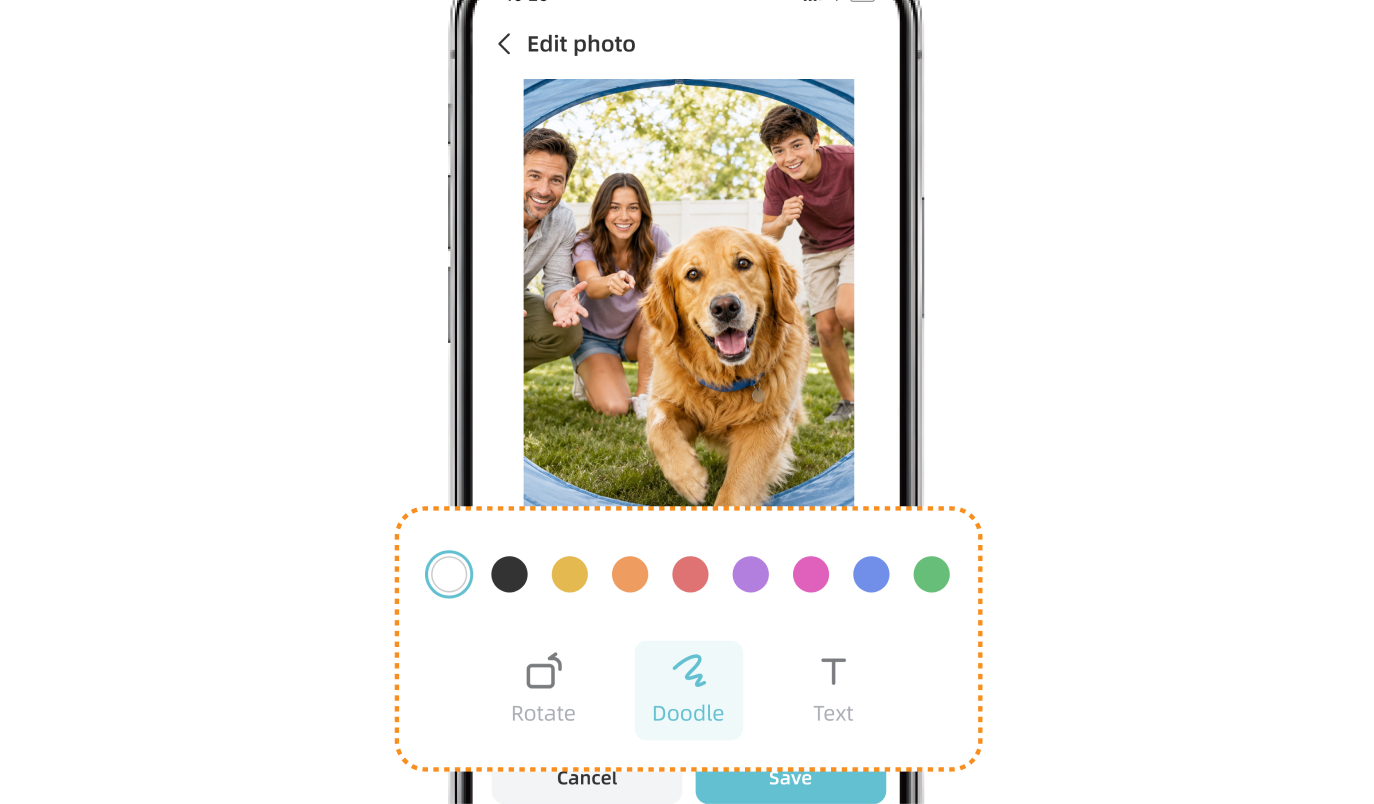
Edit Photos in the App
Before uploading a photo, use the available tools to crop, rotate, adjust, draw, or add a title. Review the result before saving or uploading.
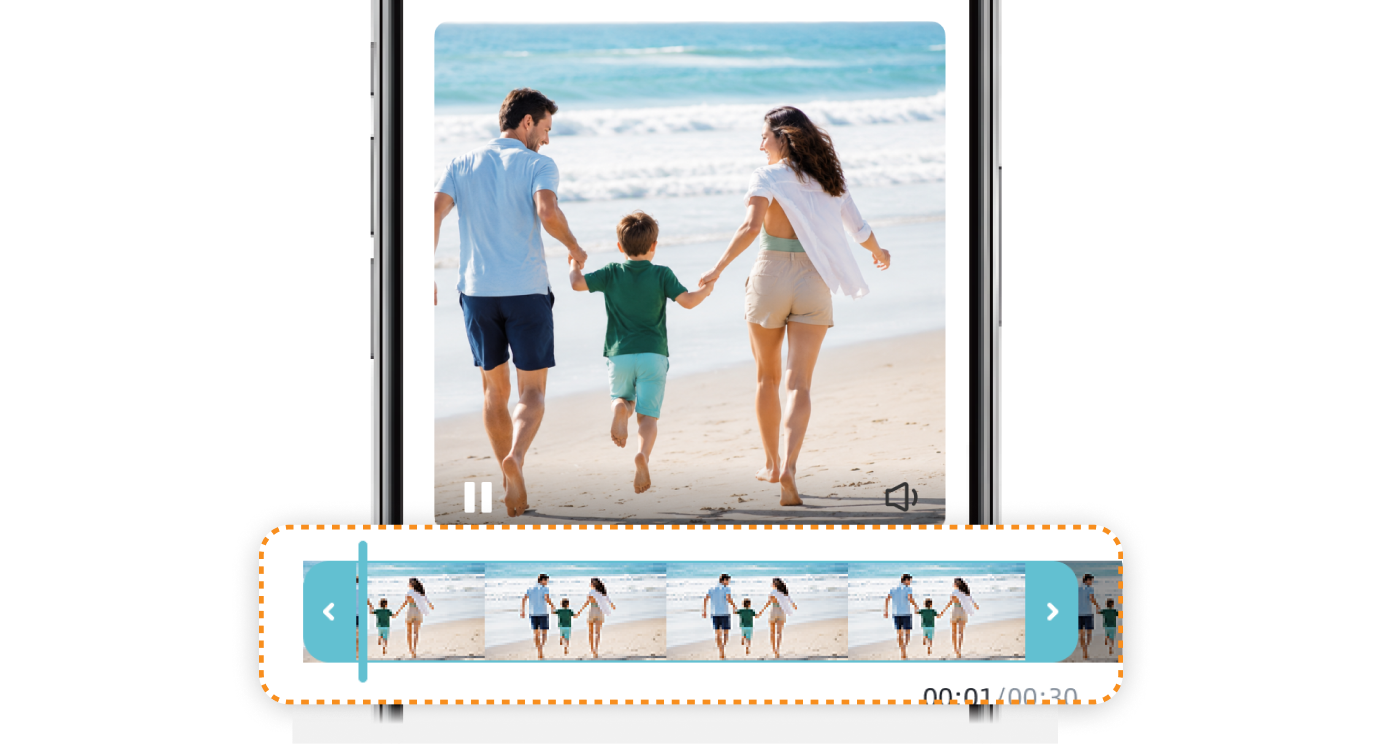
Trim Videos in the App
Standard uploads support videos up to 30 seconds. If a video is longer, use the editor to select the segment you want to upload, then review the clip before uploading.
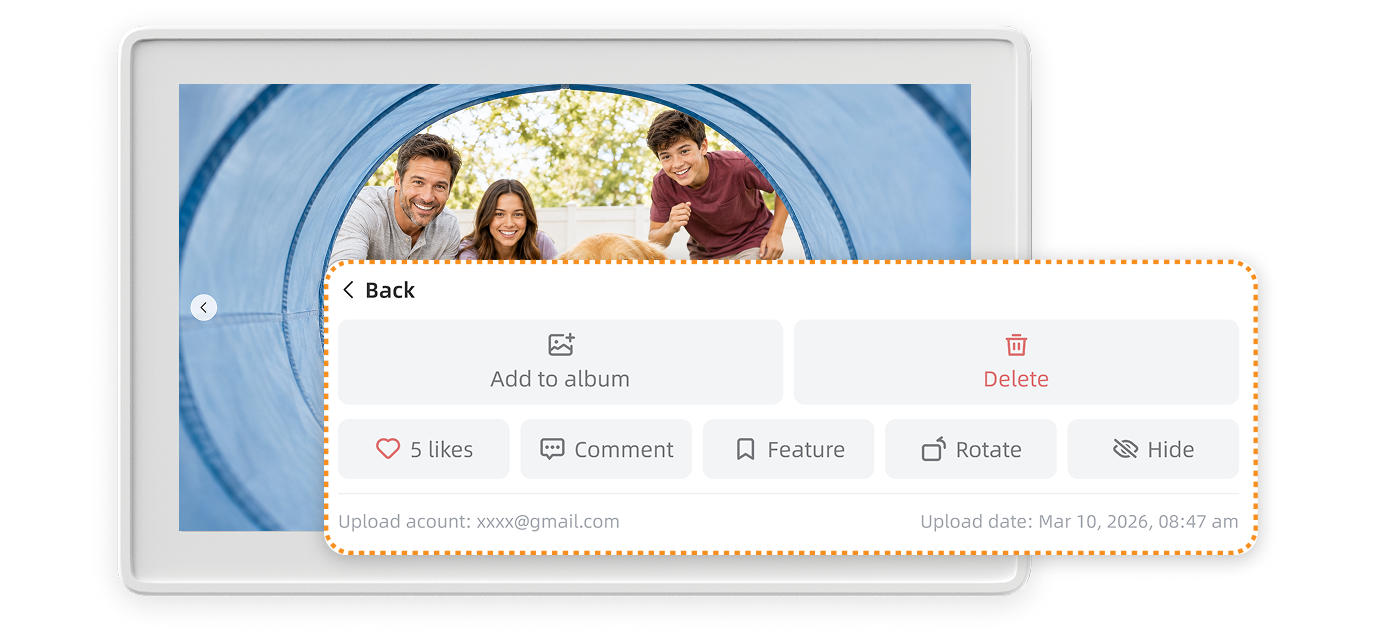
7.8.3 Manage Photos and Videos
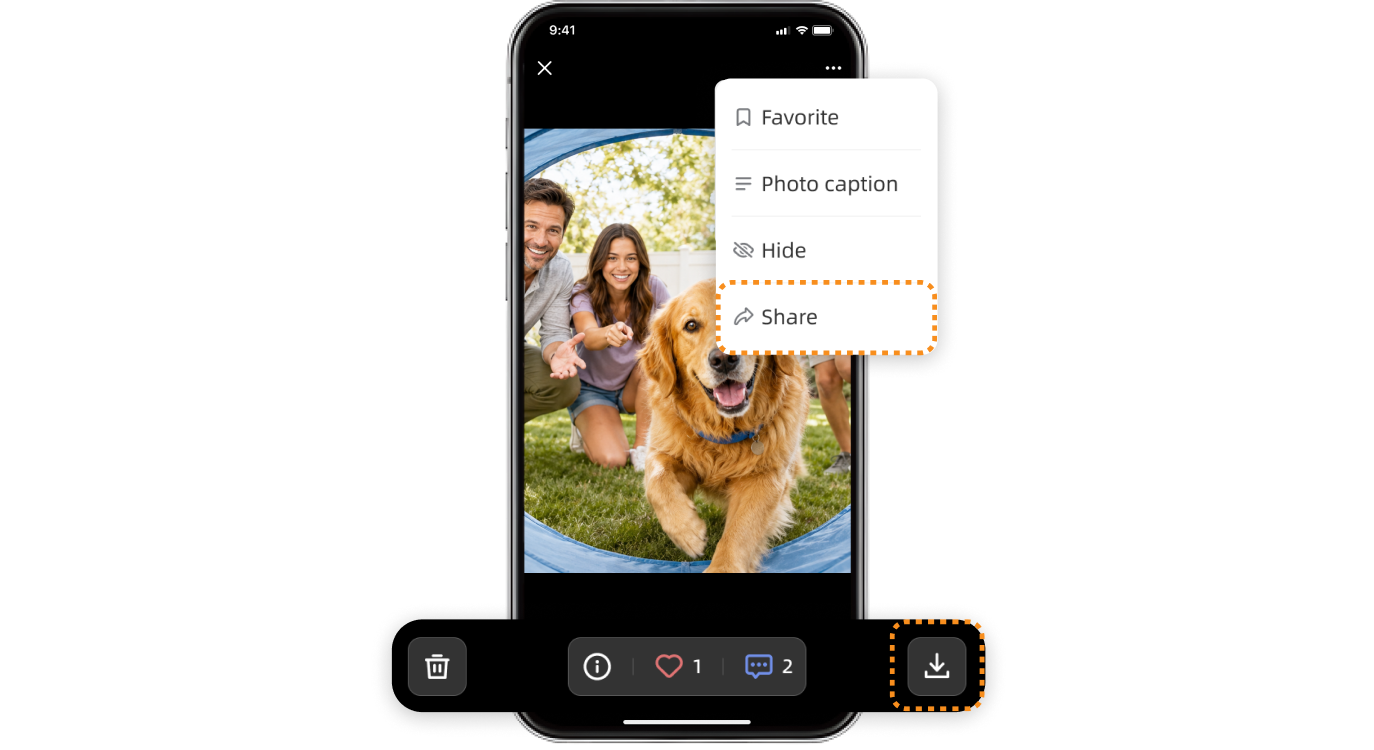
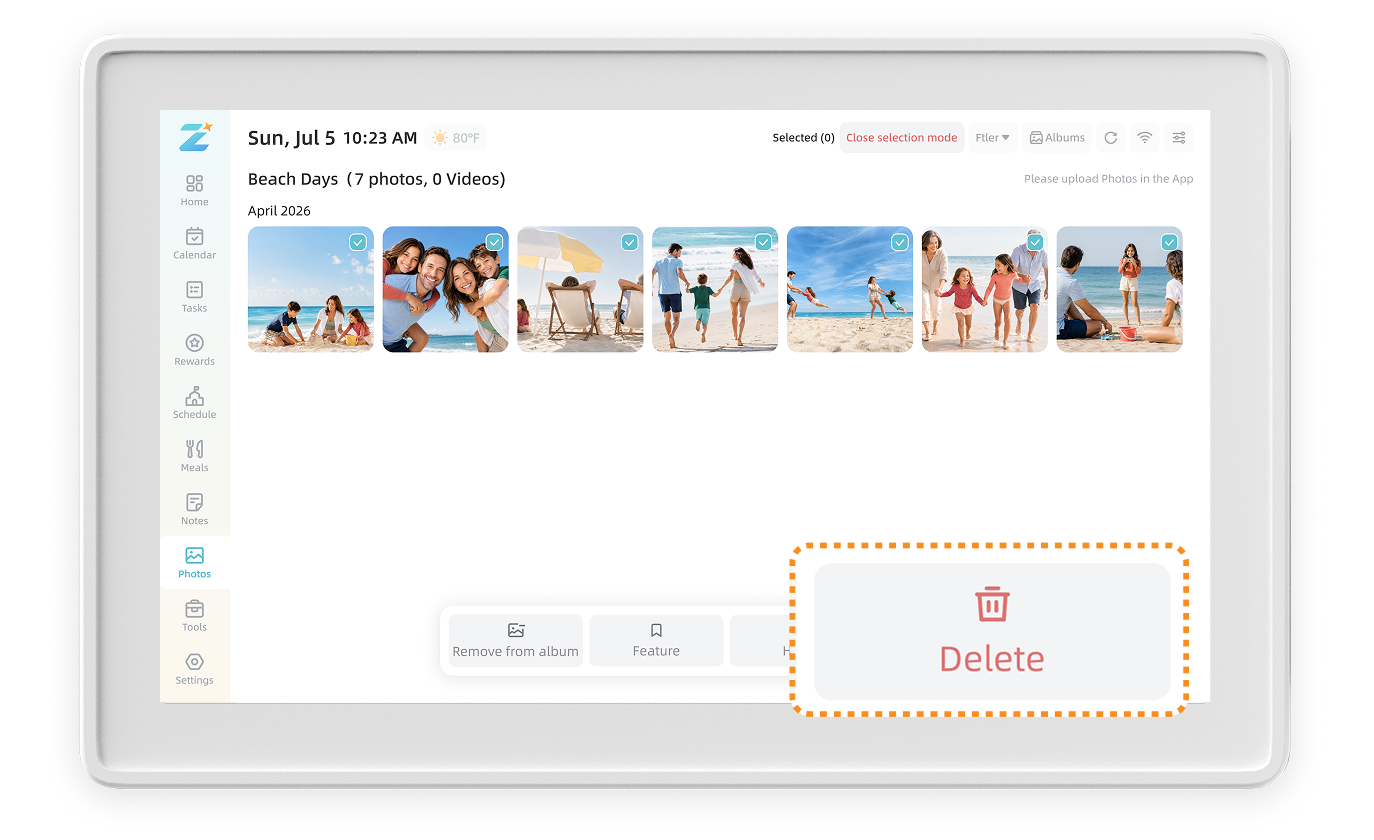
Open a photo or video to preview it and use the available actions, including Favorite, Hide, Unhide, Delete, Like, and Comment.
Download and Share are available in the Zical App.
Note: Hidden photos do not appear in slideshows on the home display. To find them, use the Hidden filter.
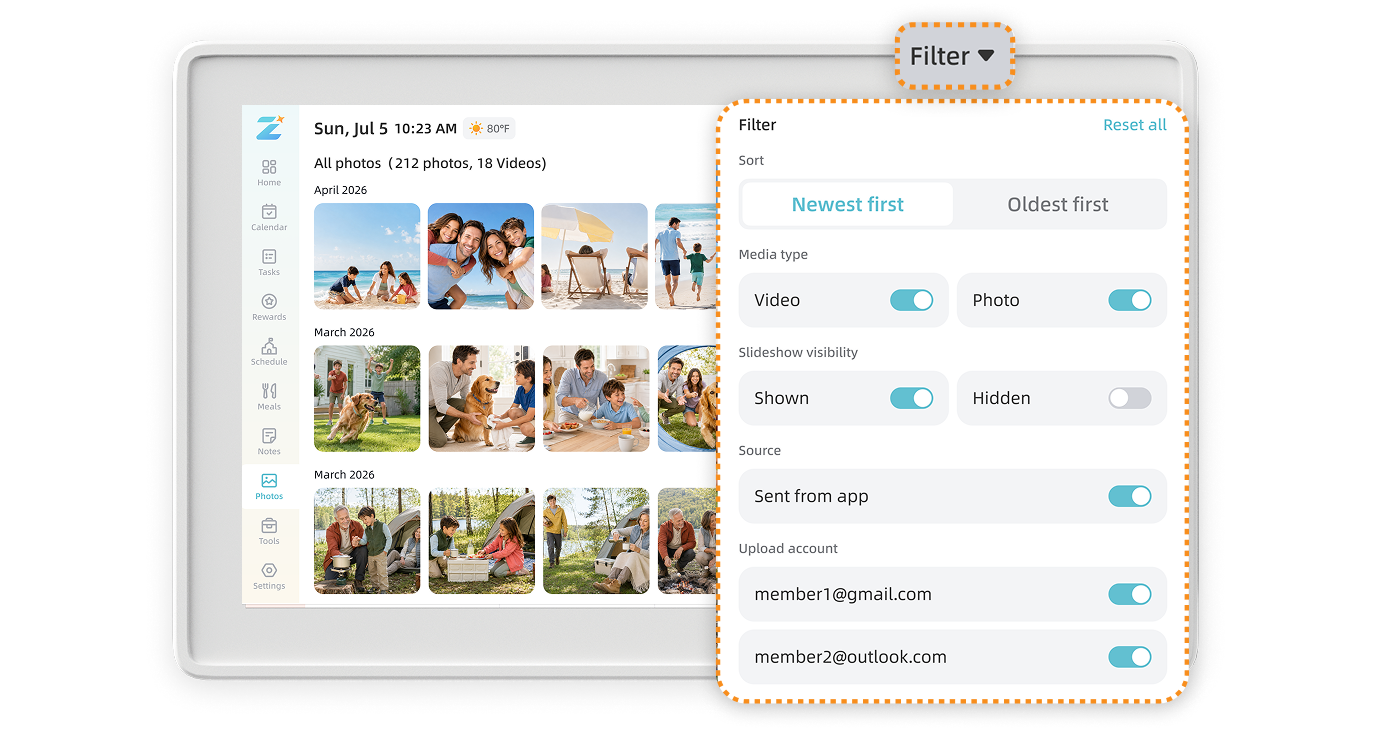
7.8.4 Filter Photos and Videos
Tap filter to view photos and videos by album, status, Member, date, or other available options.
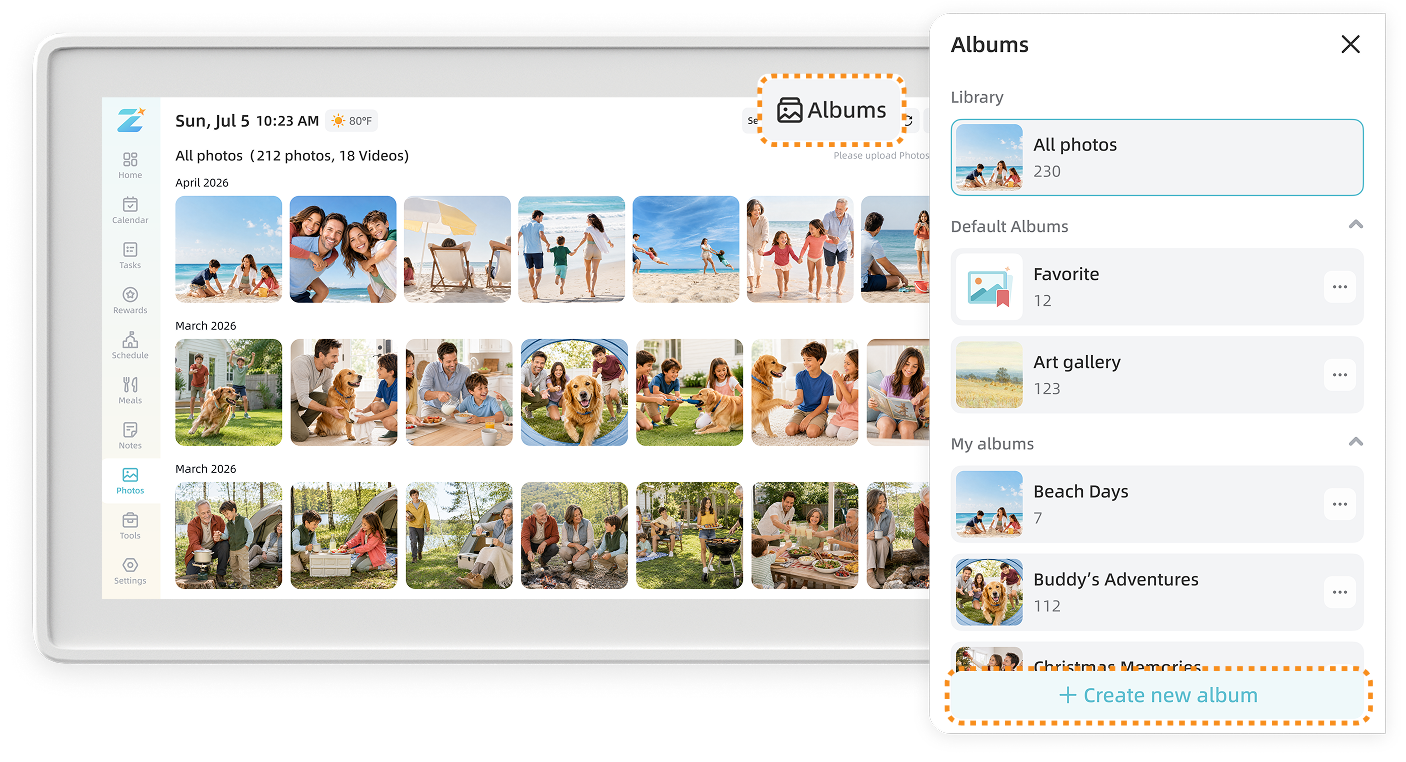
7.8.5 Create and Manage Albums
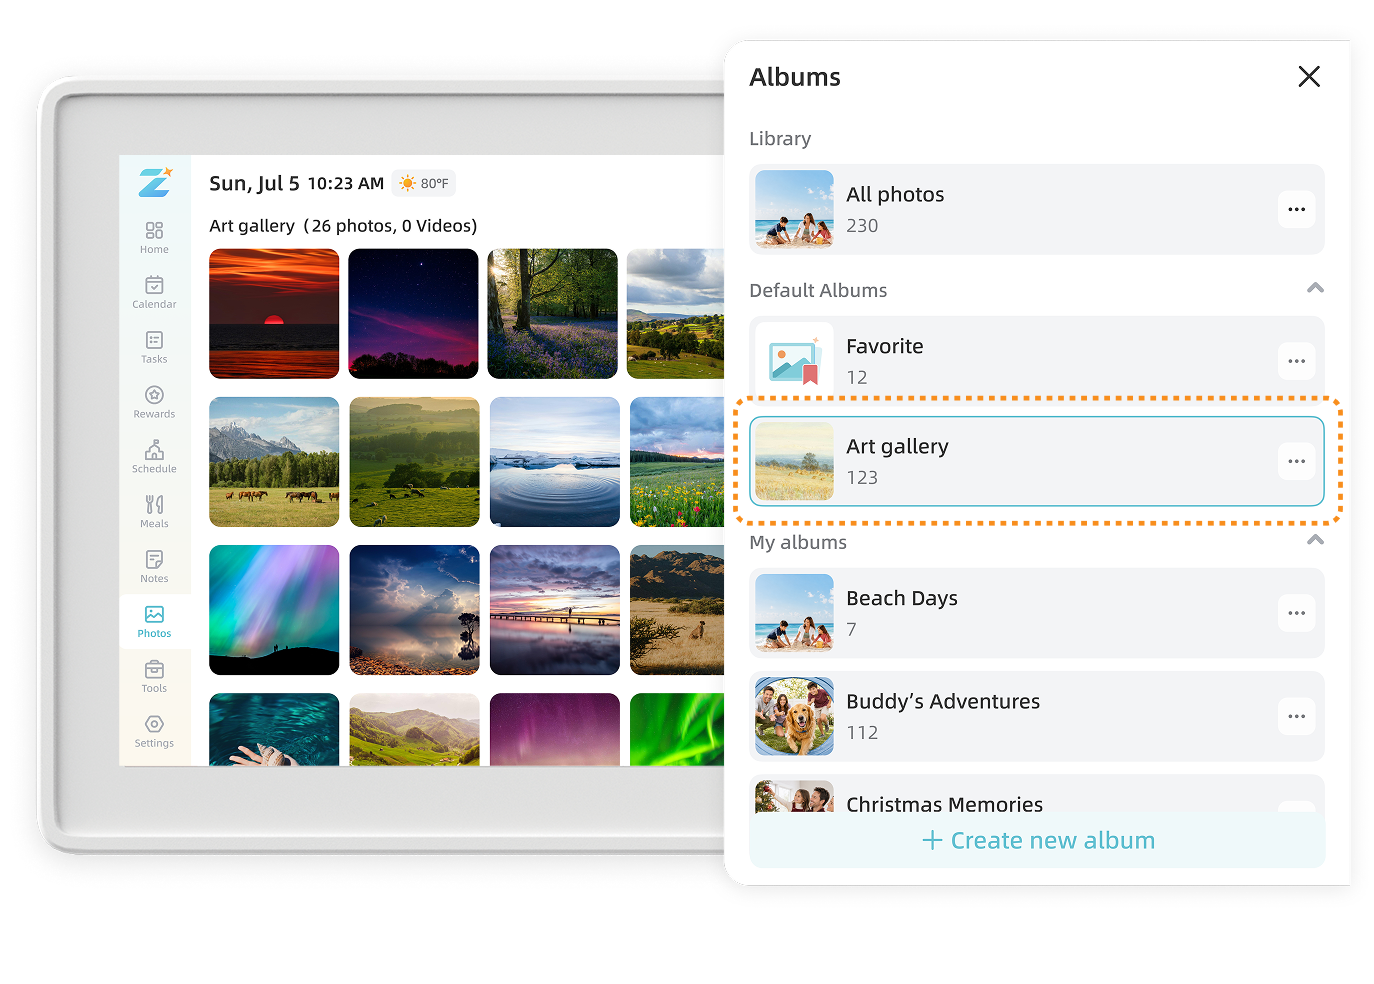
All Photos contains every uploaded photo. Zical also includes built-in albums such as Favorite and Art Gallery.
Create an album
Tap Create new album, enter a name, then save it.
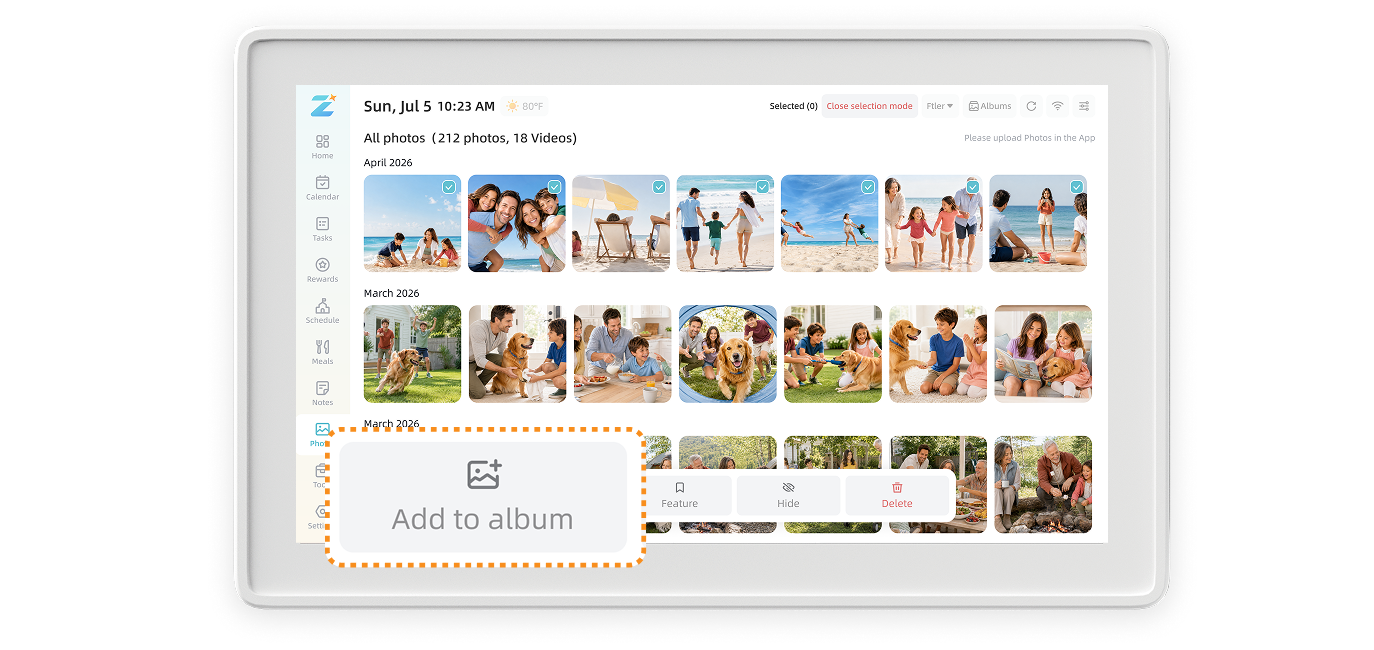
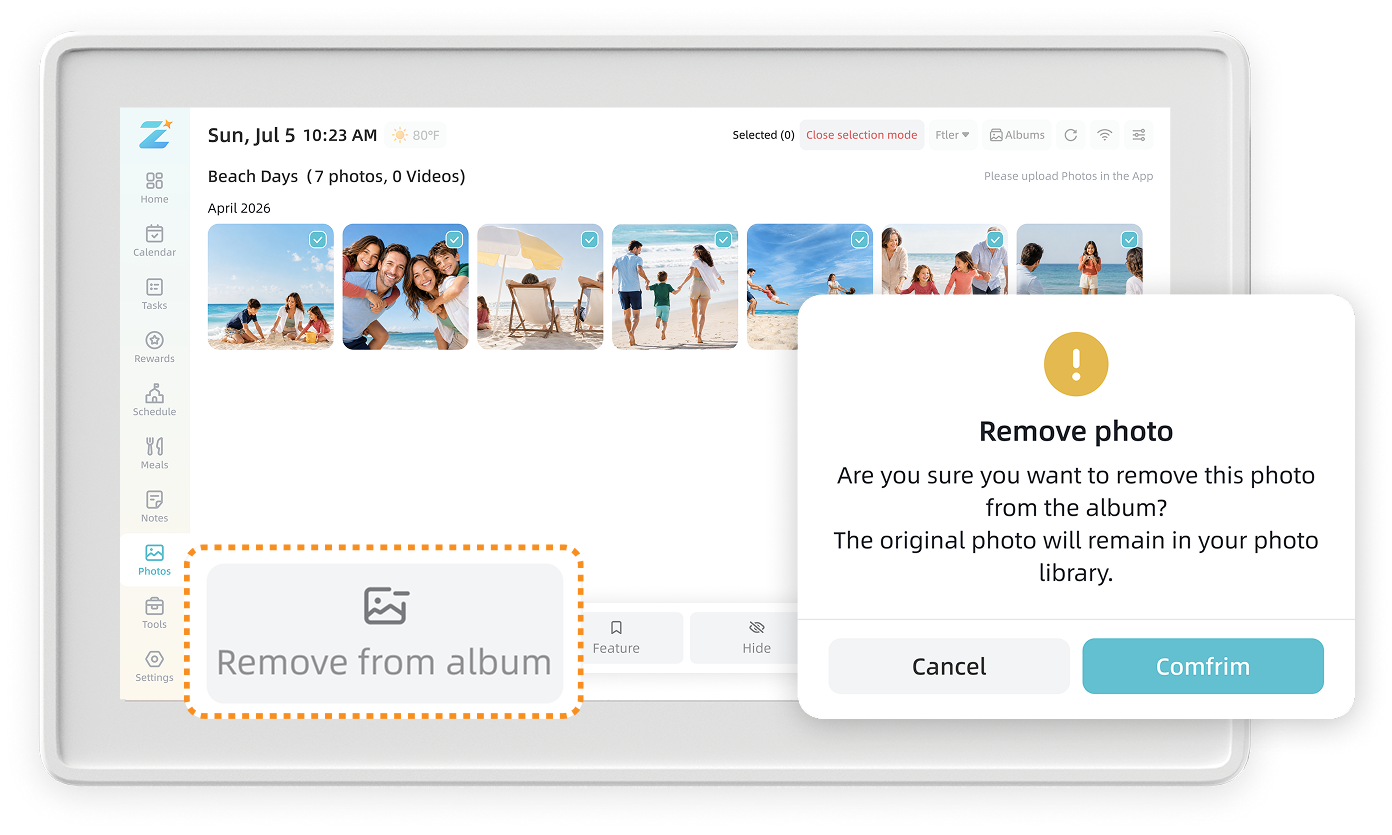
Add or remove photos
Select photos and add them to or remove them from an album. The original photos remain in All Photos and are not duplicated.
Delete an album
Deleting a custom album does not delete its photos from All Photos.
7.8.6 Art Gallery
Art Gallery contains built-in artwork that you can view or use in the screensaver. You cannot add your own photos to this album, but you can remove any built-in images you do not want to display.
8. AI Assistant
Use text, voice, images, or links to manage family schedules, tasks, and more with AI.
8.1 Open and Set Up AI Assistant
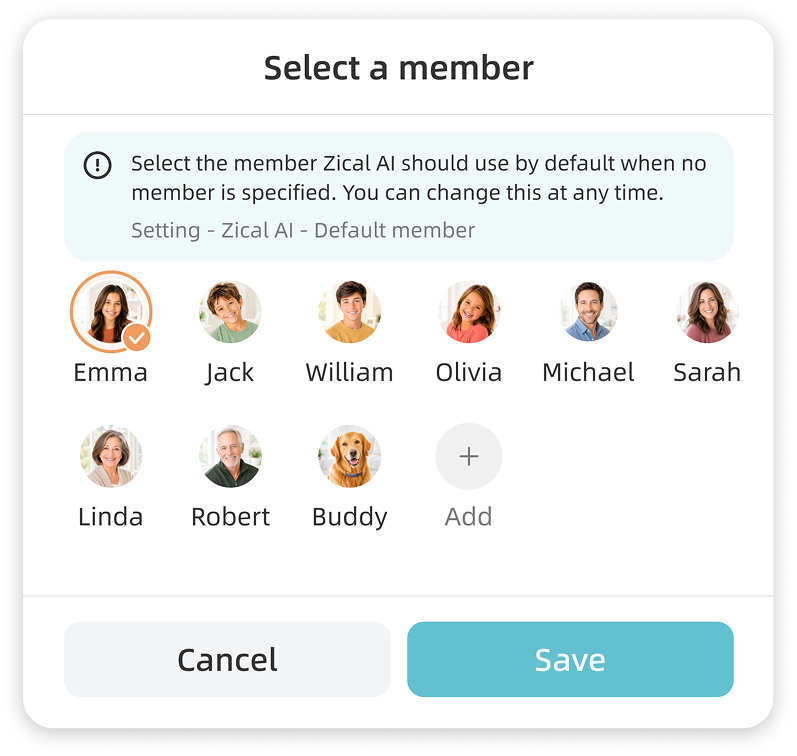
The first time you open AI Assistant, select a default Member.
If your request does not specify a Member, any item created by AI is assigned to the default Member.
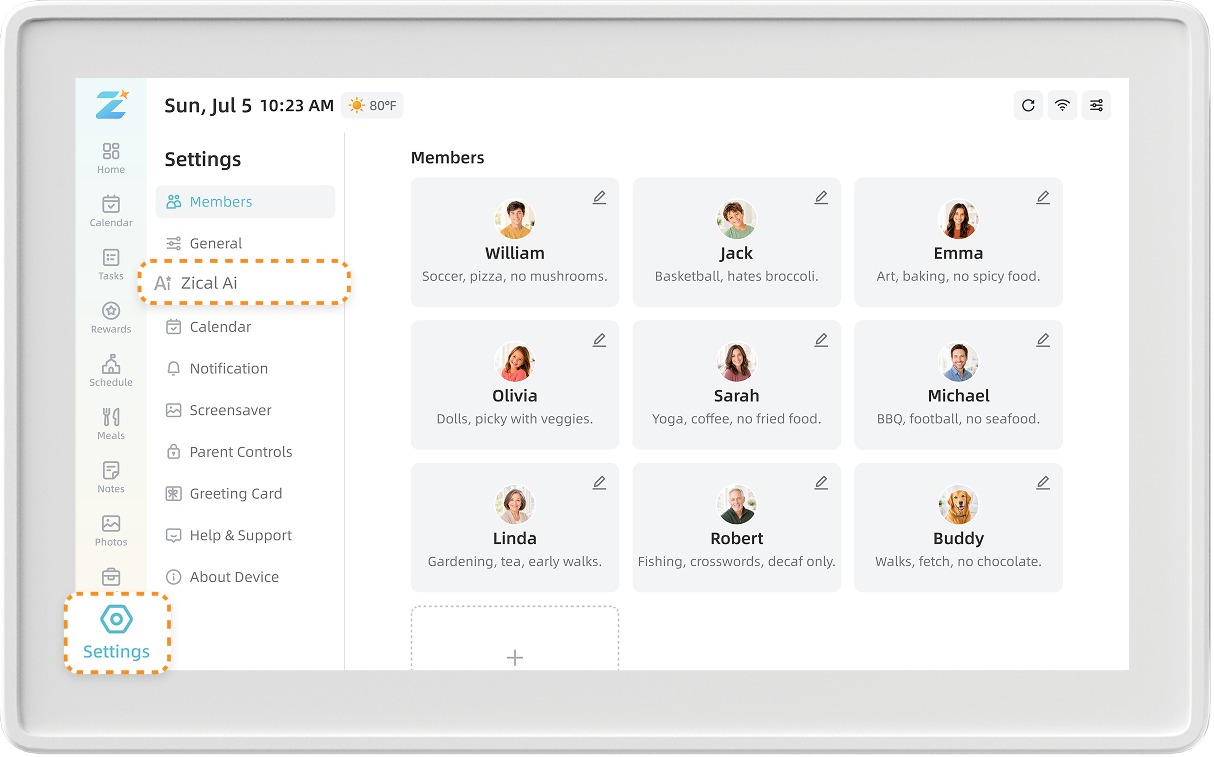
You can change the default Member later under Settings > Zical AI.
8.2 Manage Items with AI Assistant
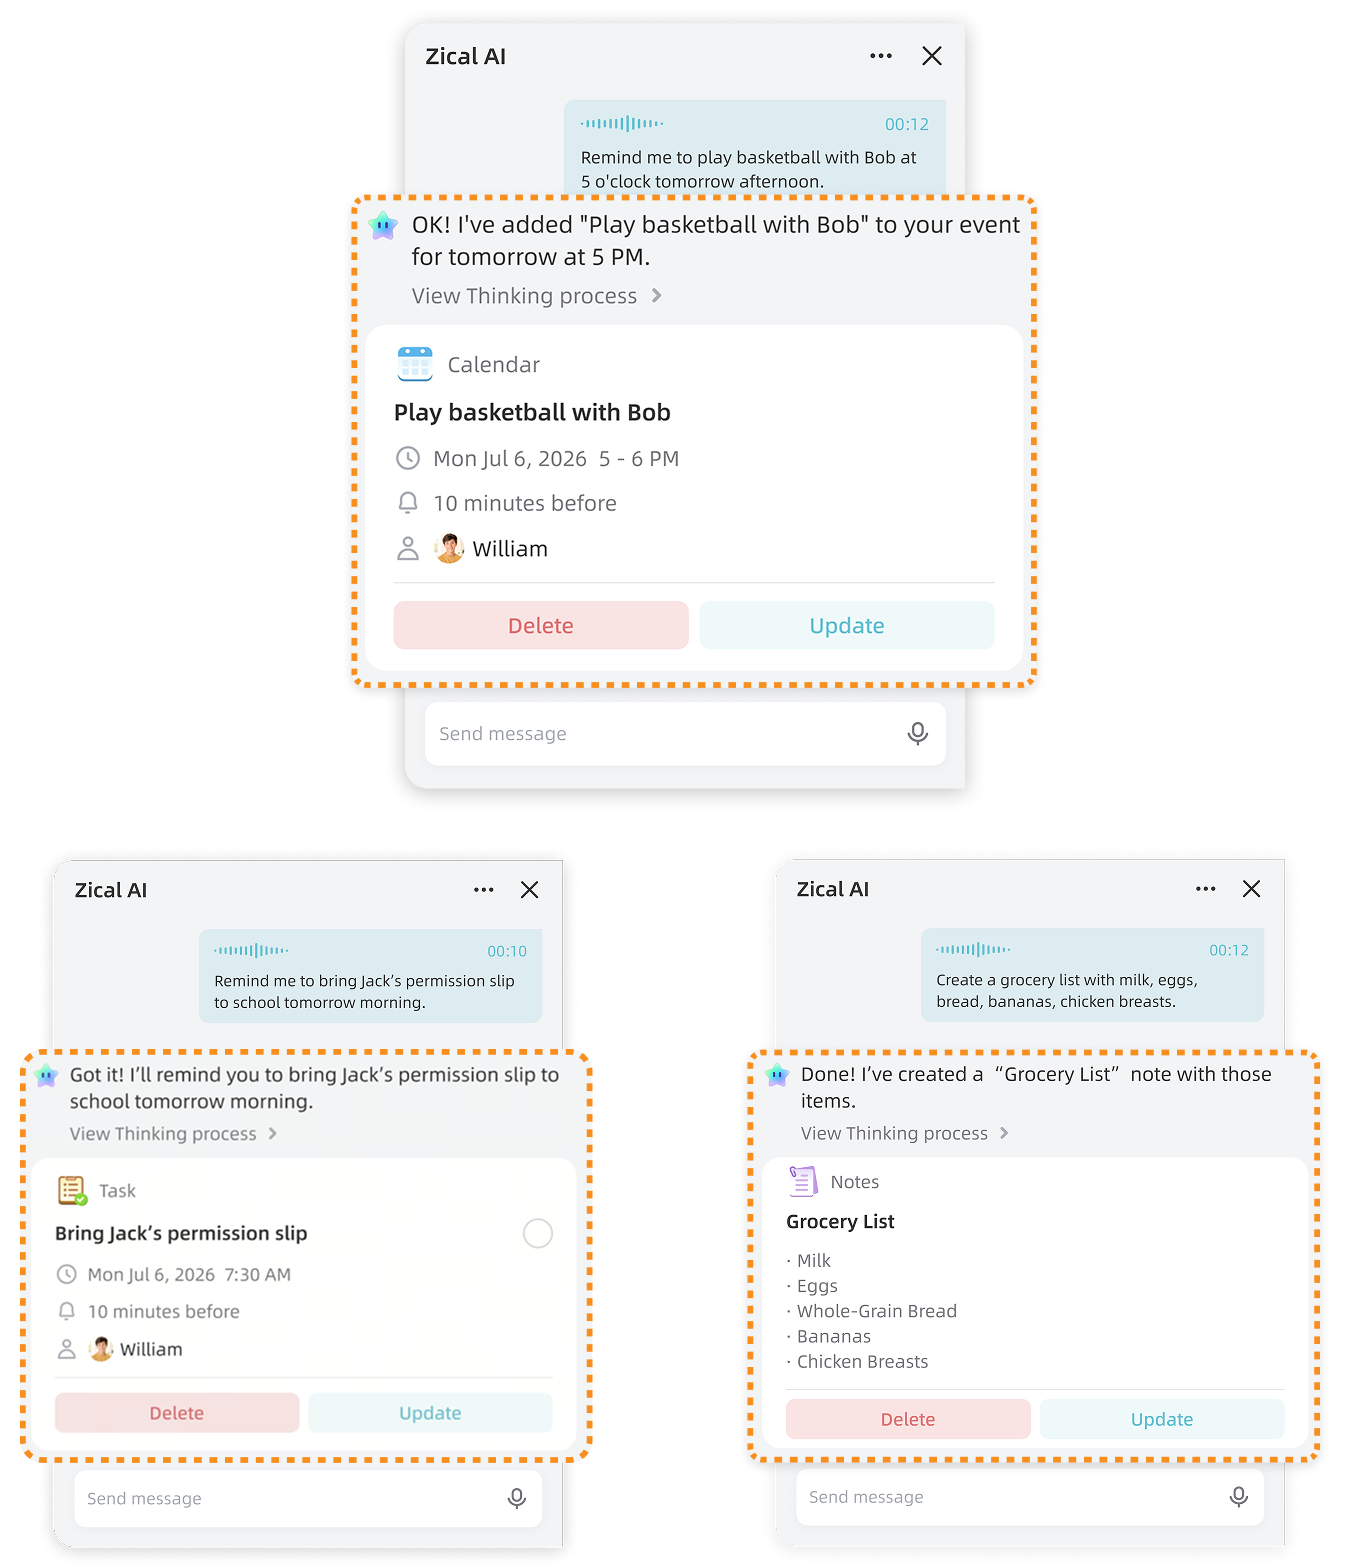
Create Items
Ask AI Assistant to create events, tasks, courses, or notes. Clearly describe your request by voice or text, such as “Schedule soccer practice for Friday at 4:00 p.m.” or “Create a task to buy milk tonight.”
Edit or Delete Items
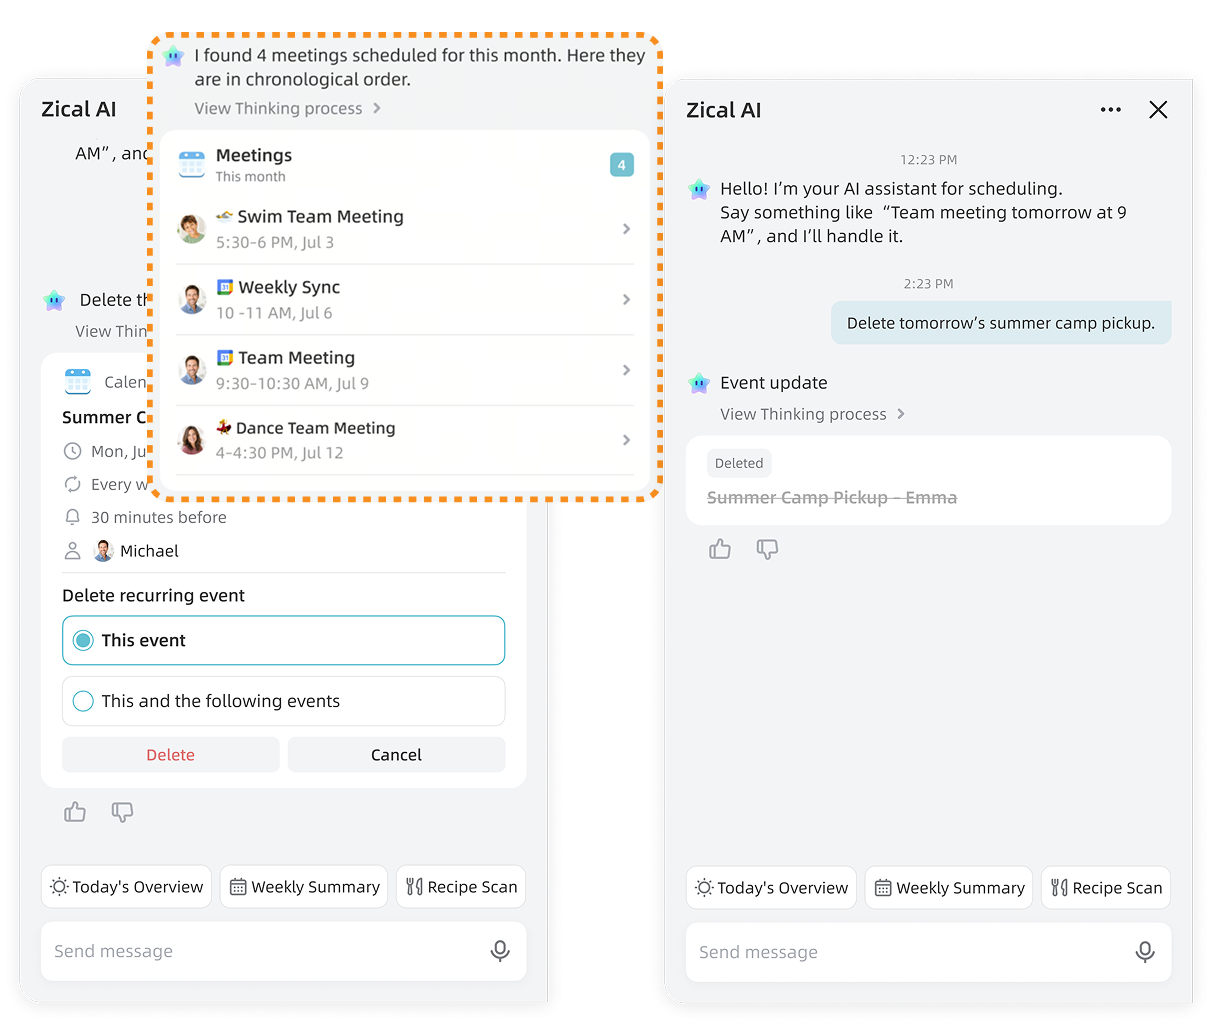
Ask AI Assistant to edit or delete events, tasks, courses, or notes. For recurring items, select which occurrences the change or deletion should apply to before confirming.
Note: AI can edit or delete only items it created or found during the current conversation. After leaving the conversation, start a new request and ask AI to find the item again before editing or deleting it.
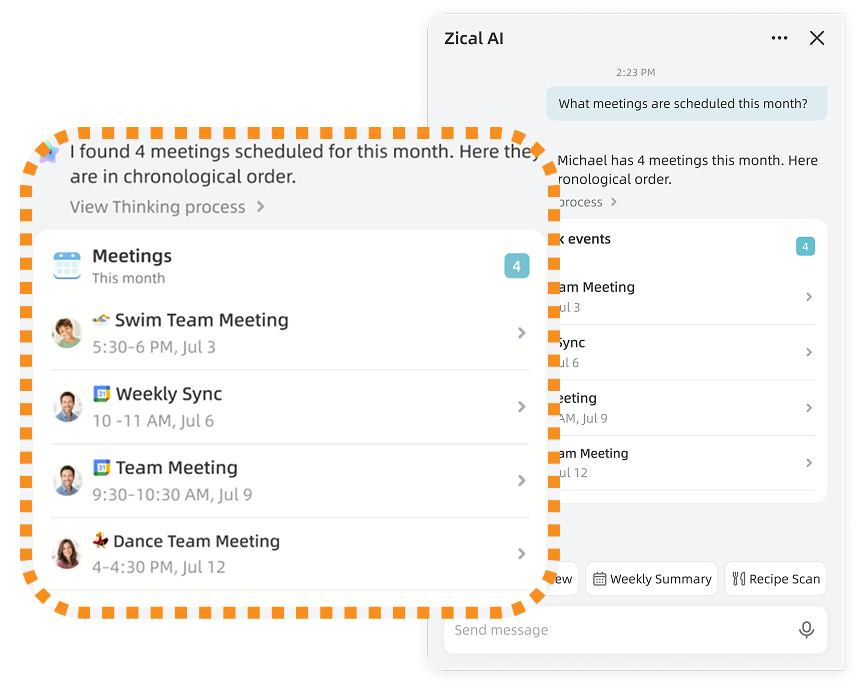
Find Items
Ask AI Assistant to find existing events, tasks, courses, or notes using details such as the title, date, Member, or item type.
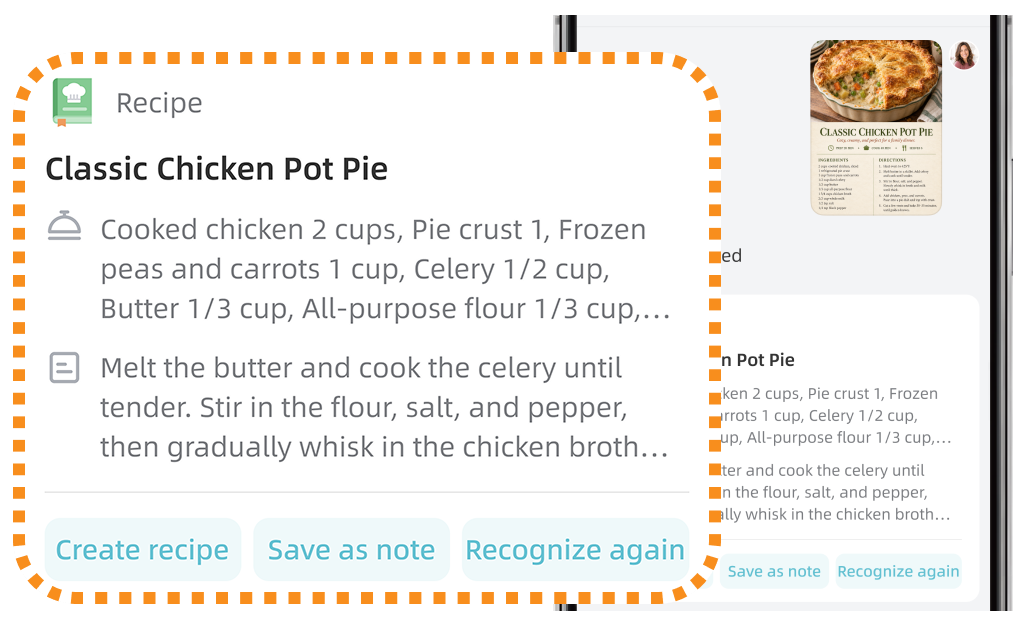
8.3 Create a Recipe from an Image or Link
Upload a food or recipe image, or paste a supported recipe link. AI identifies the recipe name, ingredients, and preparation steps.
9. Other Features
Explore more helpful tools that make everyday family life easier and more enjoyable.
9.1 Timer (Display Only)
Set countdown timers for cooking, homework, routines, and other everyday activities.
9.1.1 Set a Timer
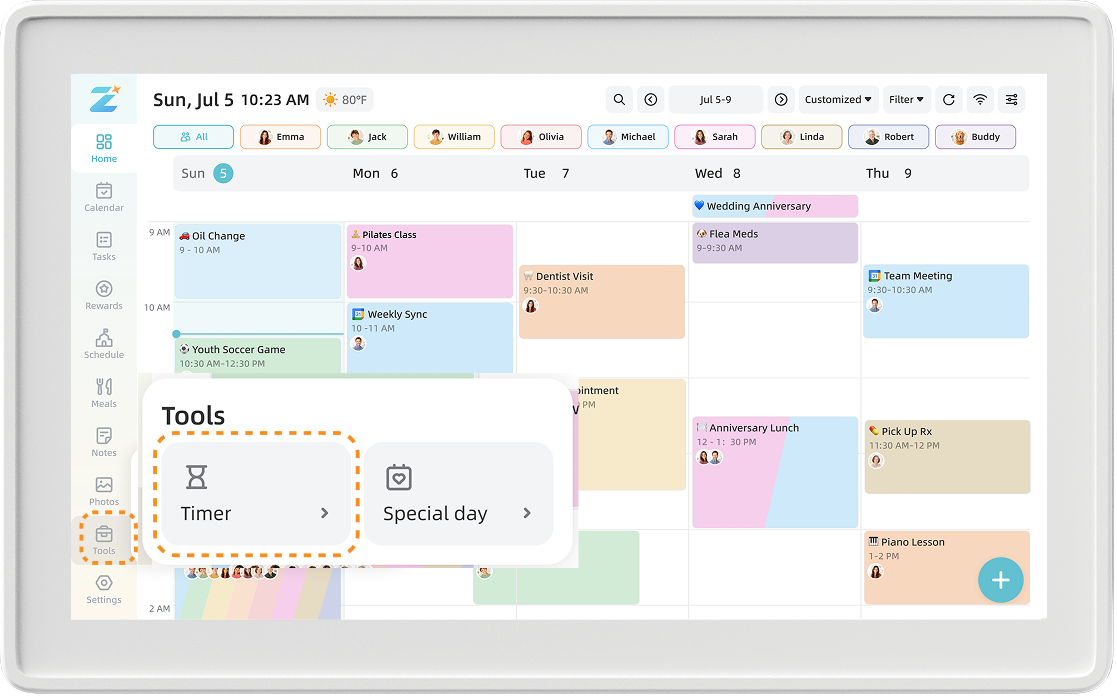
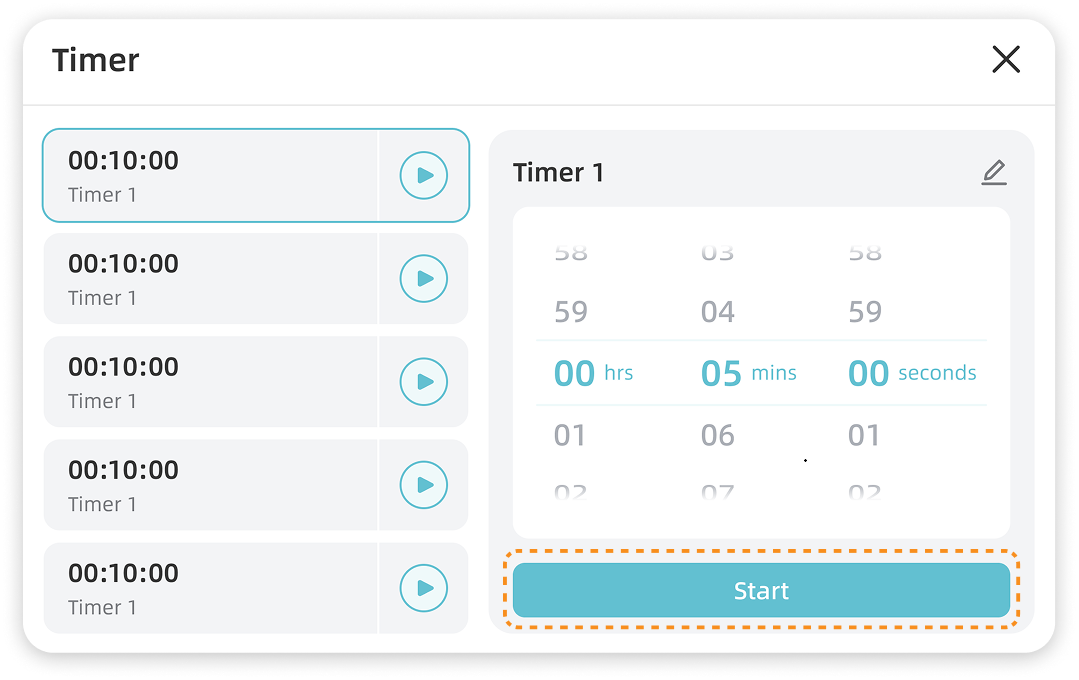
On the home display, open Tools > Timer. Enter a timer name if needed, set the countdown duration, then tap Start.
9.1.2 Start, Pause, or Resume a Timer
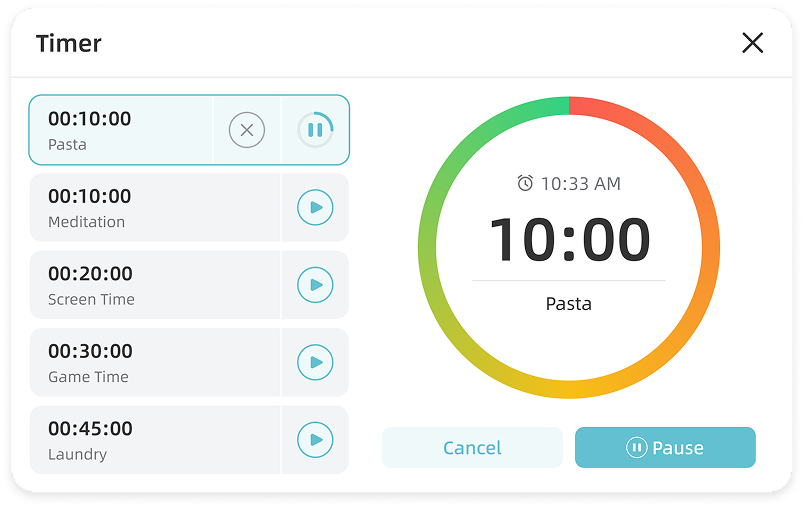
Tap Start to begin the countdown. Tap Pause when needed, then tap Resume to continue from the remaining time.
When the countdown reaches zero, the display shows Time's Up.
9.2 Special Days
Keep track of birthdays, anniversaries, vacations, and other important family moments.
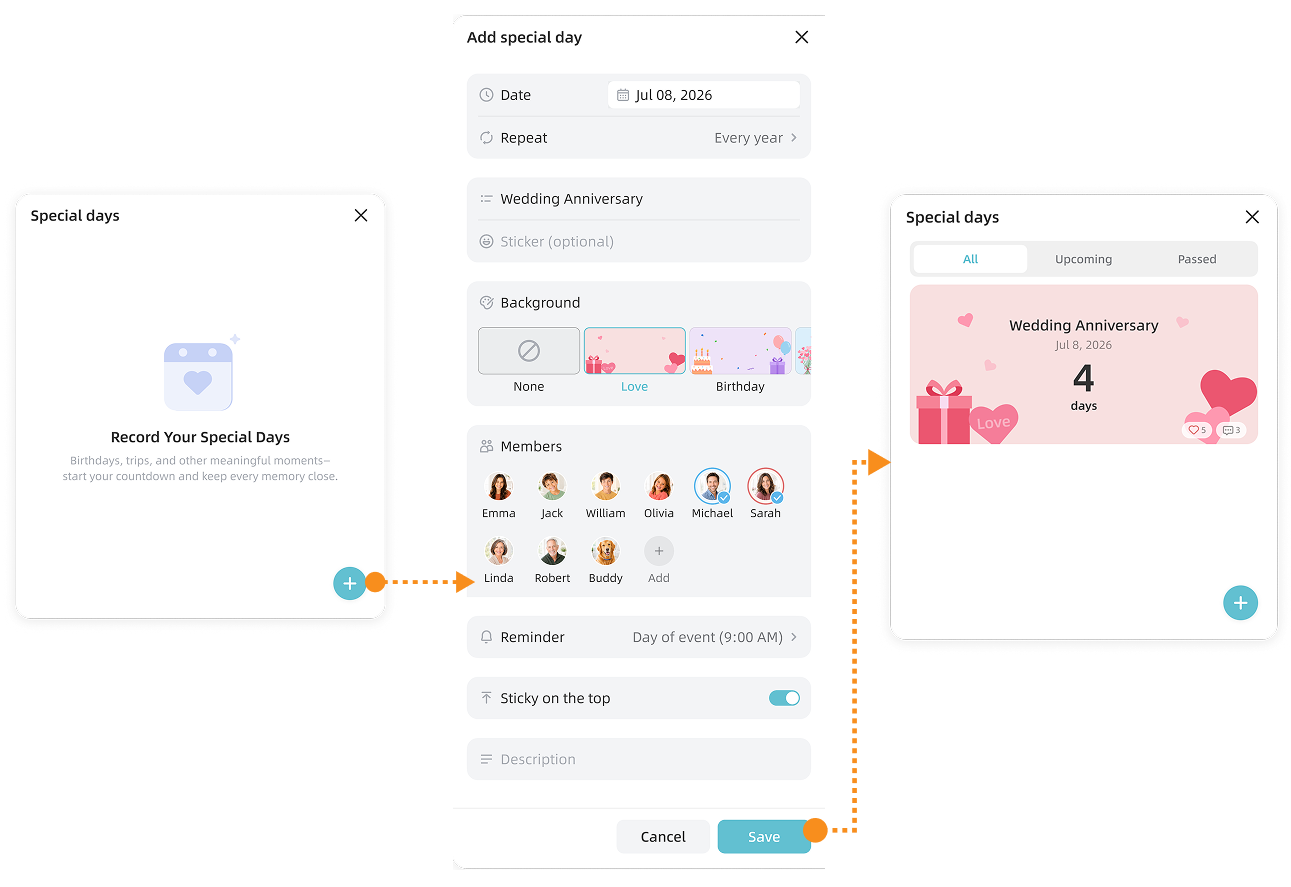
9.2.1 Create a Special Day
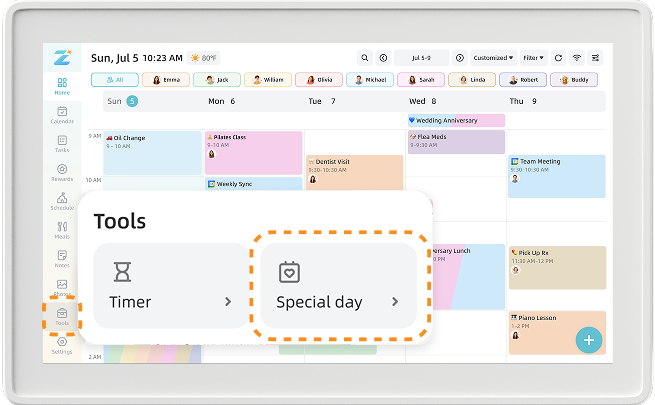
On the home display, open Tools > Special Day. Enter a title and date, choose a background, and select whether the Special Day repeats.
To keep an important Special Day at the top of the list, turn on Sticky on the top, then save it.
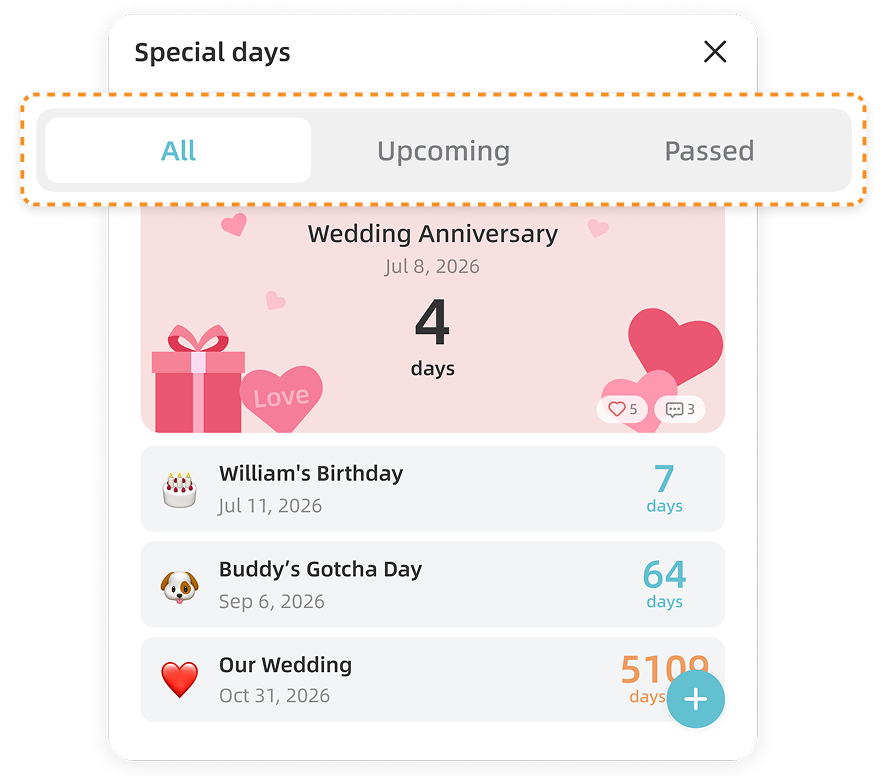
9.2.2 View Special Days by Status
Use the All, Upcoming, and Passed sections to see Special Days happening today, coming up, or already passed.
9.3 Greeting Cards
Share heartfelt messages with your family through digital greeting cards.
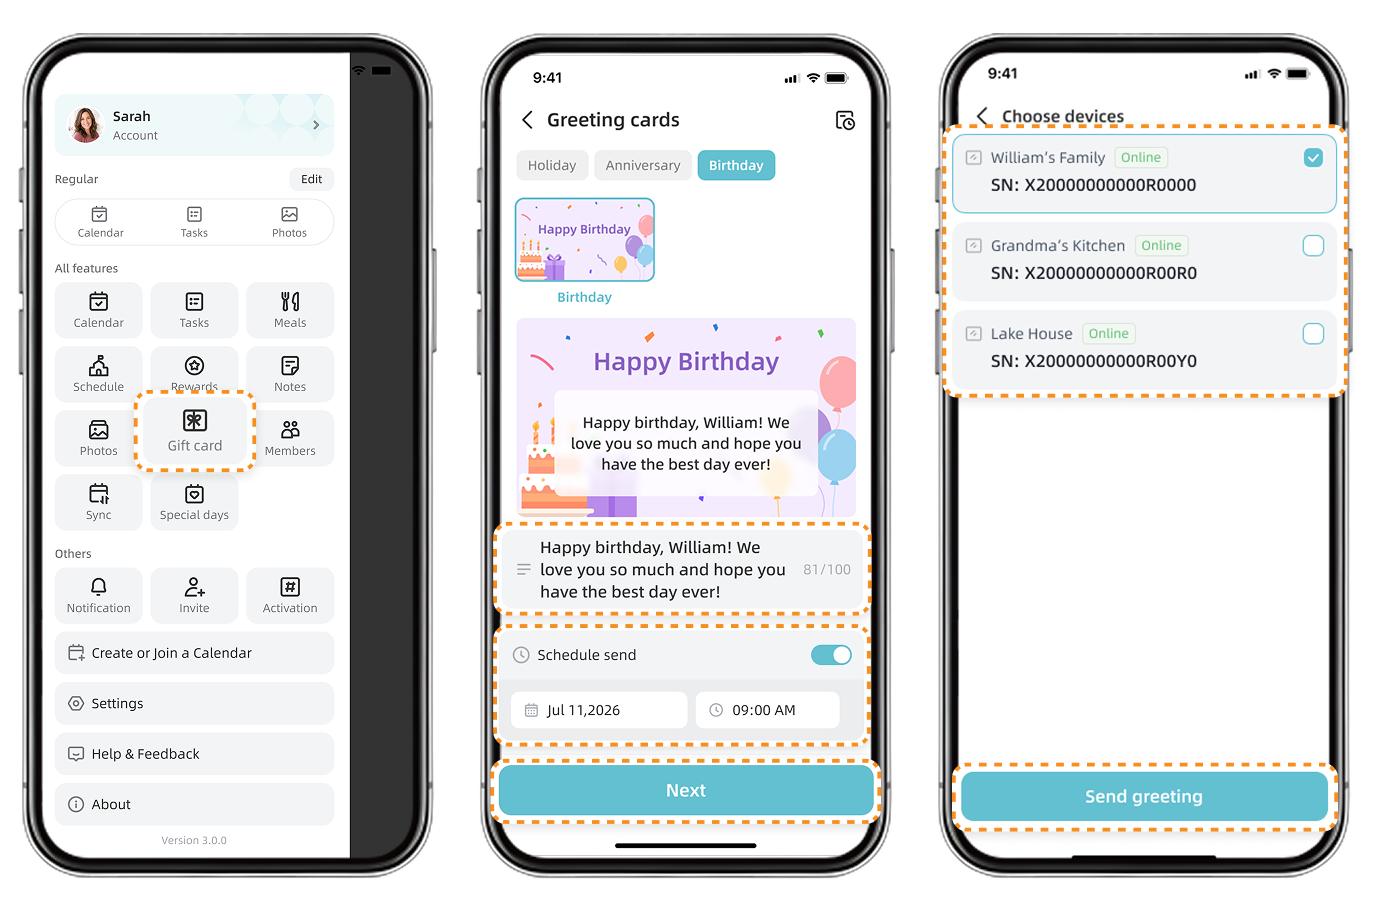
9.3.1 Send a Greeting Card in the App
In the Zical App, open the side navigation and tap Greeting Card. Choose a card design, enter your message, then choose whether to send it now or schedule it for later.
Preview the card, select the home display, then tap Send.
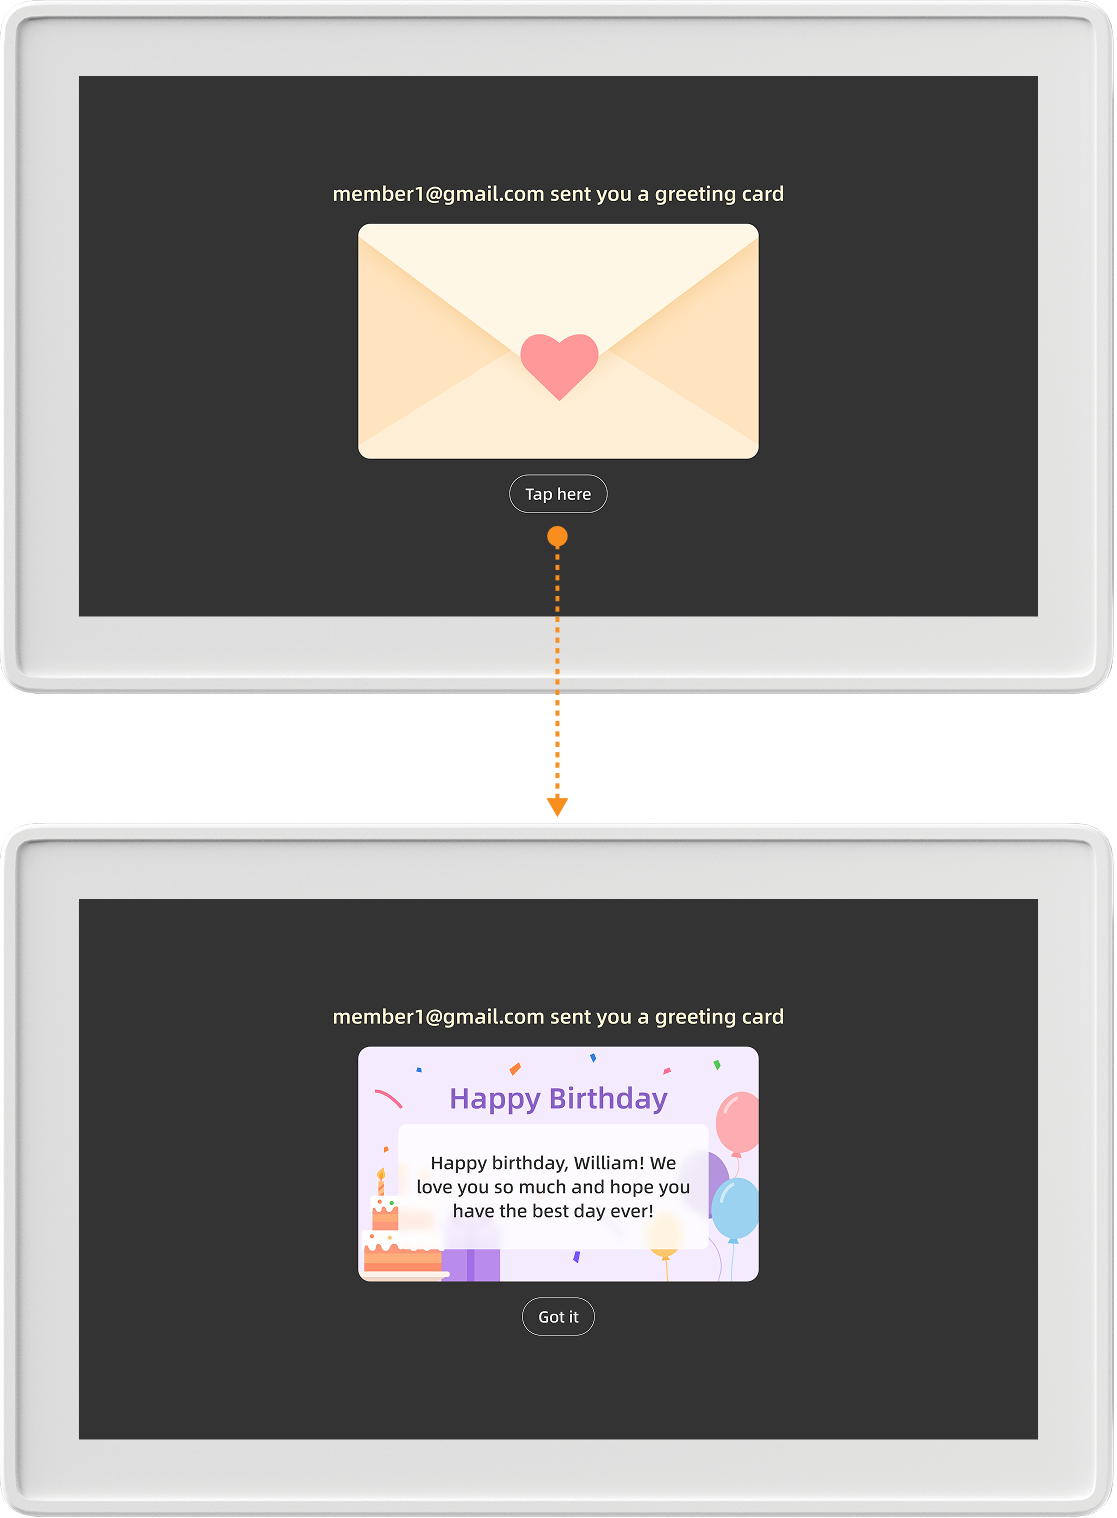
9.3.2 View Received Greeting Cards
When a greeting card arrives, a notification appears on the home display. Tap the notification to view the card.
To view previously received cards, go to Settings > Greeting Card.
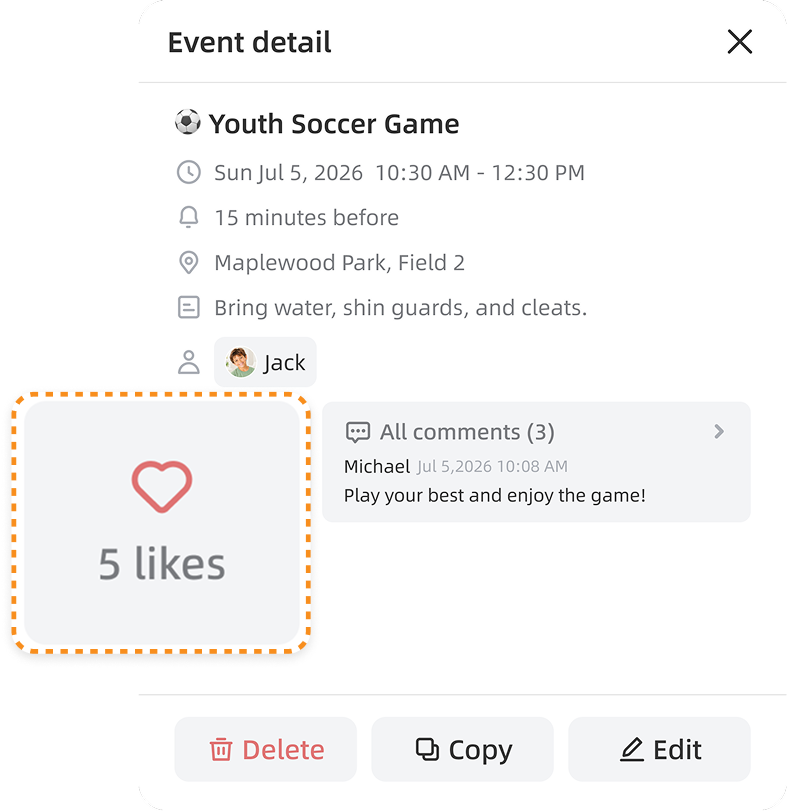
9.4 Likes and Comments
Stay connected by liking and commenting on family events, tasks, photos, and more.
9.4.1 Add a Like
Tap the Like button to add a like. Each tap adds one more like to the total.
Note: Likes cannot be removed after they are added.
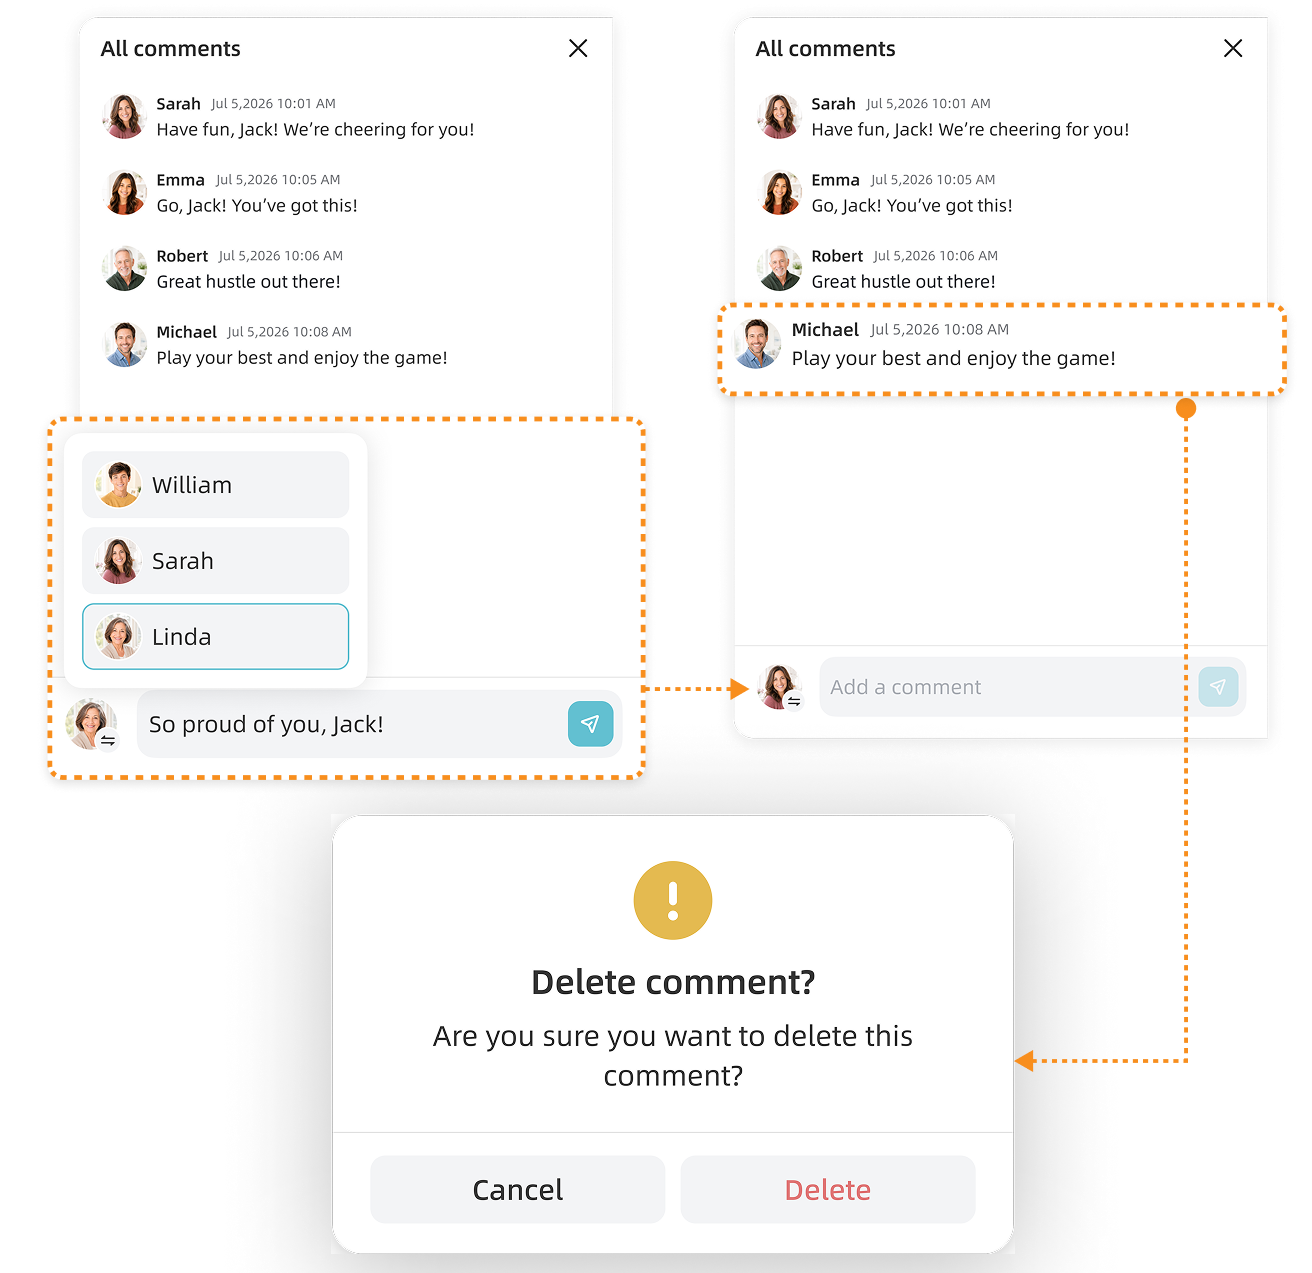
9.4.2 Add or Delete a Comment
Enter your comment, select the Member avatar that represents you, then post it.
To delete one of your comments, press and hold the comment, then tap Delete.
9.5 Parent PIN
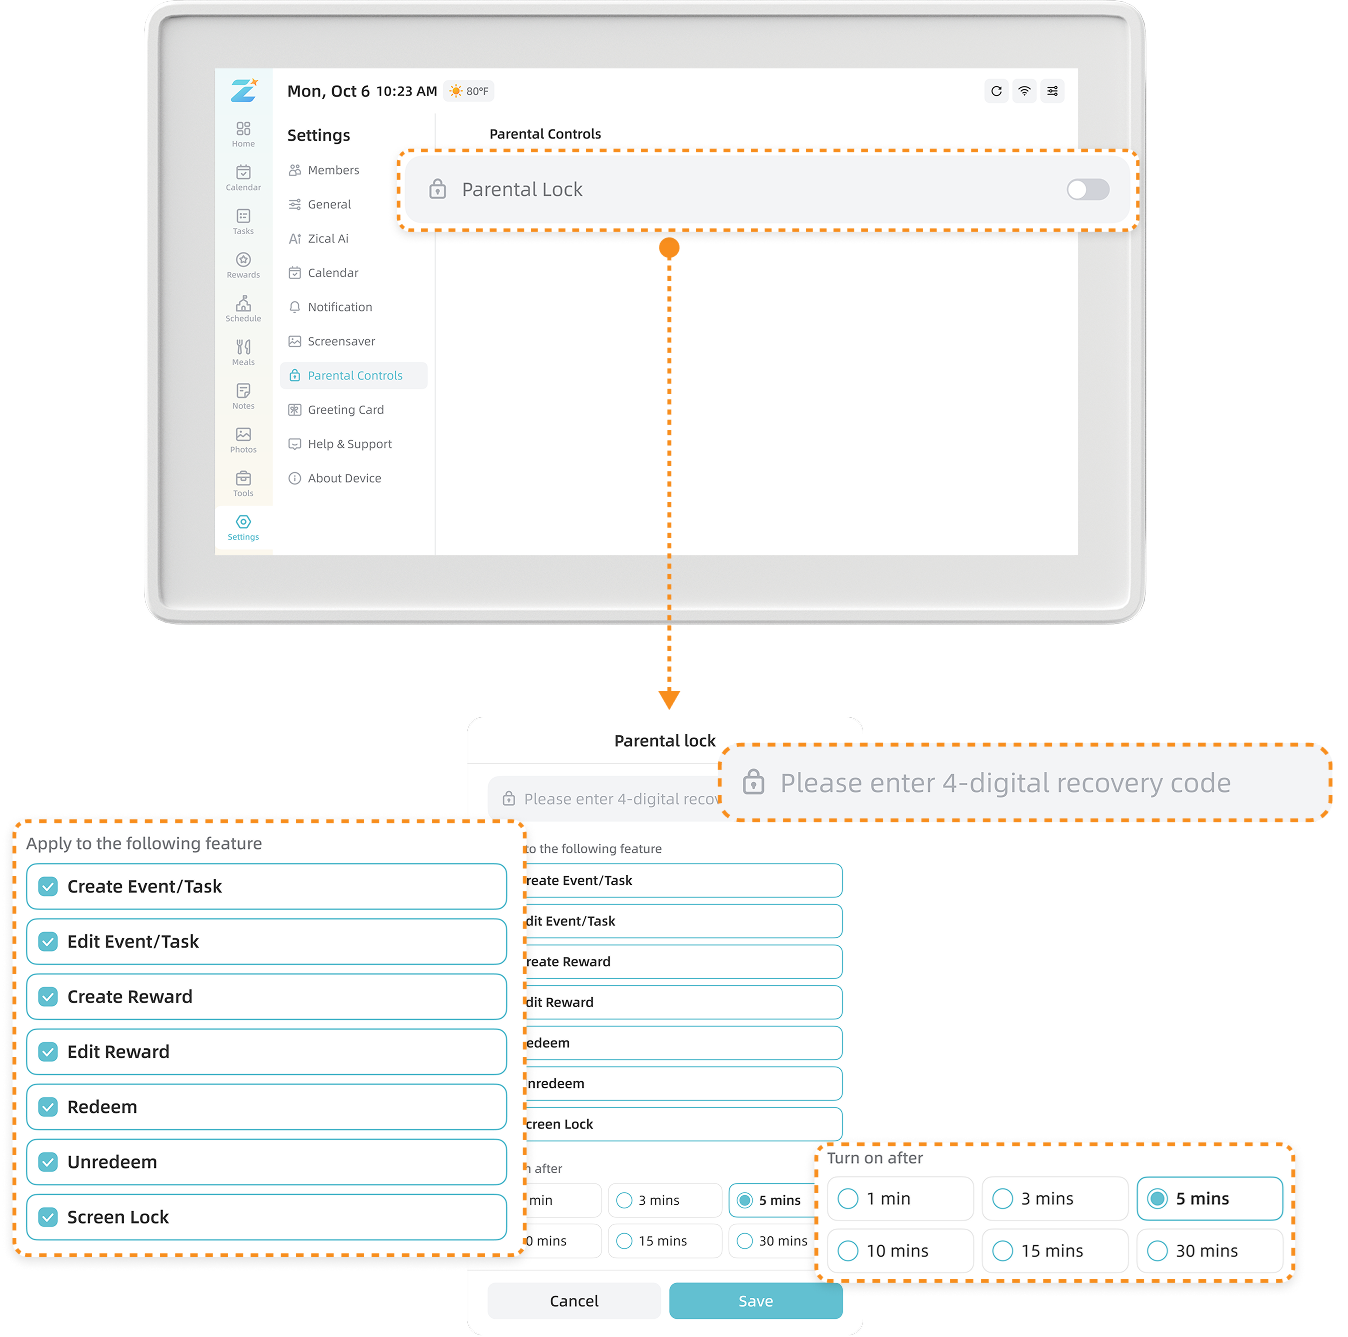
Protect selected settings and family content from unwanted changes with a Parent PIN.
9.5.1 Set a Parent PIN
Create a 4-digit PIN, choose which features to protect, and set how long the display remains unlocked after the correct PIN is entered.
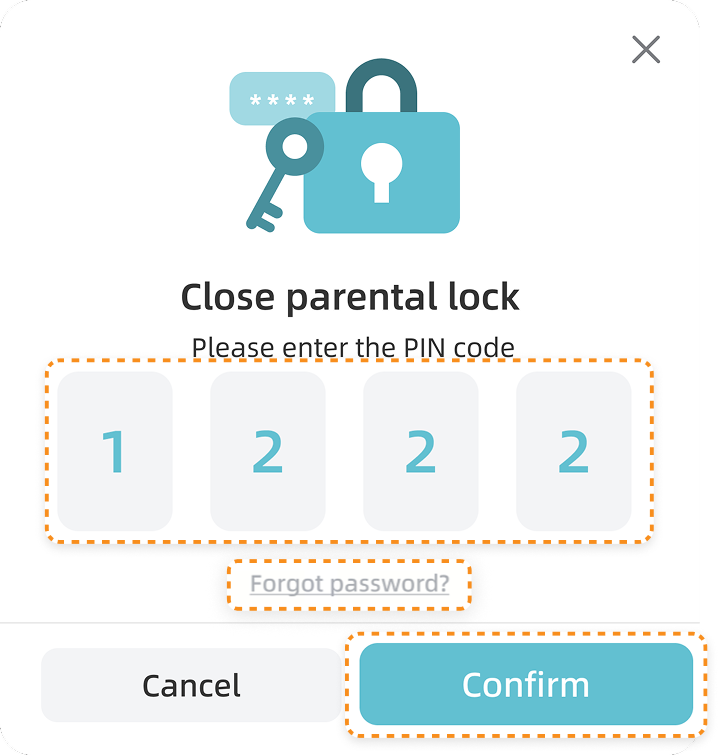
9.5.2 Change or Remove the Parent PIN
Enter the current PIN and follow the on-screen instructions to change or remove it.
After the Parent PIN is removed, previously protected features no longer require verification.
Note: If you forget your PIN, tap Forgot password and follow the on-screen instructions. Enter the email address associated with your Zical Account, use the verification code sent to your email, then reset the PIN.
10. Device Settings
Customize how your home display looks, connects, and works for your family.
10.1 Screensaver
Choose what appears after the home display has been inactive for a set amount of time.
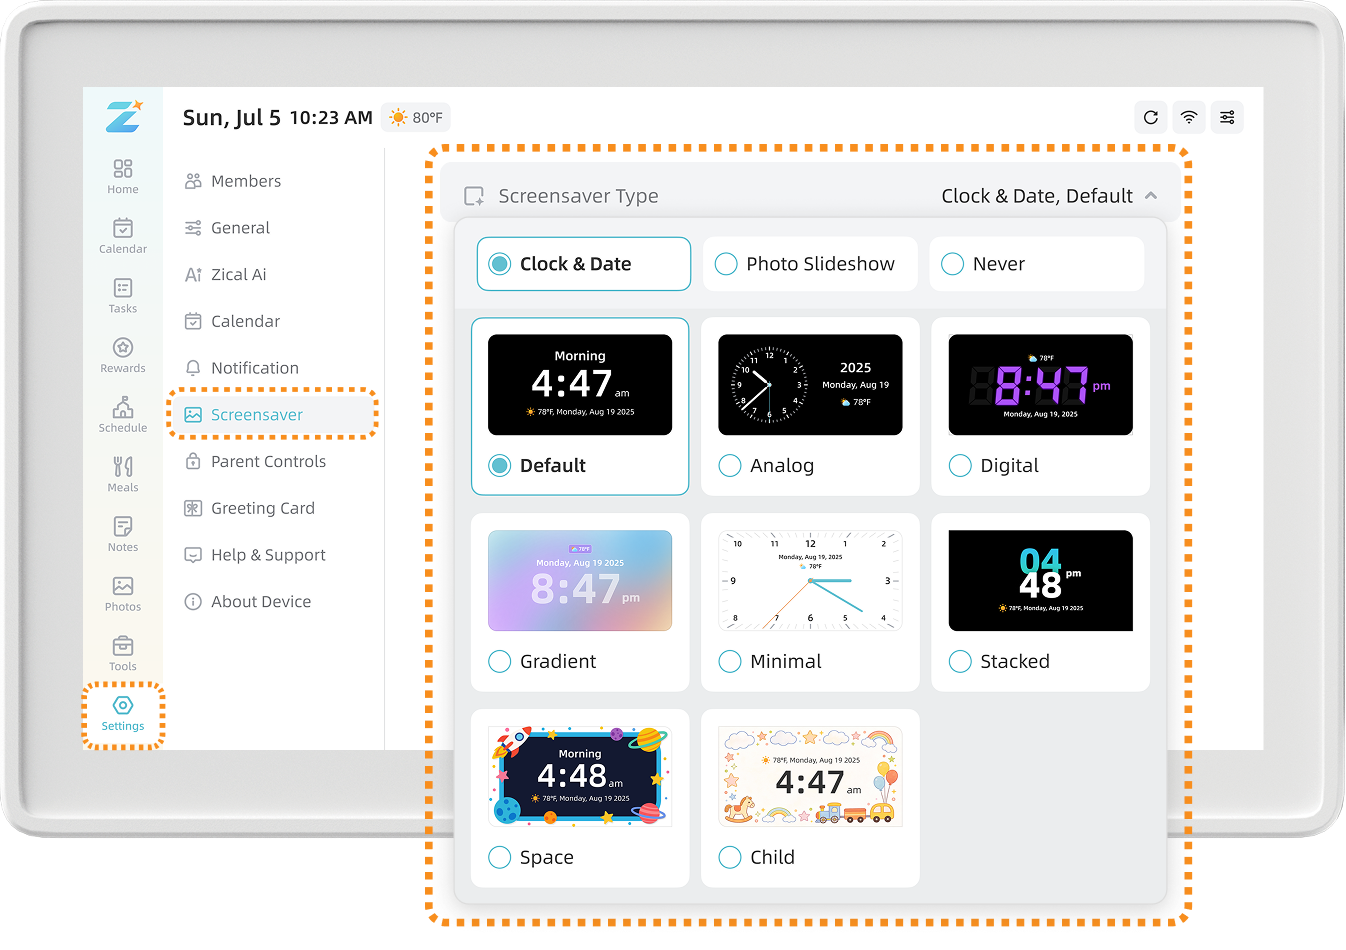
10.1.1 Choose a Screensaver Type
Go to Settings > Screensaver, then choose “Clock & Date,” “Photo Slideshow,” or “Never.”
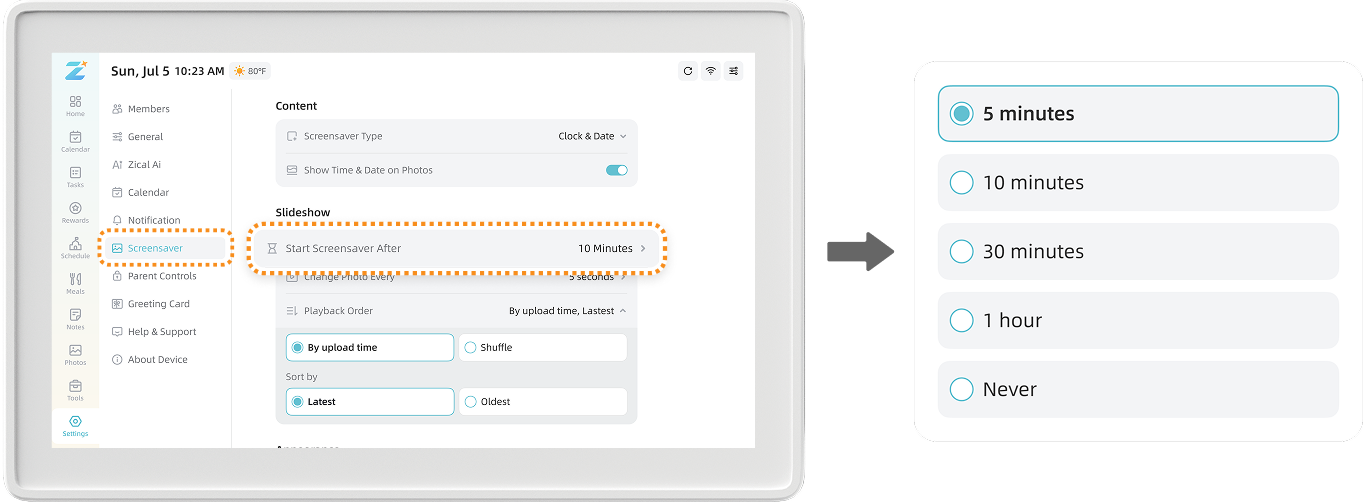
10.1.2 Set When the Screensaver Starts
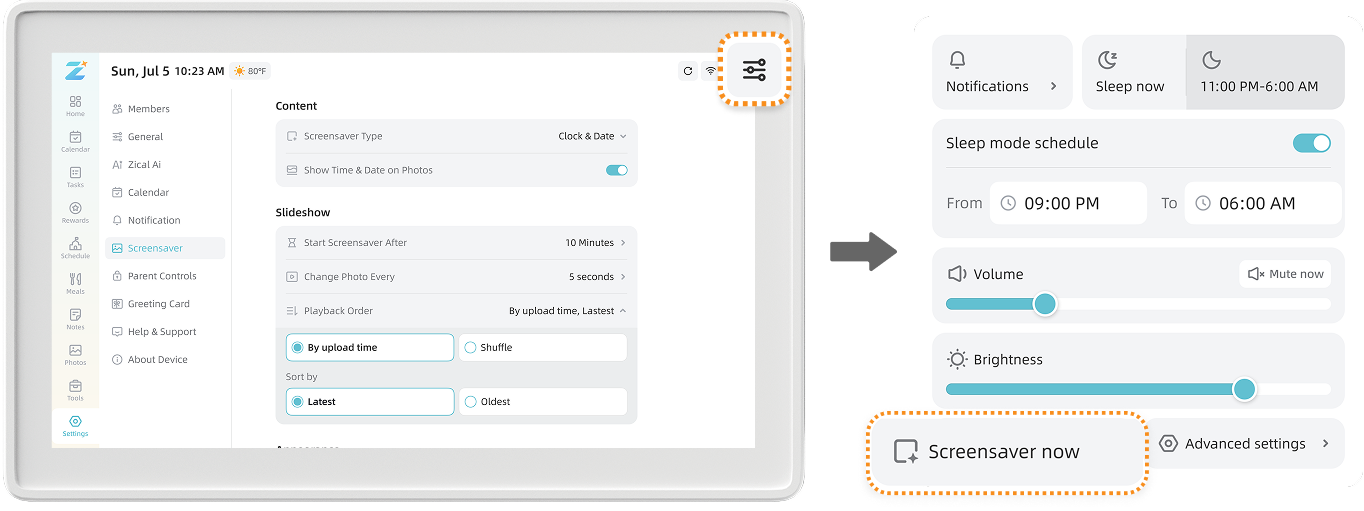
Go to “Settings" > "Screensaver”, tap “Start Screensaver After”, then choose how long the display can remain inactive before the screensaver starts.
To start the screensaver immediately, open Quick Operations at the top of the screen and tap “Screensaver now”.
10.2 Sleep
Turn off the screen when it is not in use, either immediately or on a daily schedule.
10.2.1 Set a Sleep Schedule
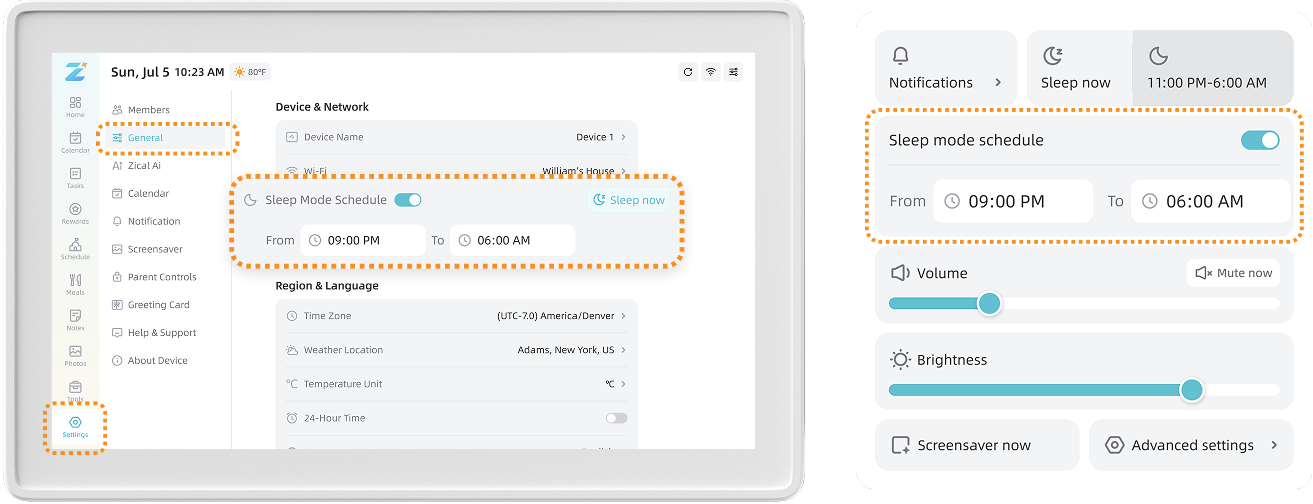
Set daily sleep and wake times so the screen turns off automatically at night and wakes at the time you choose.
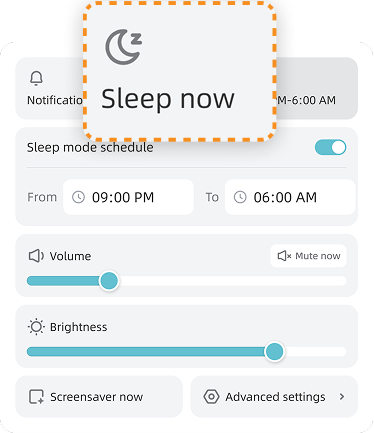
Open Quick Operations and tap the Moon icon , or go to Settings > General. Under Device & Network, turn on Sleep Mode Schedule.
10.2.2 Put the Display to Sleep Now
Open Quick Operations at the top of the screen, then tap “Sleep now”, Tap the screen to wake the display.
10.3 Theme
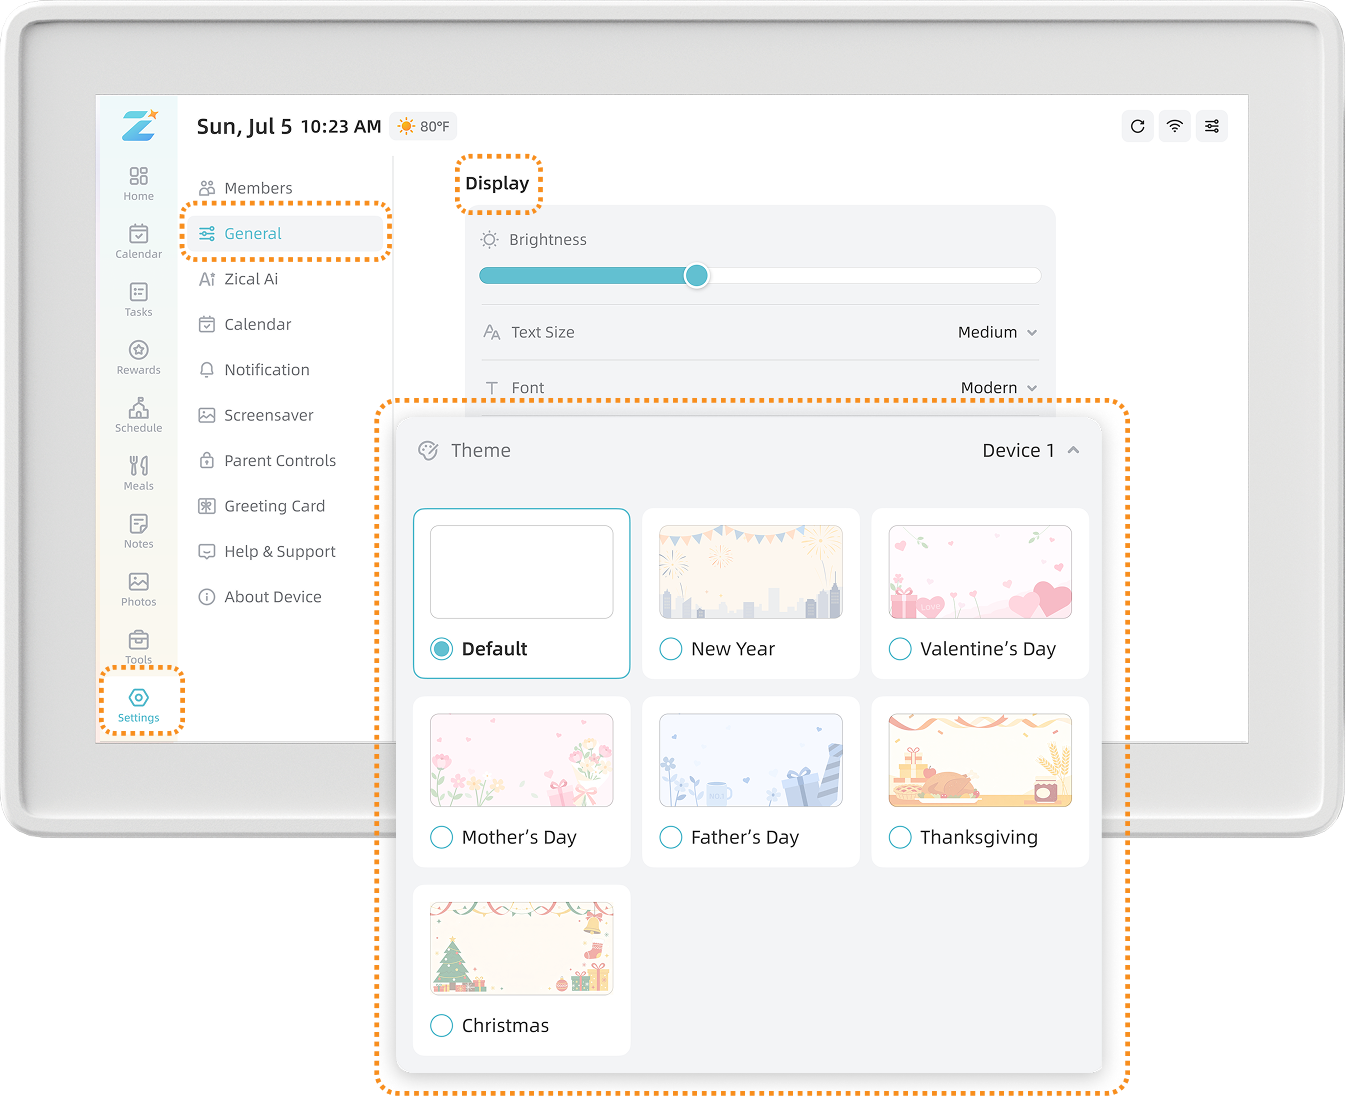
Go to Settings > General. Under Display, select Theme, then choose an available standard, seasonal, or holiday theme.
10.4 Wi-Fi
Connect to Wi-Fi
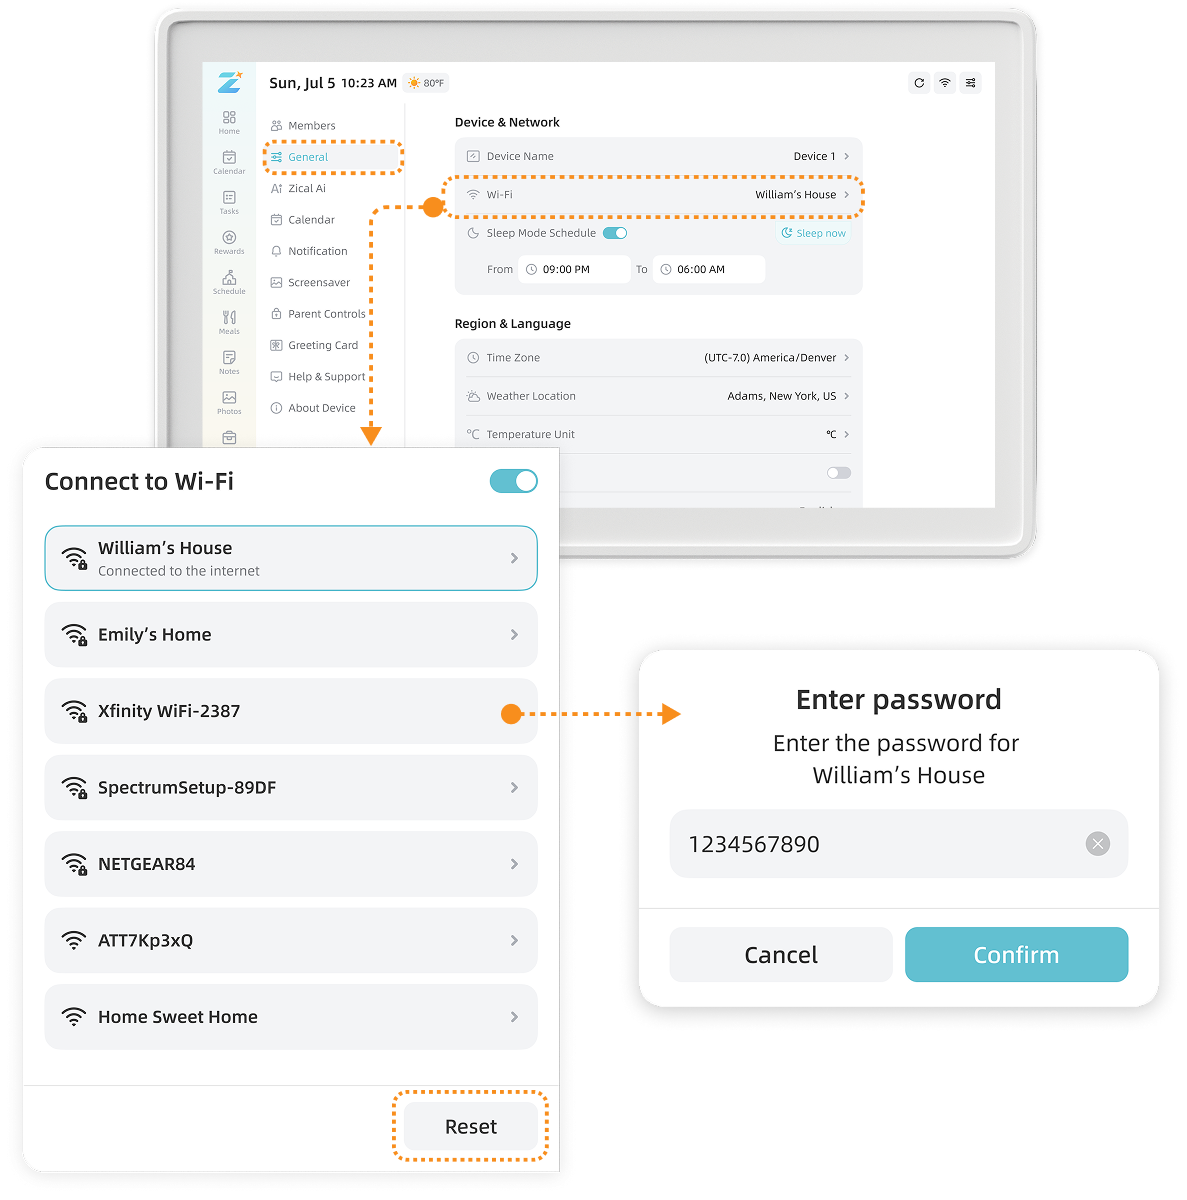
Open the Wi-Fi settings, select a compatible network, enter the password, and wait for the connection to complete. If the password is incorrect, check it and try again.
Change or forget a network
Open the Wi-Fi list and forget the current network, or tap “Reset” at the bottom of the list. Then select and connect to another compatible network.
Note: Public networks that require a web page, text message, room number, or another sign-in step may not be supported. If needed, try a personal hotspot or another private network.
10.5 Reminder Settings
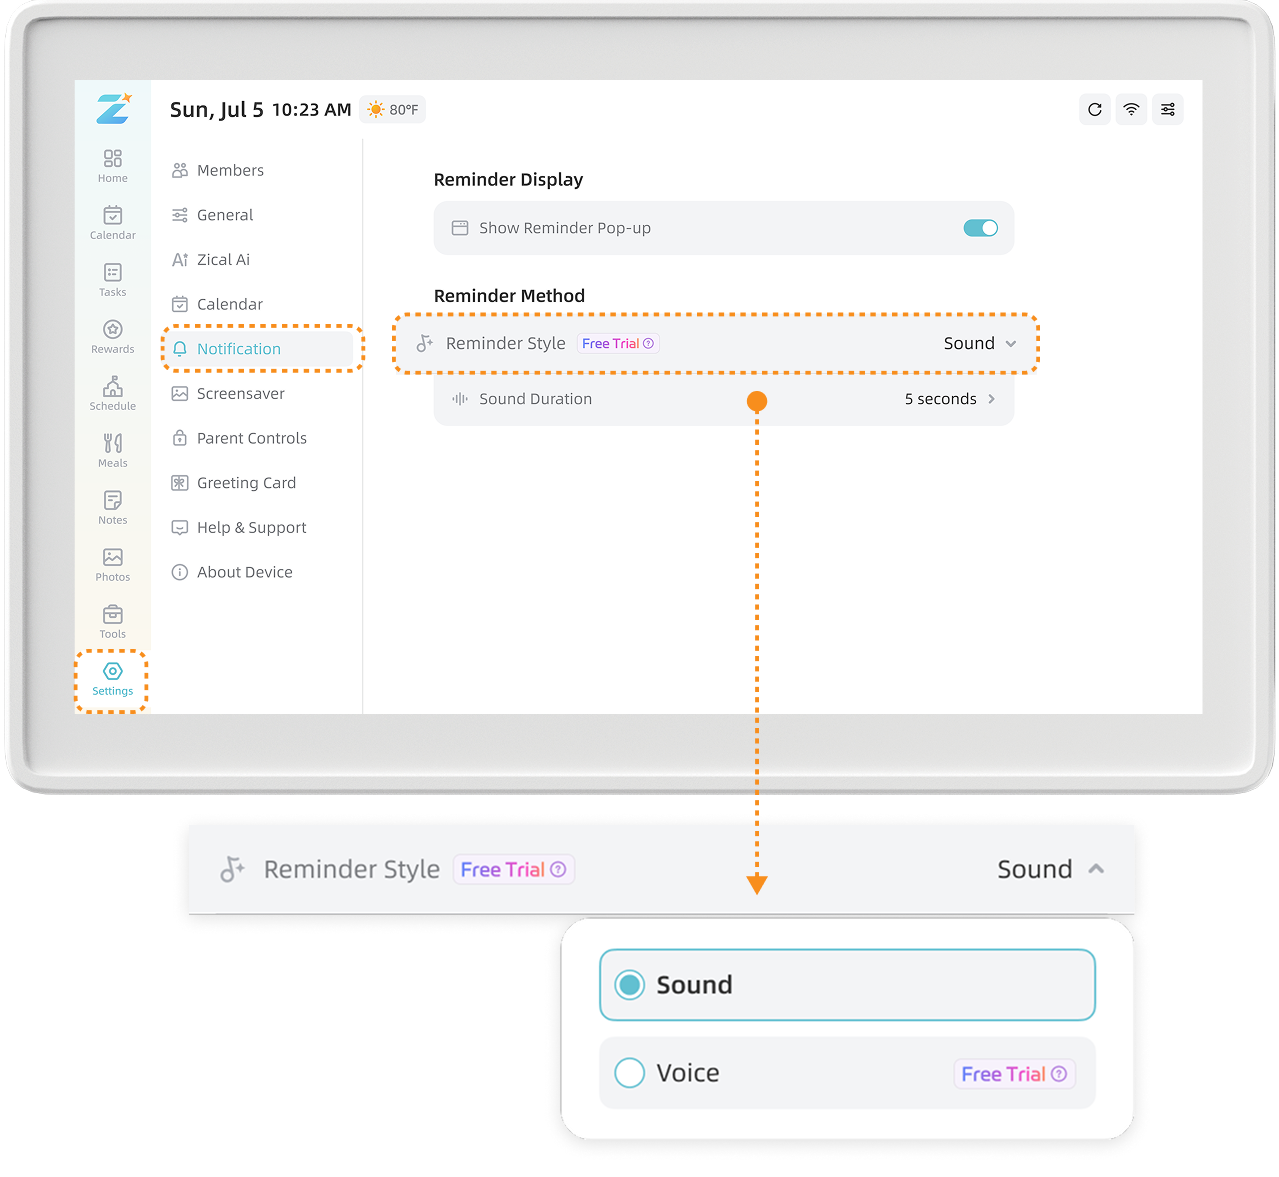
Choose how Calendar, Tasks, and Schedule reminders appear on your home display, then select Sound or Voice as the reminder style.
10.5.1 Choose Sound or Voice
Under Reminder Style, select Sound to play a reminder tone, or Voice to have the home display announce reminder details.
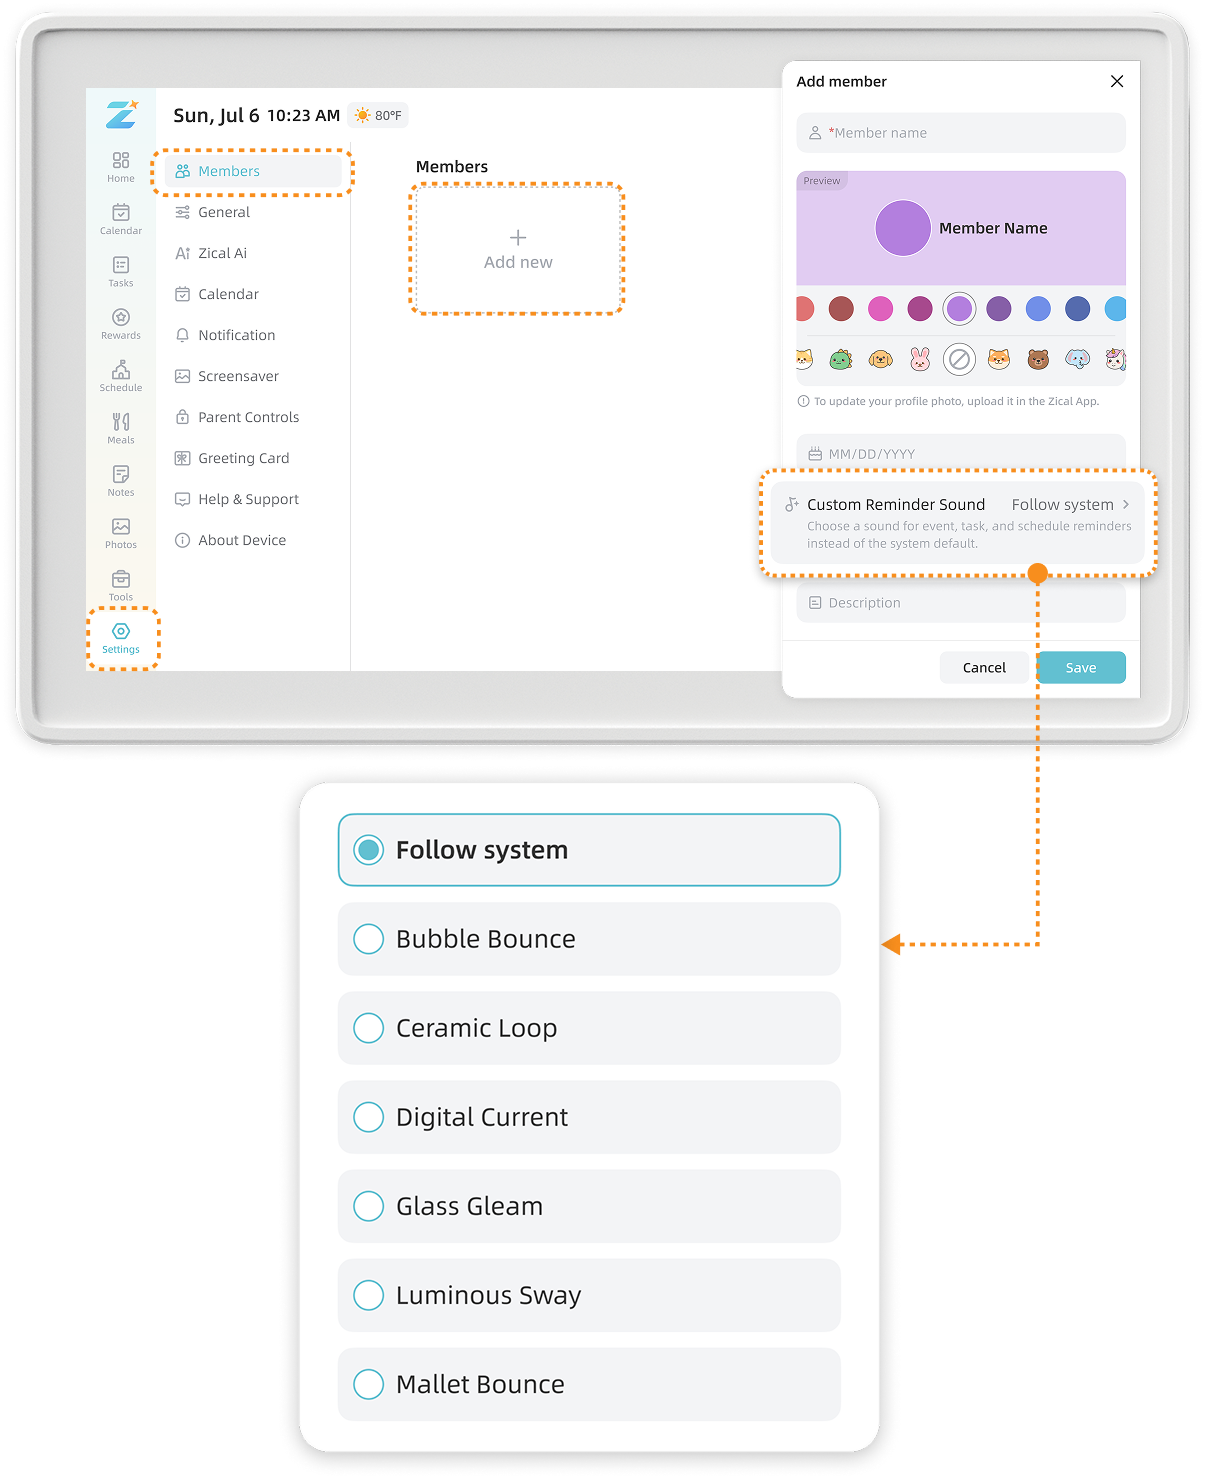
10.5.2 Set a Custom Reminder Sound for a Member
On the home display, open Members and select a Member. Choose a ringtone for that Member.
Reminders assigned to the Member will use this ringtone instead of the system tone, making it easier to recognize whose event, task, or course is being announced.
10.5.3 Turn Reminder Popup On or Off
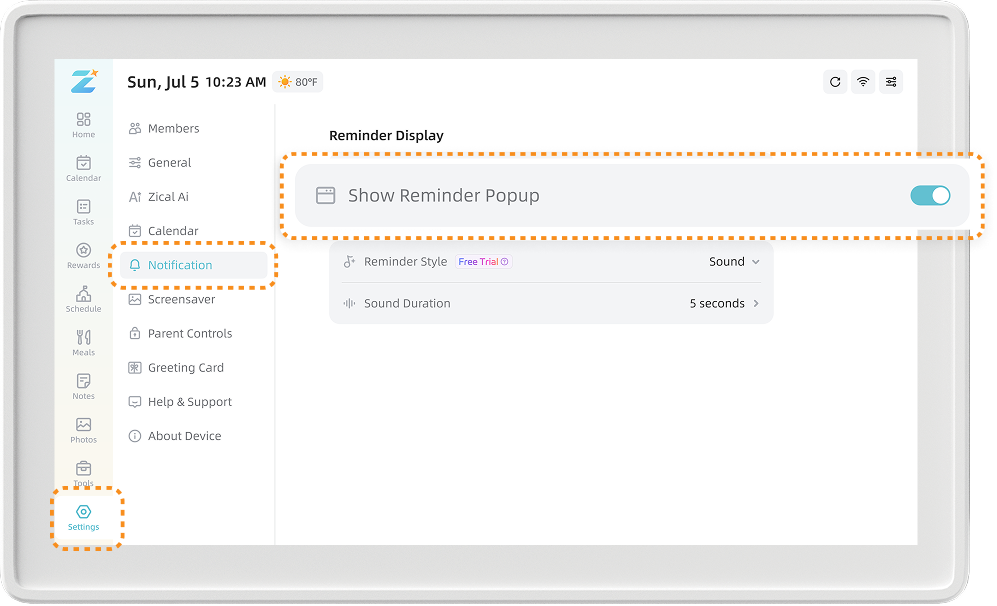
Close a reminder pop-up after reviewing it. Closing one pop-up dismisses only that reminder and does not turn off future reminders.
To prevent reminder pop-ups from appearing, go to Settings > Notification. Under Reminder Display, turn off Show Reminder Popup.
10.5.4 Set Default Reminder Times
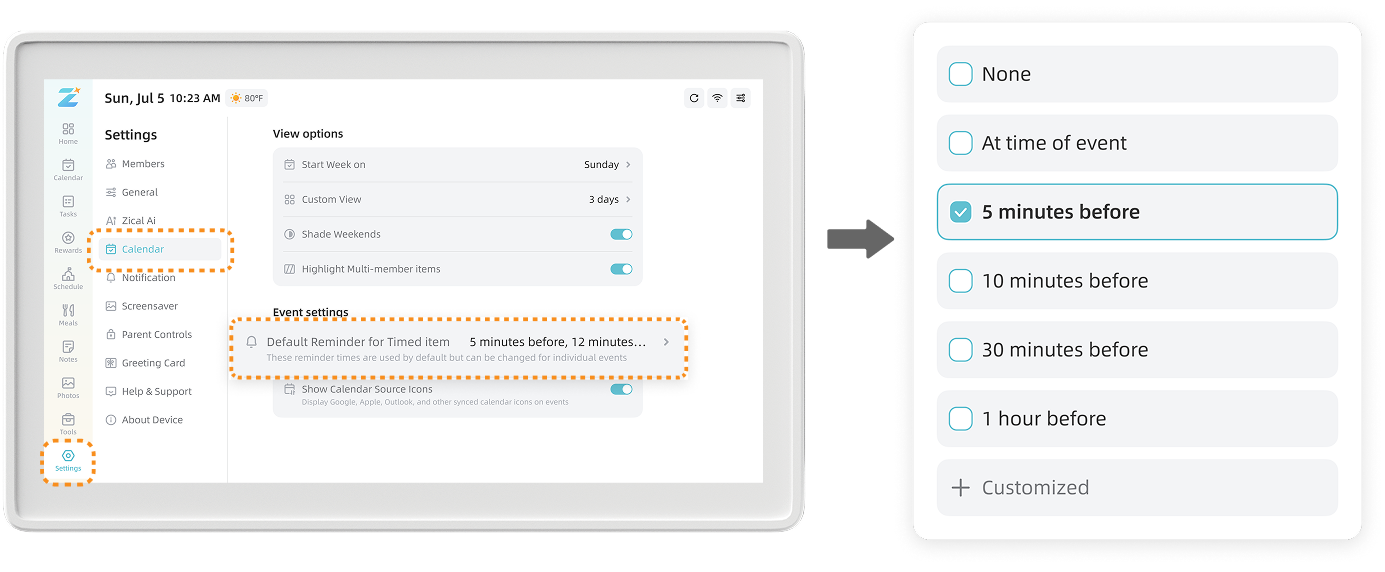
Choose the advance reminder times shown by default when creating new items. You can set up to five default reminder times.
Note: Each event, task, or course can use a different reminder time. The alert follows the reminder setting saved for that specific item.
10.6 Display Orientation and Zoom
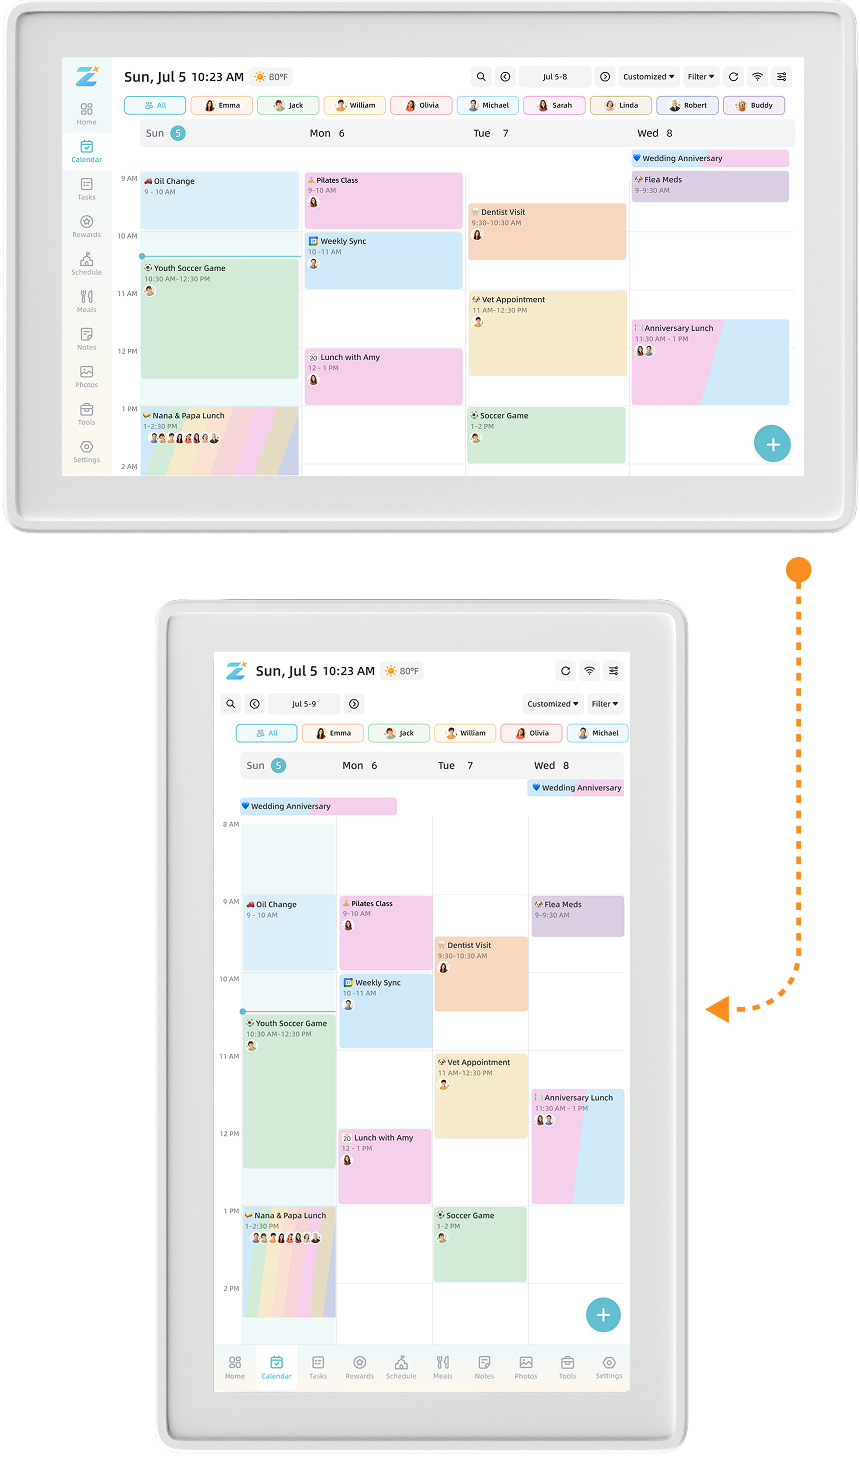
10.6.1 Use Portrait or Landscape Mode
The home display supports both portrait and landscape viewing. Rotate the display to change its orientation.
Note: Make sure the device is placed or mounted securely in the selected position.
10.6.2 Zoom In or Out
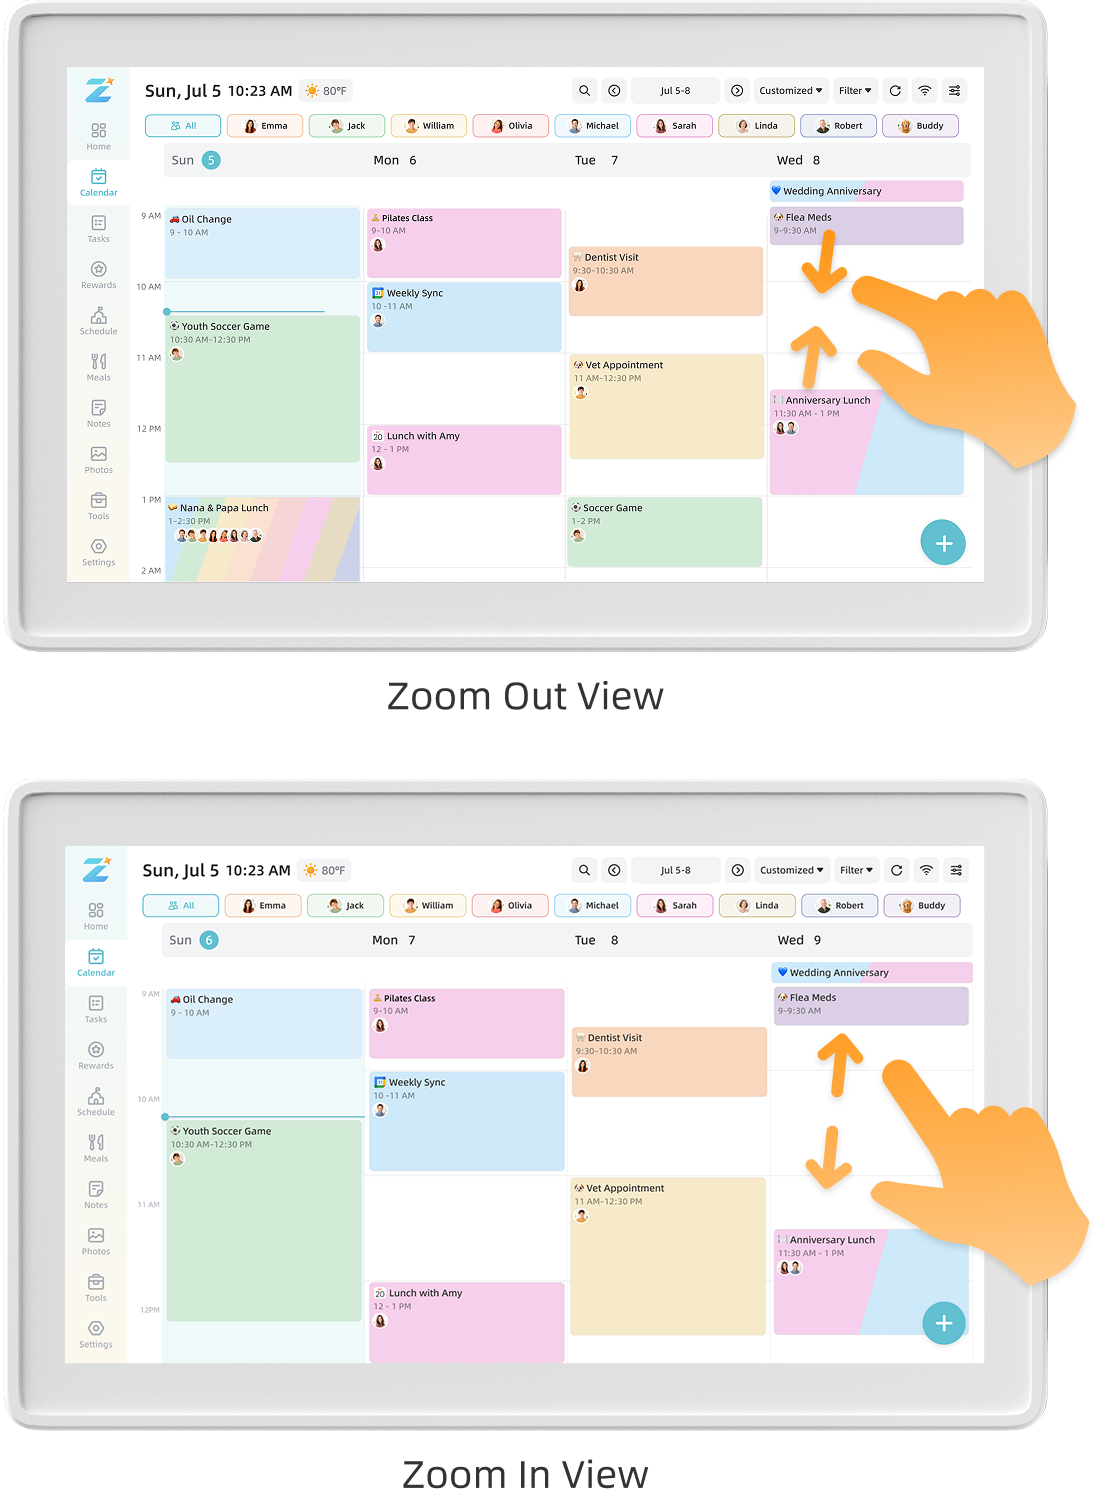
In Calendar Custom view, Calendar Week view, and Schedule Week view, spread two fingers apart to zoom in or pinch them together to zoom out and adjust how much schedule information appears.
10.7 Calendar Display Options
10.7.1 Set the First Day of the Week
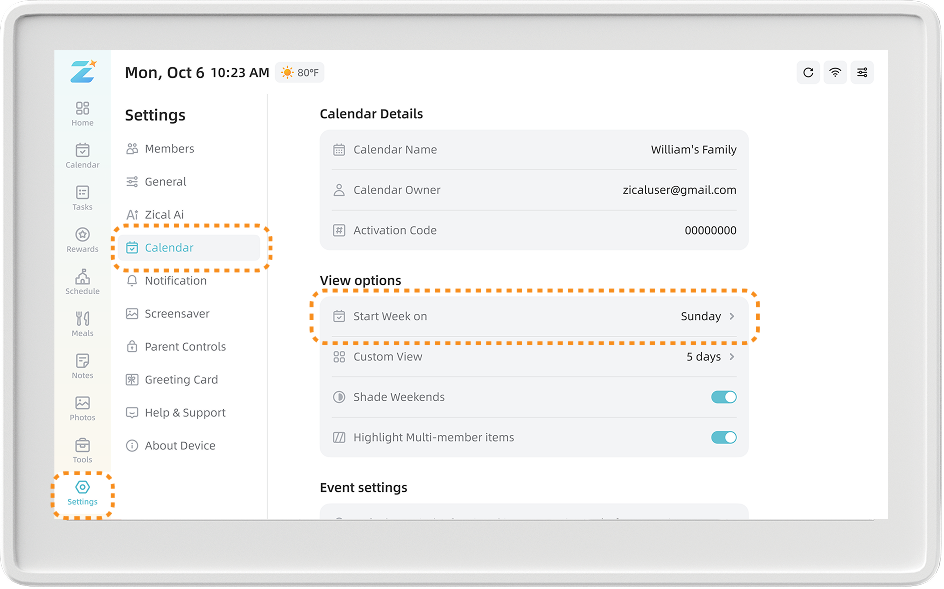
Go to Settings > Calendar. Under View options, select Start Week on, then choose Sunday or Monday.
10.7.2 Shade Weekends
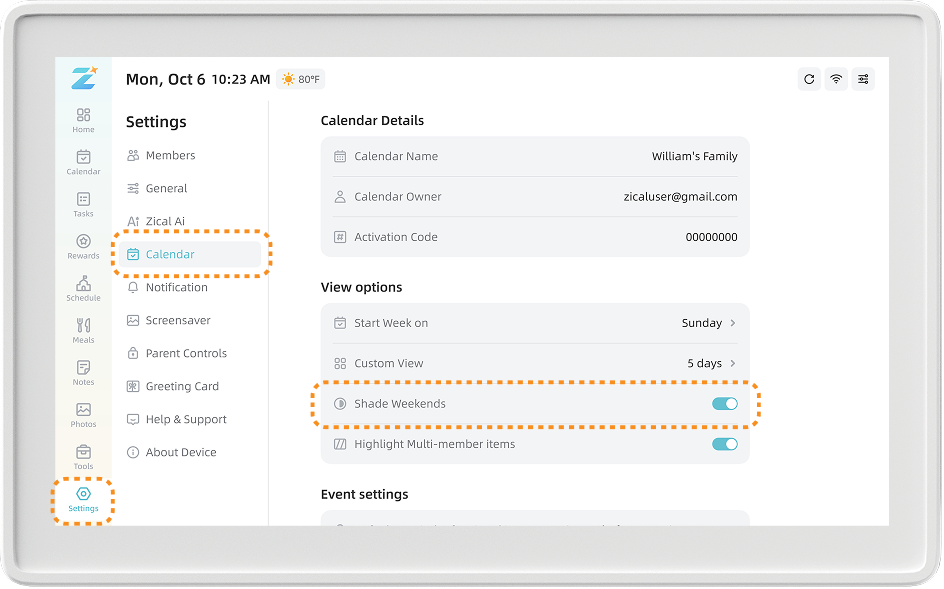
Go to Settings > Calendar. Under View options, turn on Shade Weekends to distinguish weekend columns from weekdays in supported views
10.8 Restart, Reset, and Update
10.8.1 Restart the Display
If the display is unresponsive, disconnect it from power, wait a few minutes, then reconnect it.
Note: This restarts the device and does not delete data stored in your Zical Account.
10.8.2 Reset the Display
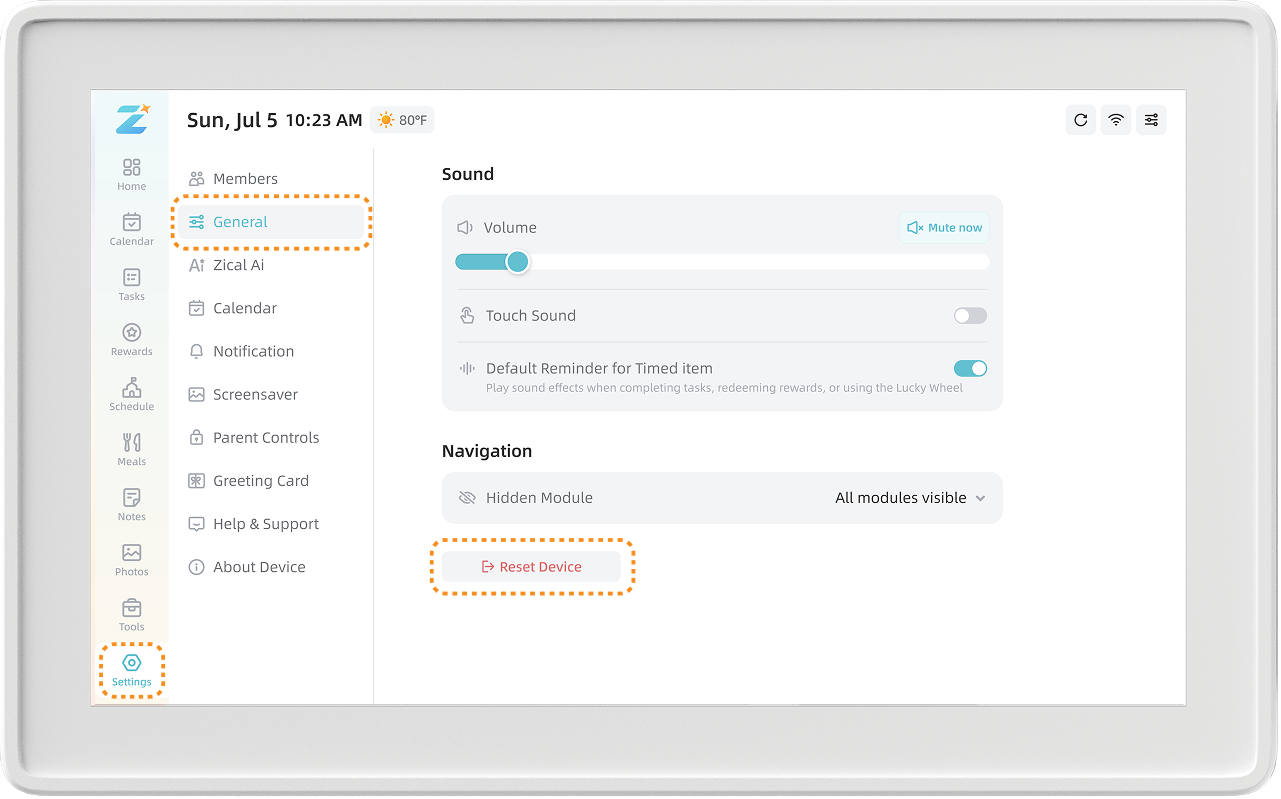
Go to Settings > General > Reset Device.
Note: Resetting clears local device data and returns the display to the activation process. Data stored in your Zical Account remains available unless you delete it separately in the Zical App.
10.8.3 Update the Software
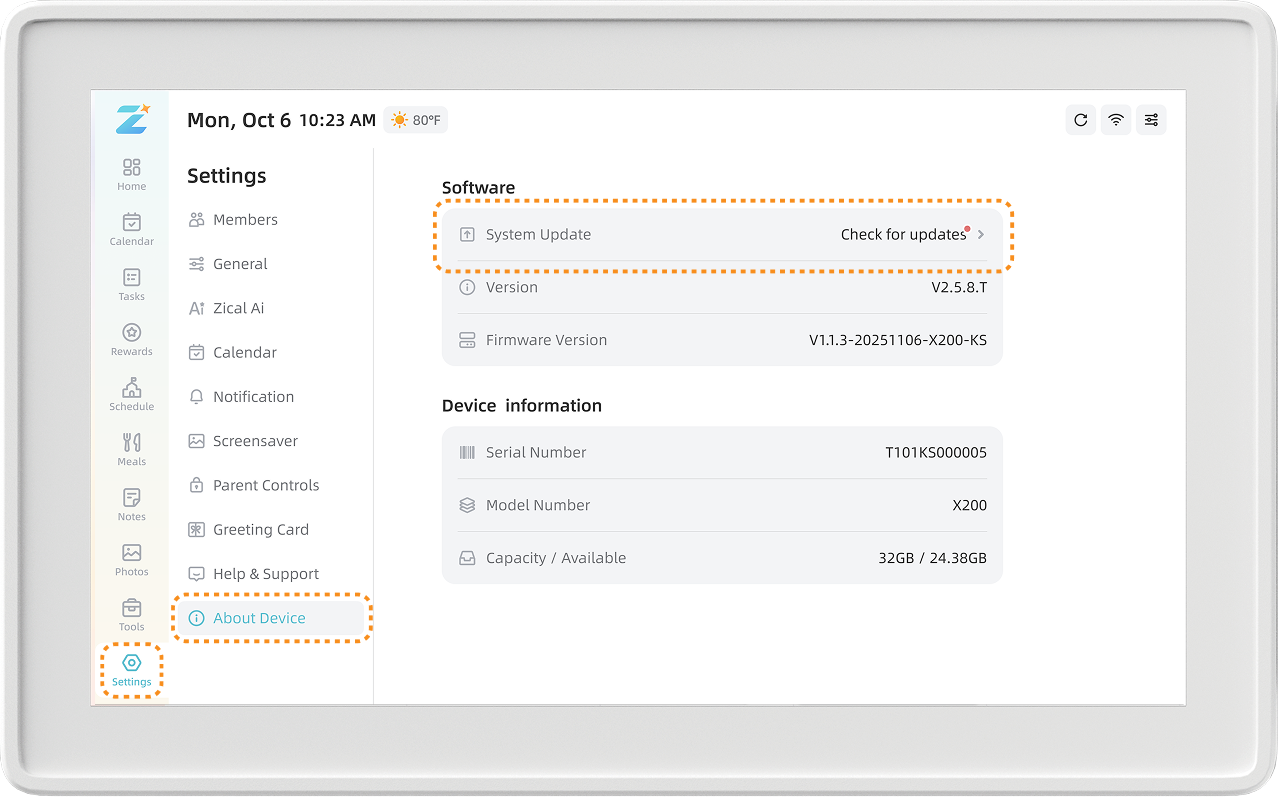
When connected to Wi-Fi, the display automatically checks for and installs available software updates. To check manually, go to Settings > About Device > System Update.
Note: Keep the display connected to power and Wi-Fi while an update is being installed.
10.9 Refresh Displayed Content
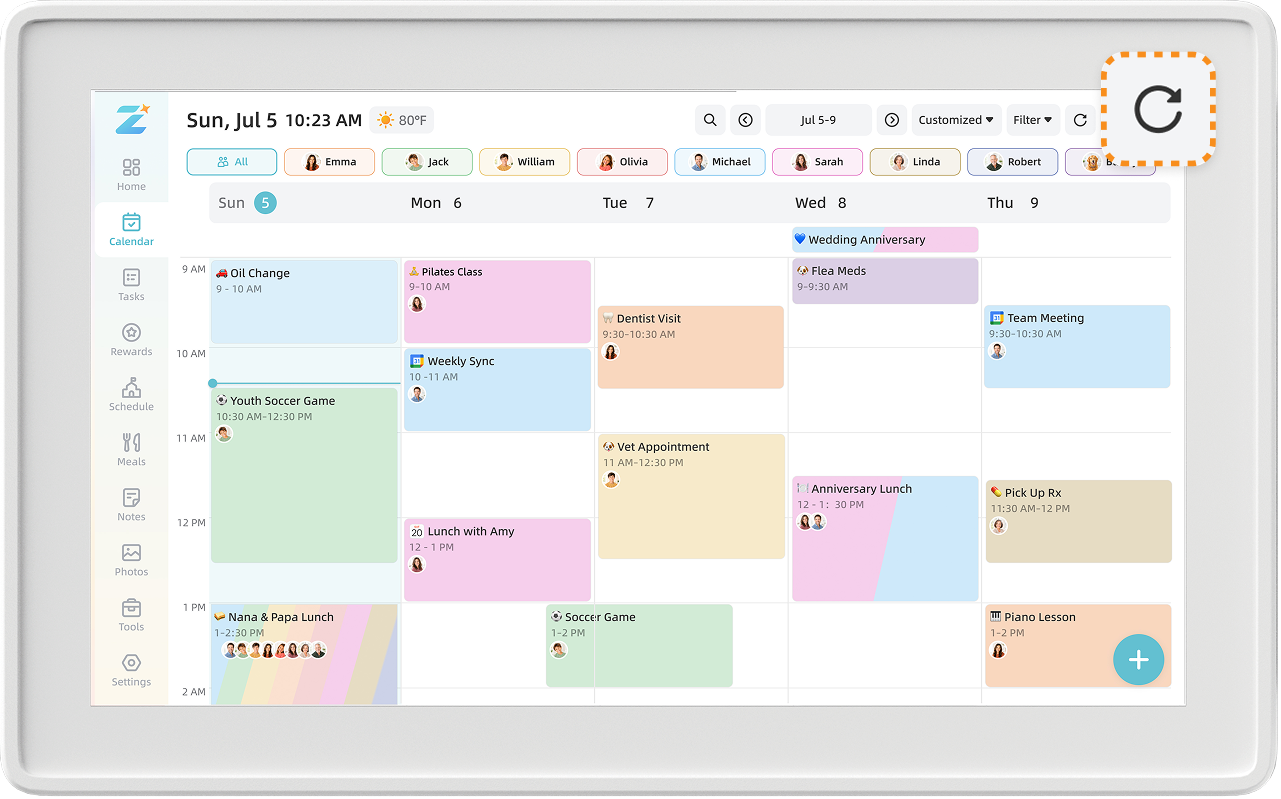
If synced content appears outdated or incomplete, tap the Refresh button in the upper-right corner of the screen.
Note: If the content is still incorrect, check the selected calendar, active filters, Wi-Fi connection, and third-party calendar connection. Contact Zicalstar Support if the issue continues.
11. Troubleshooting
Find solutions to common power, response, Wi-Fi, activation, account, location, and reminder issues.
11.1 Device and Display Problems
Use the following steps when the home display does not power on, freezes, or stops responding.
11.1.1 Display Does Not Power On
① Check the power adapter and outlet.
Make sure the adapter is firmly connected to the display and outlet. Test the outlet with another device.
② Check the DC power port.
Make sure the connector is fully inserted and does not appear damaged or loose.
③ Use the supplied or approved power adapter.
Do not use another adapter unless its voltage, current, polarity, and connector match the requirements for your display model.
④ Contact Support.
If the display still does not power on, contact the seller or Zicalstar Support. Include the device model, serial number, and a clear photo of the power connection.
11.1.2 Display Is Frozen or Not Responding
① Restart the display.
Disconnect the display from power, wait a few minutes, then reconnect it.
② Contact Support.
If the problem continues after restarting, contact Zicalstar Support and include a photo or video showing the issue. If possible, also include a clear photo of the serial number (SN) label on the back of the display.
11.2 Photo and Video Upload Problems
11.2.1 Nothing Happens When I Tap the Upload (+) Button
The Zical App may not have permission to access the photos and videos on your phone.
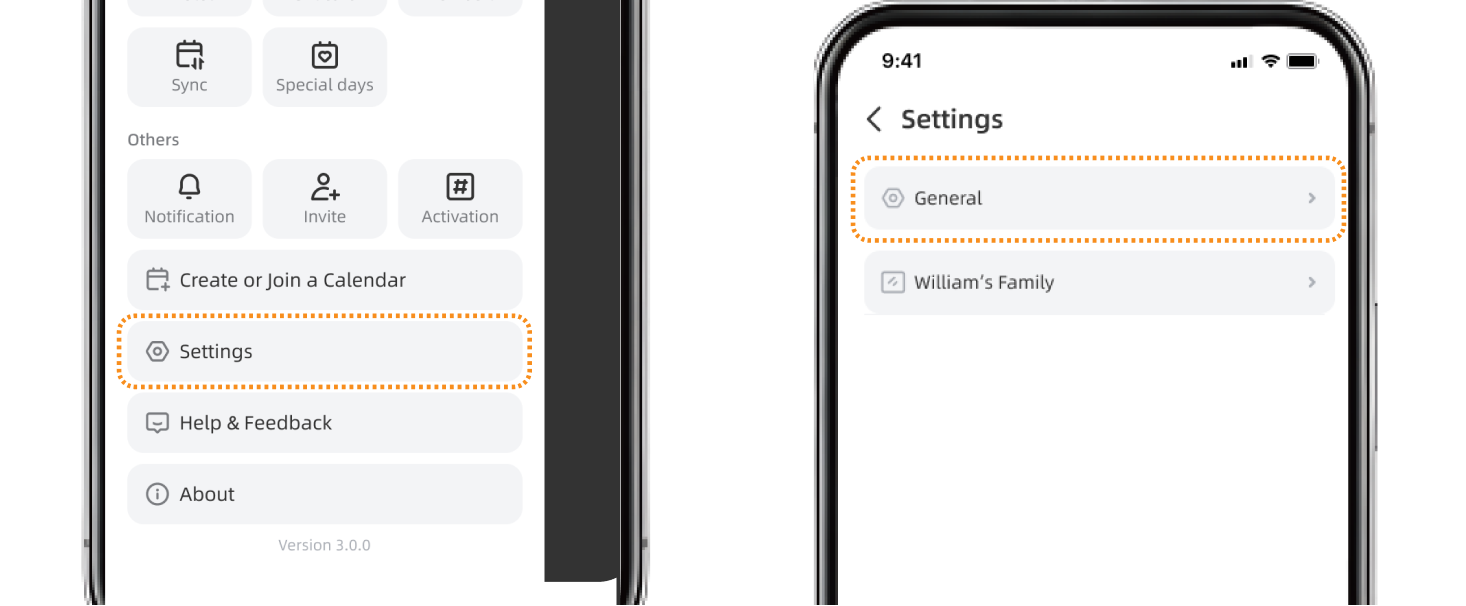
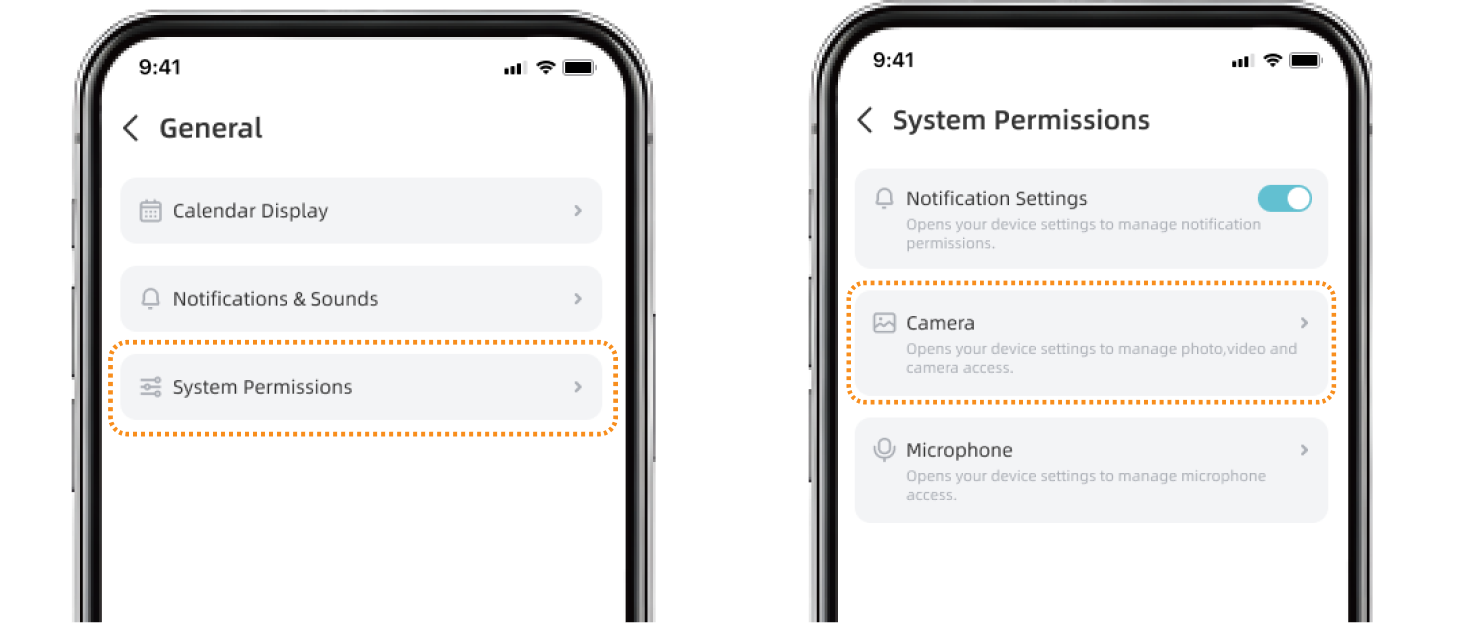
Open the side navigation and go to Settings > General > System Permissions > Camera. When your phone’s system settings open, make sure the Zical App is allowed to access your photos and videos. Then return to the Zical App and try uploading again.
11.2.2 Some Photos or Videos Cannot Be Selected
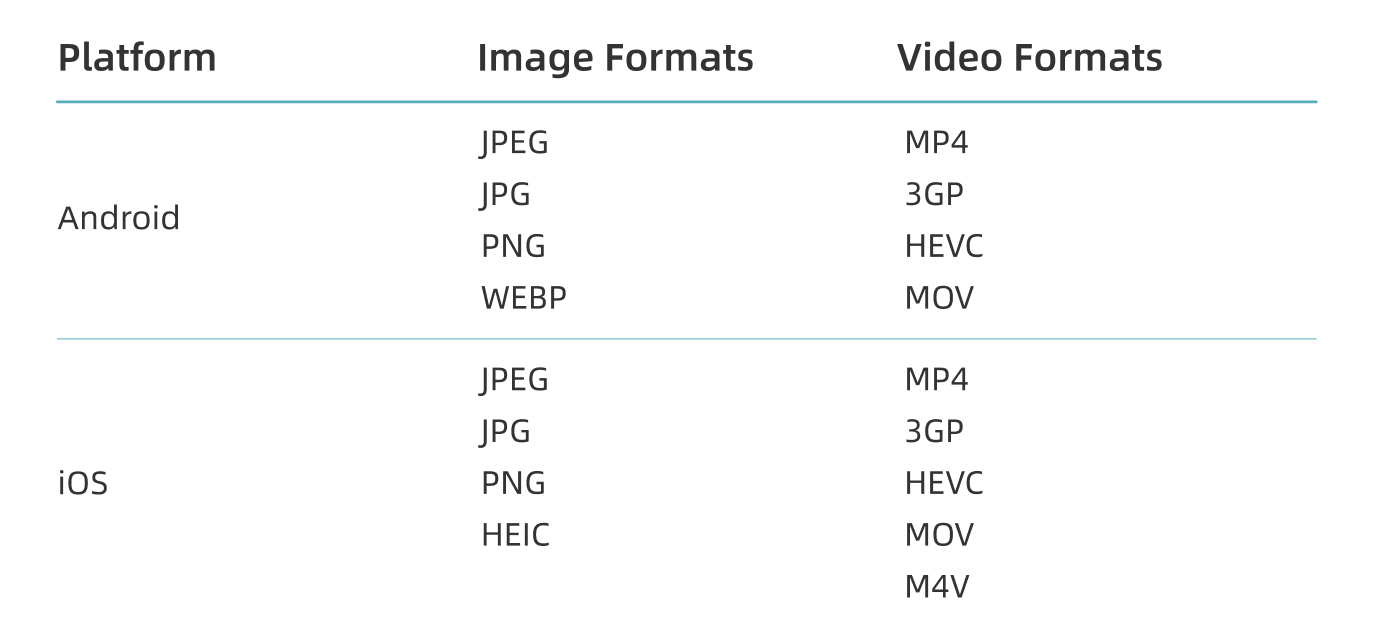
The Zical App supports only certain photo and video formats. Files in unsupported formats cannot be selected or uploaded.
The supported photo and video formats are shown below.
11.3 Wi-Fi and Network Problems
Use the following steps when the home display cannot connect to Wi-Fi or when you need to check whether a public network is supported.
11.3.1 Unable to Connect to Wi-Fi
① Reset the saved network.
On the Wi-Fi selection screen, tap “Reset” at the bottom, then try connecting again.
② Test a mobile hotspot.
Try connecting the display to a mobile hotspot to determine whether the issue is related to your home network or the display.
③ If the hotspot works, check your home network.
Confirm the Wi-Fi password, signal strength, security mode, and any network restrictions.
④ If the hotspot does not work, restart the devices.
Restart the display and router or hotspot. Wait until they have fully restarted, then try again.
⑤ Contact Support.
If the issue continues, contact Zicalstar Support. Include photos of the Wi-Fi screen, any error message, and the device serial number (SN).
Note: During activation, the SN appears at the bottom of the screen. After activation, go to Settings > About Device. Under Device information ,find Serial Number under Device information. You can also take a clear photo of the SN label on the back of the display.
11.3.2 Can I Connect to Public Wi-Fi?
The display may connect to a public Wi-Fi network if no additional sign-in steps are required.
Networks that require a browser page, acceptance of terms, a room number, a text-message code, or other authentication may not be supported. Use another Wi-Fi network or a mobile hotspot instead.
11.4 Activation and Calendar Linking Problems
Use the following steps when an activation code does not work or the display is linked to the wrong Zical calendar.
11.4.1 Activation Code Is Invalid or Expired
① Check the activation code.
Make sure all eight digits were entered correctly and that the code belongs to the Zical calendar you want to display.
② Get the current activation code.
In the Zical App, switch to the intended calendar, open the side navigation, and tap Activation. Find the current 8-digit activation code and enter it again on the display
11.4.2 Display Is Linked to the Wrong Calendar
① Check the Zical Account and calendar.
In the Zical App, confirm that you are signed in to the correct Account and have selected the calendar you want to show. If needed, sign out and sign in again with the correct email address.
② Get the correct activation code.
Open the side navigation and tap “Activation” to find the 8-digit activation code for the selected calendar.
③ Reset and reactivate the display.
On the display, go to Settings > General > Reset Device. Complete the setup process again and enter the activation code for the correct calendar.
11.5 Sync and Content Display Problems
① Check the selected calendar.
In the Zical App, open the calendar list and confirm that the selected calendar matches the calendar linked to the display.
② Check the network and refresh the display.
Make sure both the Zical App and home display can access the internet. Allow time for synchronization, then tap the Refresh button in the upper right corner of the affected page.
③ Check the filters.
Make sure a Member, calendar, task, or other active filter is not hiding the content.
④ Contact Support.
If the content still does not appear, contact Zicalstar Support. Include the content type, title, date, screenshots from the App and display, and the device serial number (SN).
11.6 Account and Sign-In Problems
11.6.1 Password Reset Email Does Not Arrive
① Check the Email Address.
Make sure you entered the email address registered to your Zical Account.
② Check Other Folders.
Look in your Spam, Junk, Promotions, and other filtered folders.
③ Request Another Email.
Wait a few minutes, then request a new password reset email.
④ Contact Support.
If you still do not receive the email, contact Zicalstar Support and provide the email address registered to your Account.
Note: Never share your password or verification code with anyone.
11.6.2 Unable to Sign In
① Check the Email Address.
Enter the email address exactly as it was registered to your Zical Account, including the same capitalization.
② Check the Password.
Make sure the password is entered correctly. If your device fills it in automatically, delete the saved password and enter it again.
③ Reset the Password.
Tap Forgot Password and follow the instructions to reset your password.
④ Contact Support.
If you still cannot sign in, contact Zicalstar Support and provide your registered email address and a screenshot of any error message.
11.7 Time Zone and Weather Location Problems
11.7.1 Time Zone Is Not Listed
Not every city is listed. Search for your time zone directly or select any listed city in the same time zone.
If the correct time zone is still unavailable, contact Zicalstar Support and provide your city, state or province, country, and postal code.
11.7.2 Weather Location Is Not Listed
If your location is not listed, select the closest supported city to view nearby weather conditions.
To request that a location be added, contact Zicalstar Support and provide the city, state or province, country, and postal code.
11.8 Reminder and Sound Problems
11.8.1 Phone Does Not Receive Reminder Notifications
① Check the Item's Reminder Settings.
Open the event, task, or course and confirm that a reminder is enabled and the reminder time is correct.
② Check the Phone's System Notification Permission.
In the Zical App, open the side navigation and go to Settings > General > System Permissions > Notification Settings. Make sure the phone's system notification permission is turned on for the Zical App.
③ Check the Notification Settings in the Zical App.
Go to Settings > General > Notifications & Sounds. Make sure the applicable notification and sound options are turned on.
④ Contact Support.
If the issue continues, contact Zicalstar Support and provide your phone model, operating system version, Zical App version, an example item, the expected reminder time, your time zone, and screenshots of the relevant settings.
11.8.2 Home Display Does Not Receive Reminders
① Check the Item's Reminder Settings.
Open the event, task, or course and confirm that a reminder is enabled and the reminder time is correct.
② Check the Home Display's Reminder Settings.
Go to Settings > Notification. Under Reminder Display, make sure Show Reminder Popup is turned on.
③ Check the Date, Time, and Network Connection.
Make sure the home display is connected to the internet and that its date, time, and time zone are correct.
④ Check the Sound Settings.
Make sure the volume is turned up and the home display is not muted or in Sleep Mode.
⑤ Restart the Home Display.
Disconnect the display from power, wait a few minutes, and reconnect it.
⑥ Contact Support.
If the issue continues, contact Zicalstar Support and provide the item type and title, assigned Member, expected reminder time, time zone, device model and serial number, software version, and screenshots of the relevant settings.